How to create a free website with custom domain (Step-by-step)
 By David Nge | Last Updated: March 13, 2026
My work is supported by affiliate commissions. Learn More
By David Nge | Last Updated: March 13, 2026
My work is supported by affiliate commissions. Learn More
No budget? No problem.
In this tutorial, I'll walk you through step-by-step (with screenshots) how you can create a free website for your business and connect your own domain.
For free, and no coding experience required.
Here's the website we're going to build today:
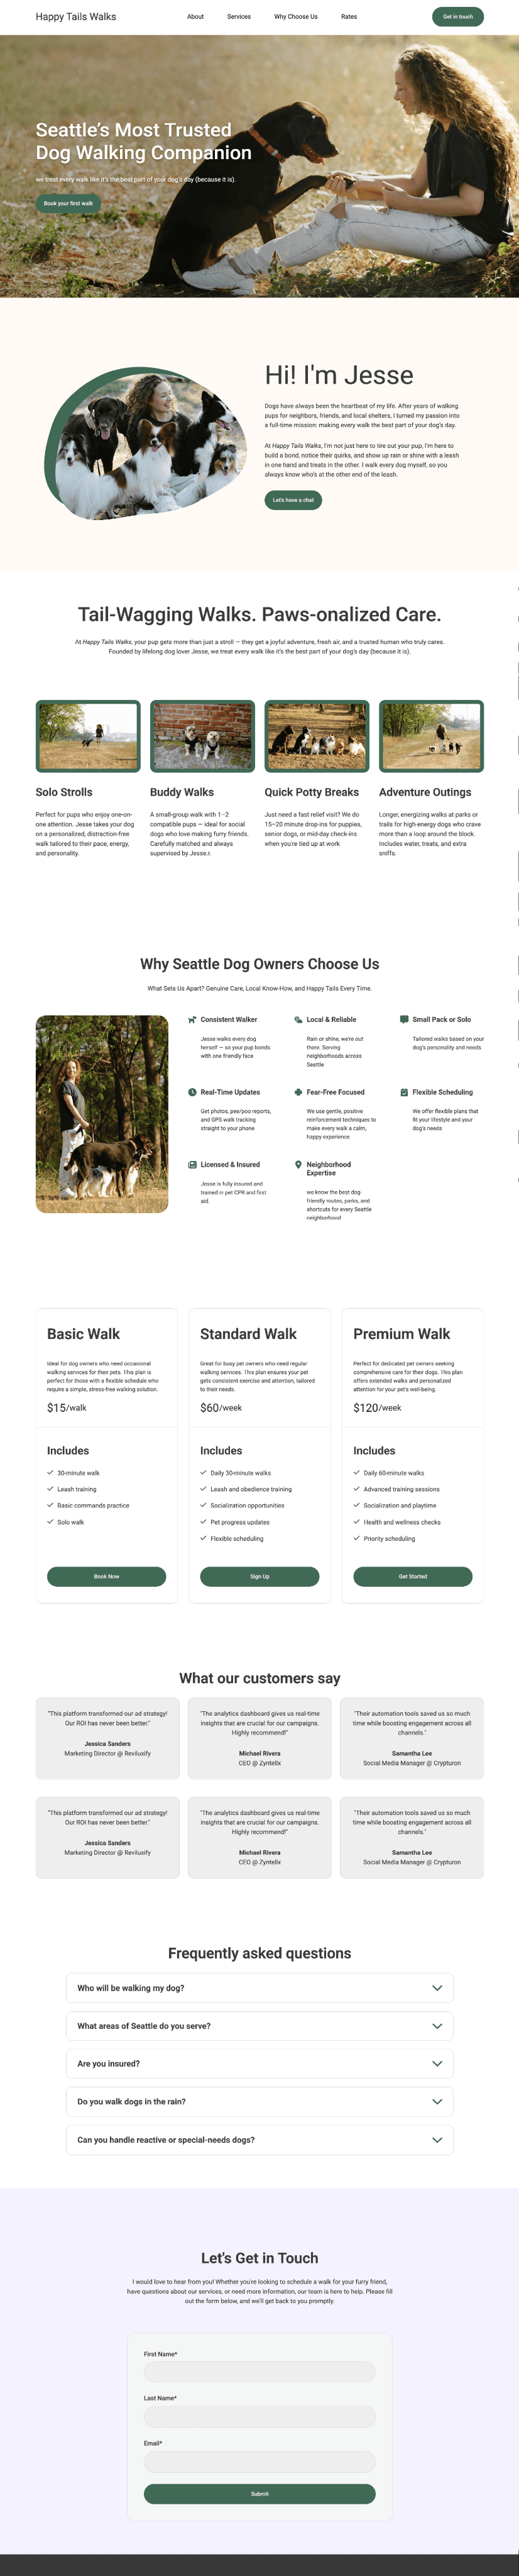
A website for a local dog-walking business in Seattle. This tutorial works for any small business website, especially a marketing website to promote your business or generate leads.
Just fyi, the website builder platform we will use to build the site is HubSpot.
For a few reasons:
Let's get started.
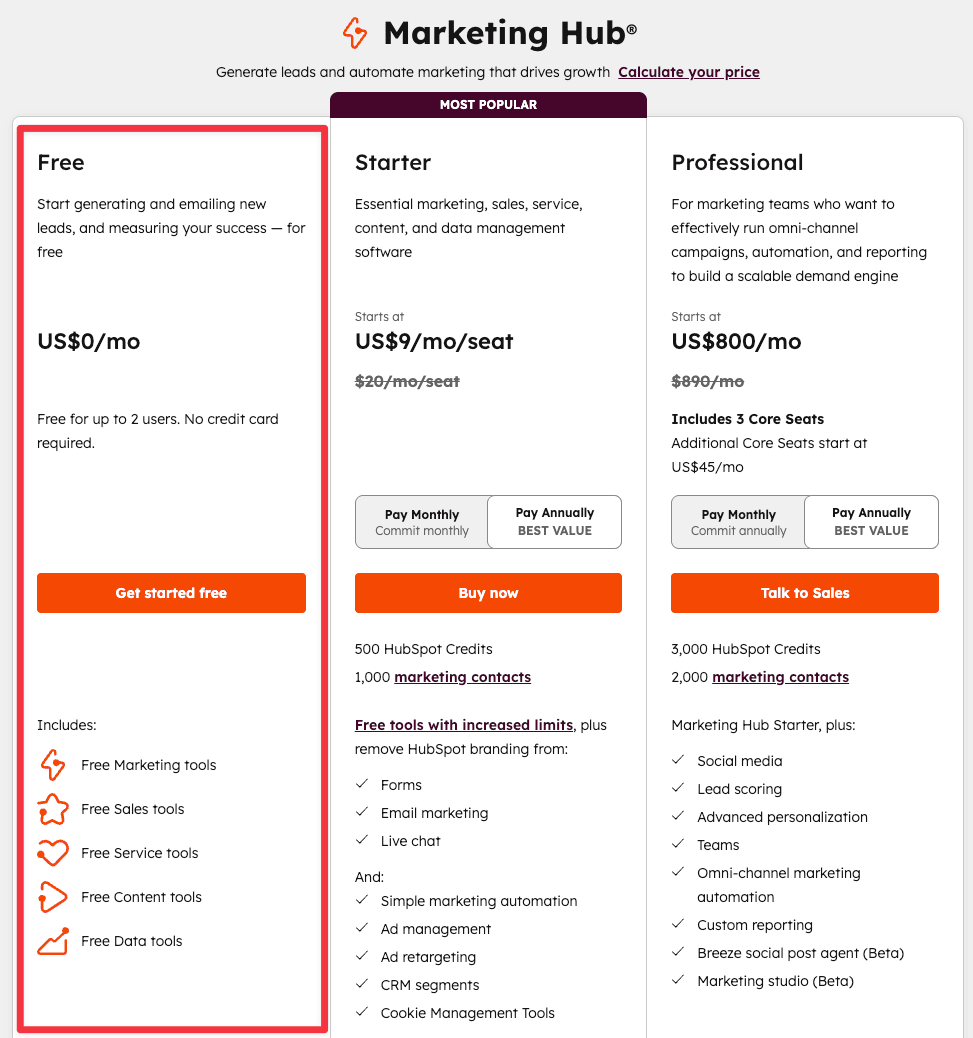
First, head over to Hubspot's Marketing Hub page and click "Get started free".
You'll be asked to create a free account if you haven't already.
By the way, you have the option to create a Hubspot account with your Gmail, Apple or Microsoft account.
Once you've signed up, Hubspot will ask you a series of questions as part of their onboarding.
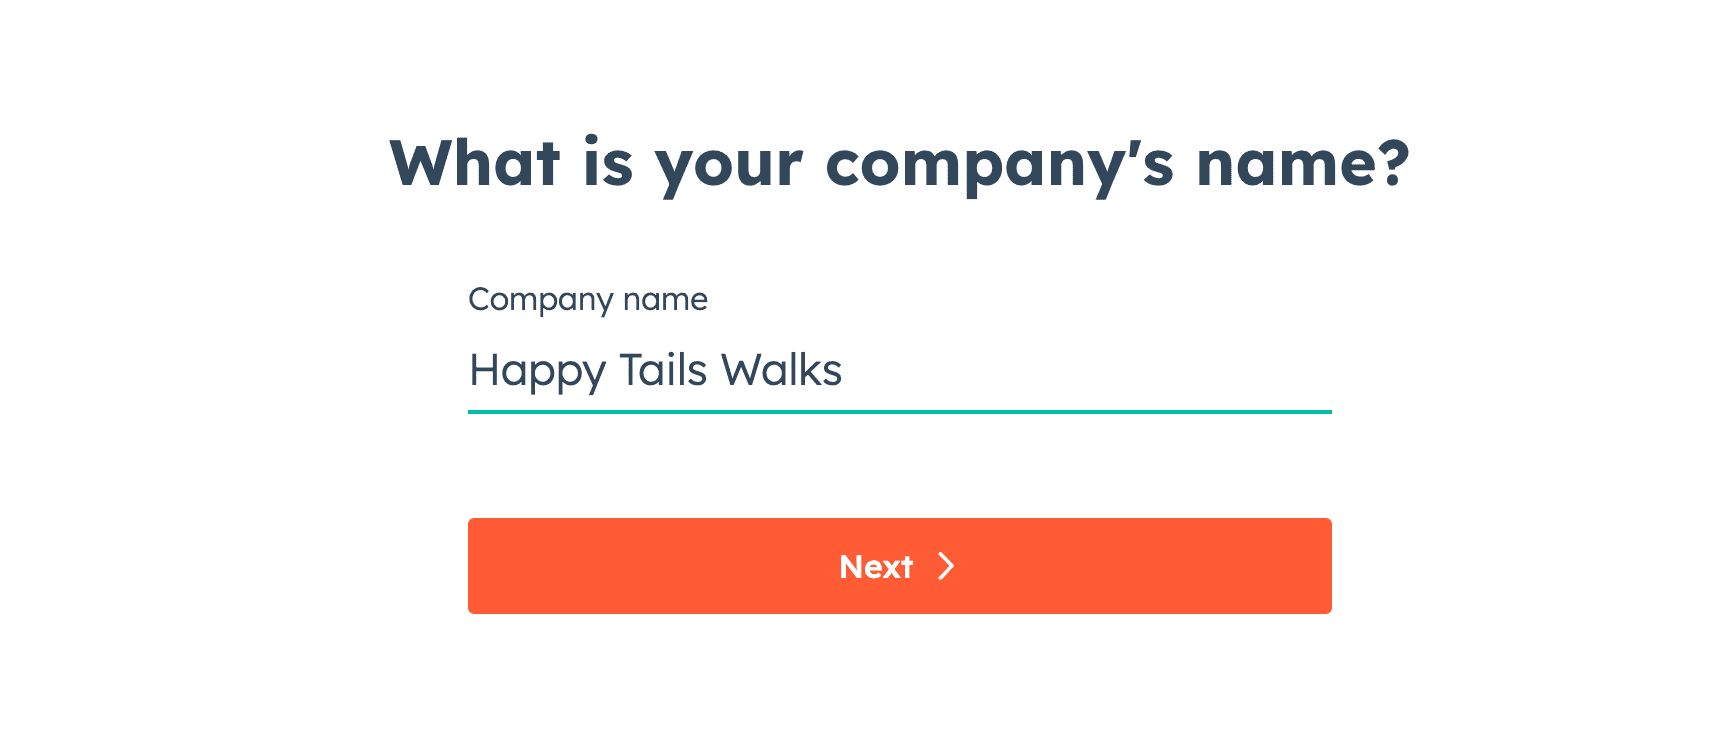
Heads up, the onboarding could take a minute (ok, maybe a few) because there are a dozen questions total, but take your time.
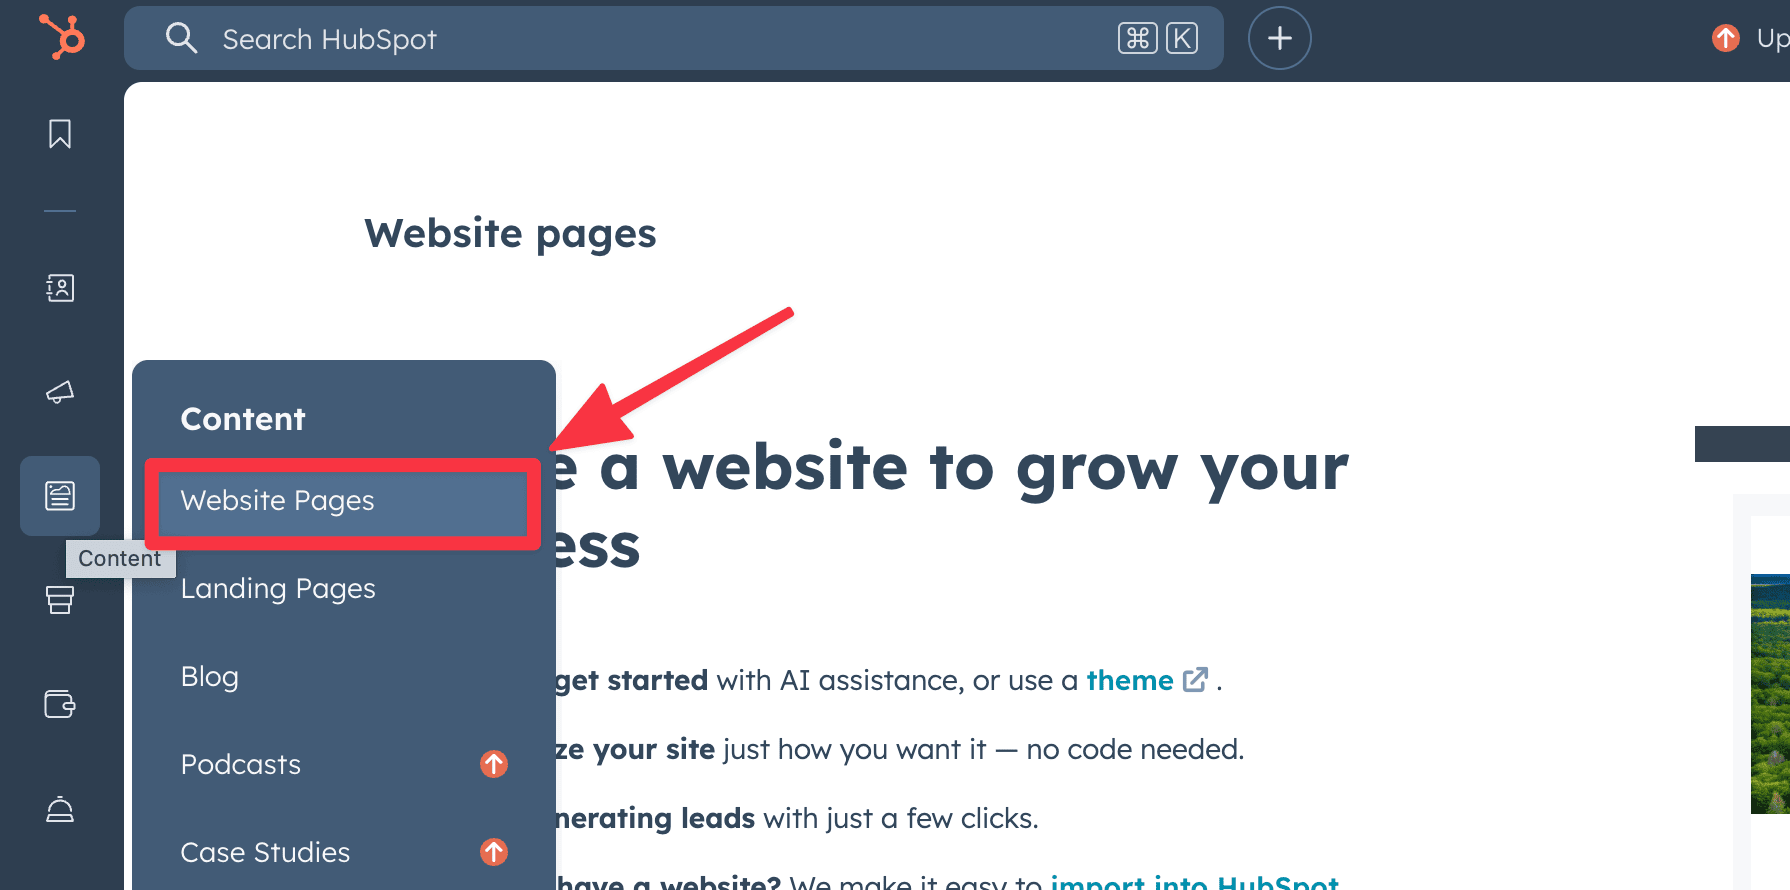
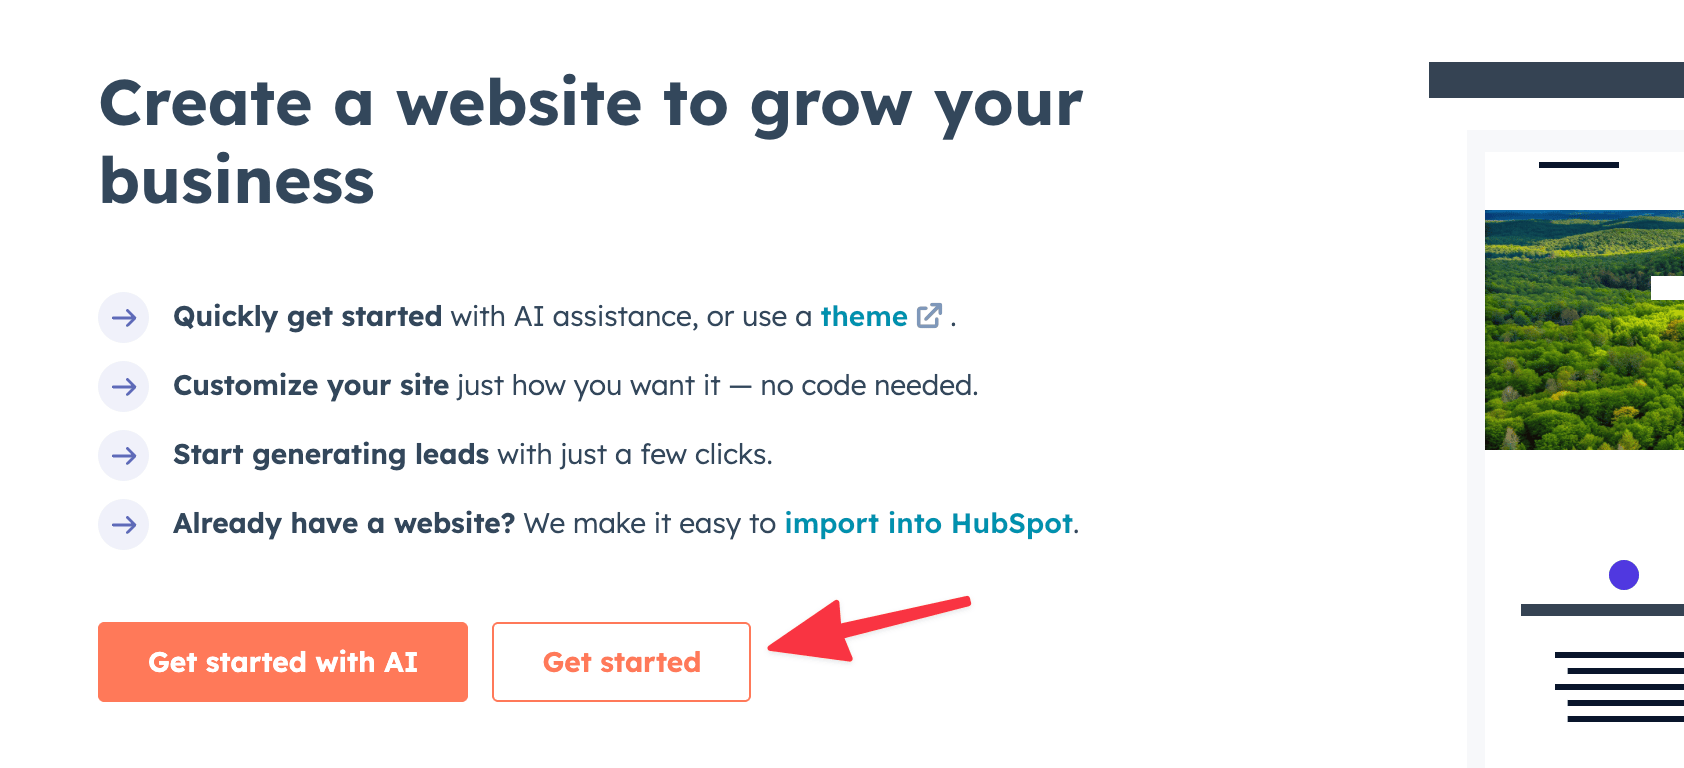
Once you get through that, you'll be redirected to the dashboard. Now open up the sidebar and head to Content ➝ Website pages ➝ Get started.
We can now finally begin work on your website.
Before we get to the actual Hubspot Content Management System (CMS), there are a couple things we need to prepare to make this design process easier for us.
I was lucky to find some great candid dog-walking pictures on Pexels, all credits go to Blue Bird.
I usually source stock images from either Pexels or Unsplash. Their photos feel more candid and natural, which is great if your content needs some human touch.
Their search tools are also intuitive, and of course, the images are free to use (as long as you give proper credit). You can download the images in various sizes depending on your needs.
You can download the images for this project in this Google Drive.
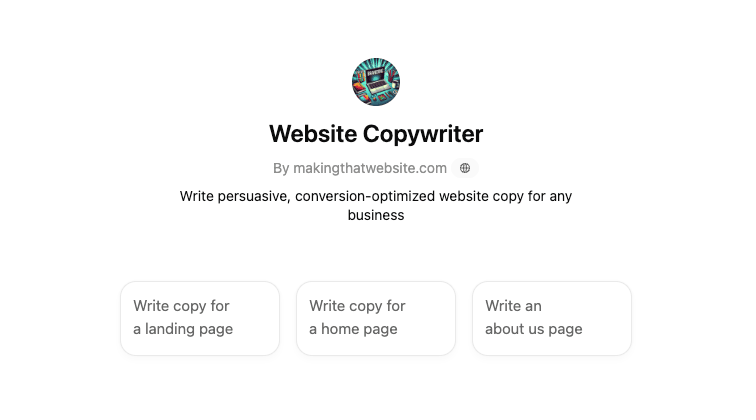
Here's a pro tip: Use a custom GPT (not just regular ChatGPT) to generate content for your site!
A custom GPT is a tailored version of ChatGPT, built for a specific task. In this case, I've created a Website Copywriter GPT that can write persuasive, conversion-optimized website copy for any business.
The point isn't to let ChatGPT write all your content, but to help you draft a solid version fast, something "good enough" to polish and make your own. You can think of it like having a helpful junior copywriter.
Here's the prompt I used to generate the content for this tutorial.
This AI-assisted copywriting workflow can seriously cut down the time it takes to launch a site, especially if writing isn't your thing.
Now let's start designing the page in the CMS.
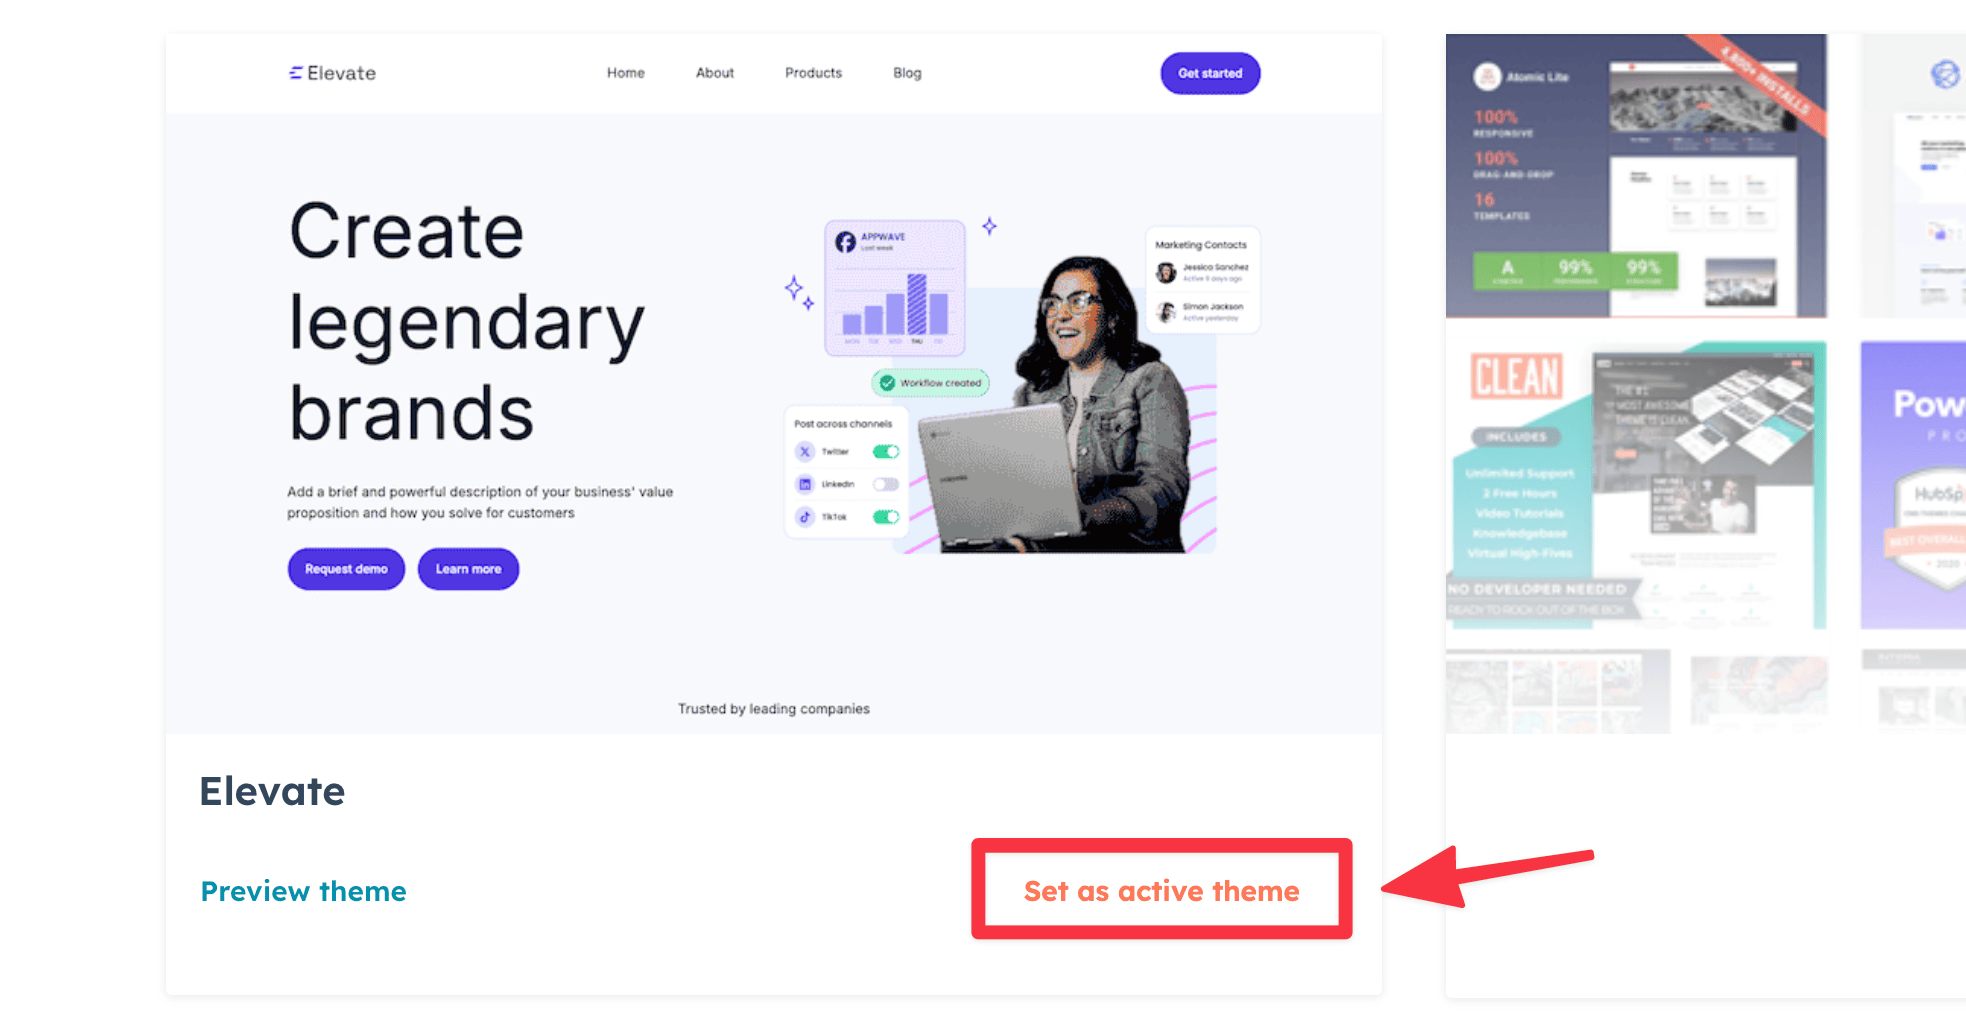
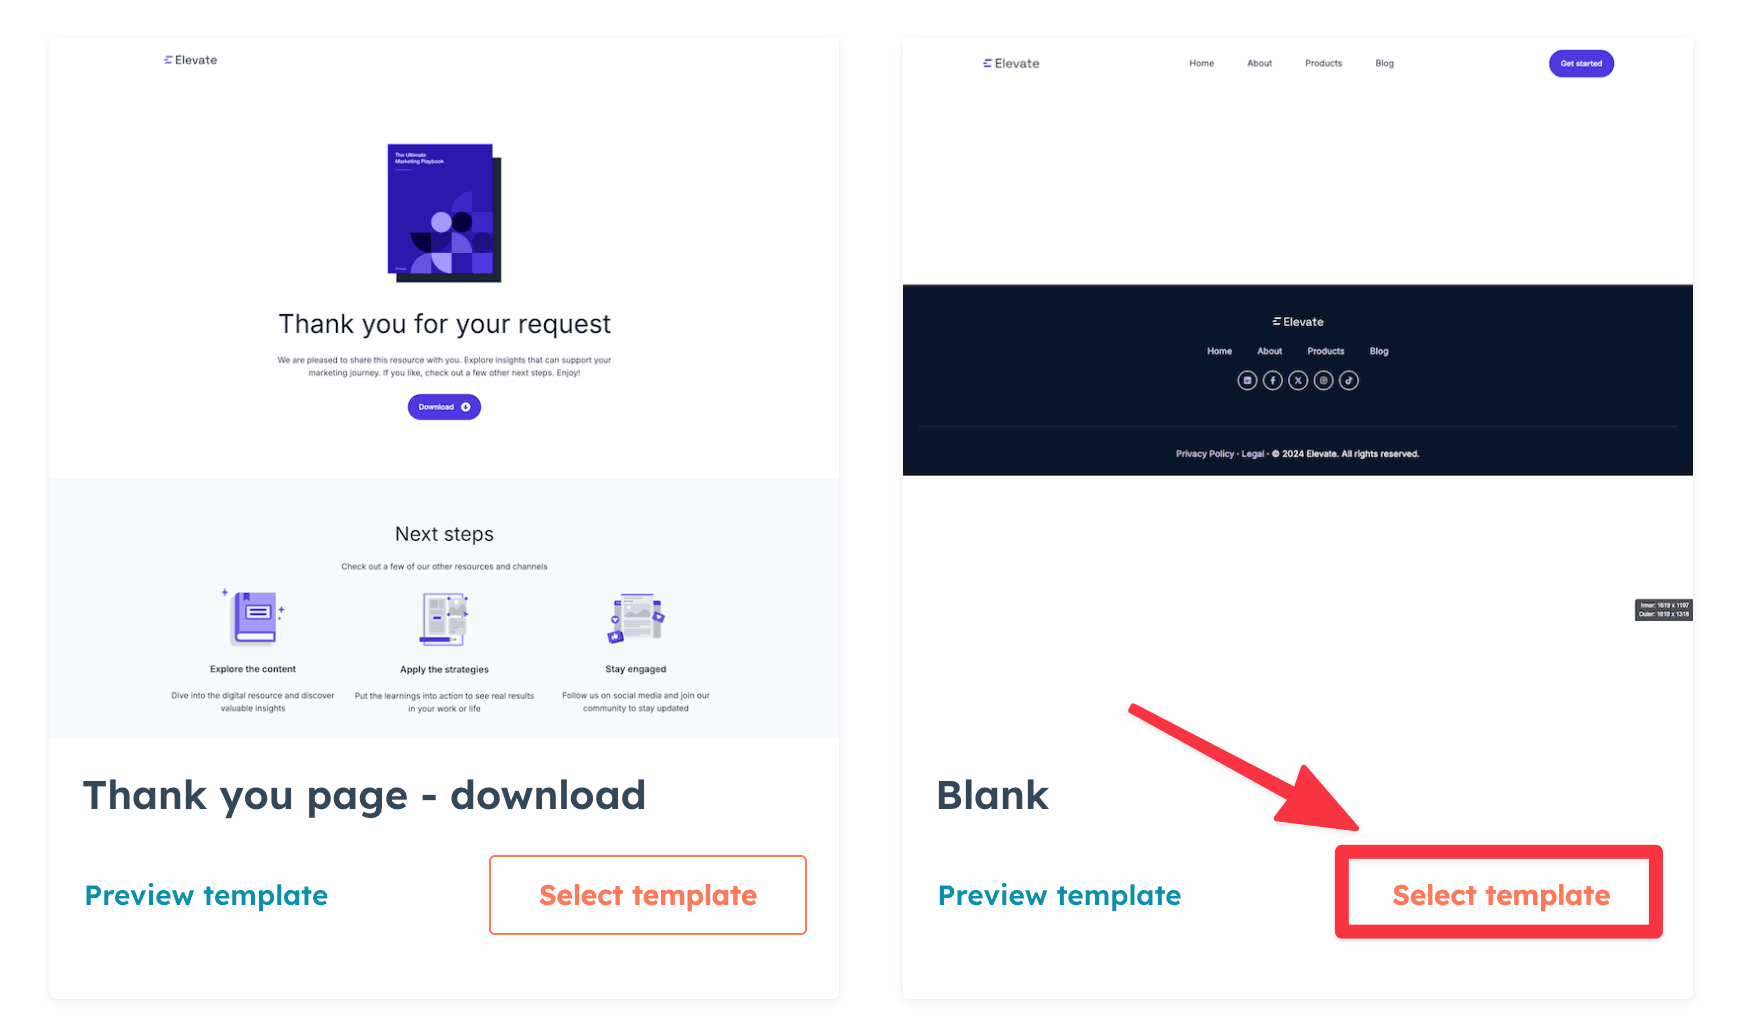
For this tutorial, we'll start with a blank template from Elevate, the default theme for all Hubspot websites.
Note: You can always change to a different theme later by going to Settings ➝ Template ➝ Use a different template.
I actually encourage you to explore after completing this tutorial.
Hubspot's template marketplace has hundreds of free themes across several industries. Many of them look just as polished as premium templates.
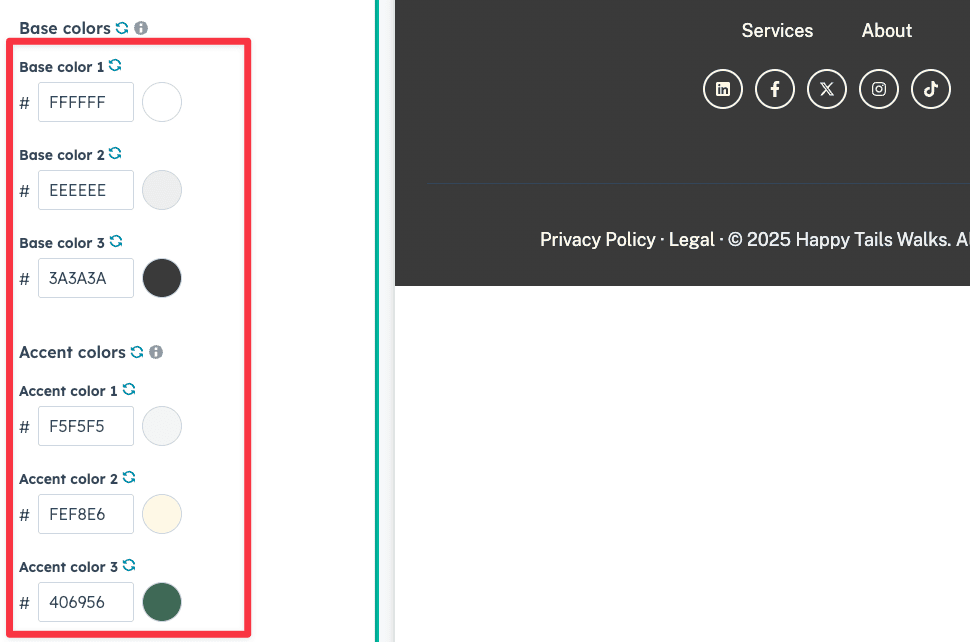
While the Elevate theme looks fine by default, I feel we can make it more approachable/friendly for a dog-walking business.
As it is, it feels more “corporate tech startup” than “trustworthy and pet-loving". So to make it more on-brand, especially for a friendly dog-walking business. We'll update:
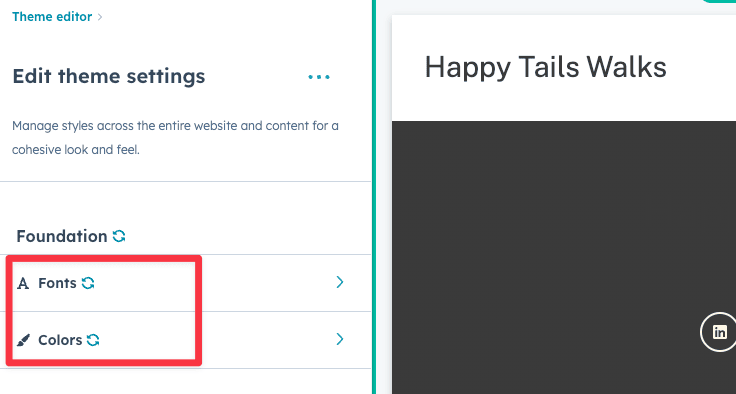
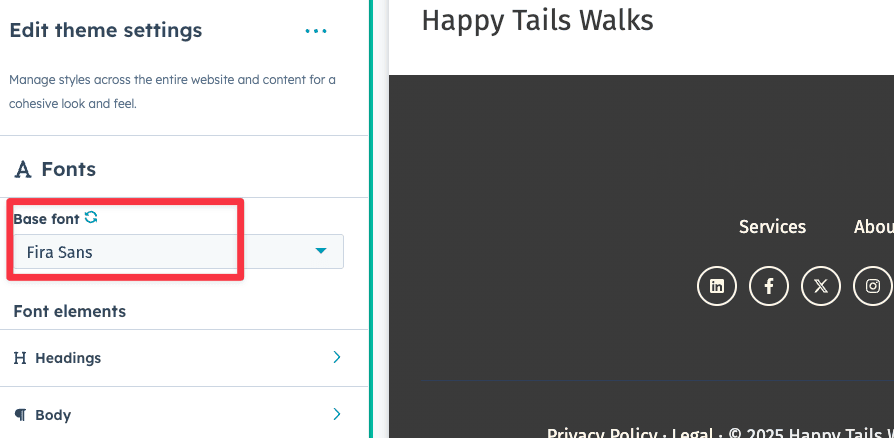
Fira Sans, Inter, or Source Sans.From the top navigation, go to Edit ➝ Theme: Elevate.
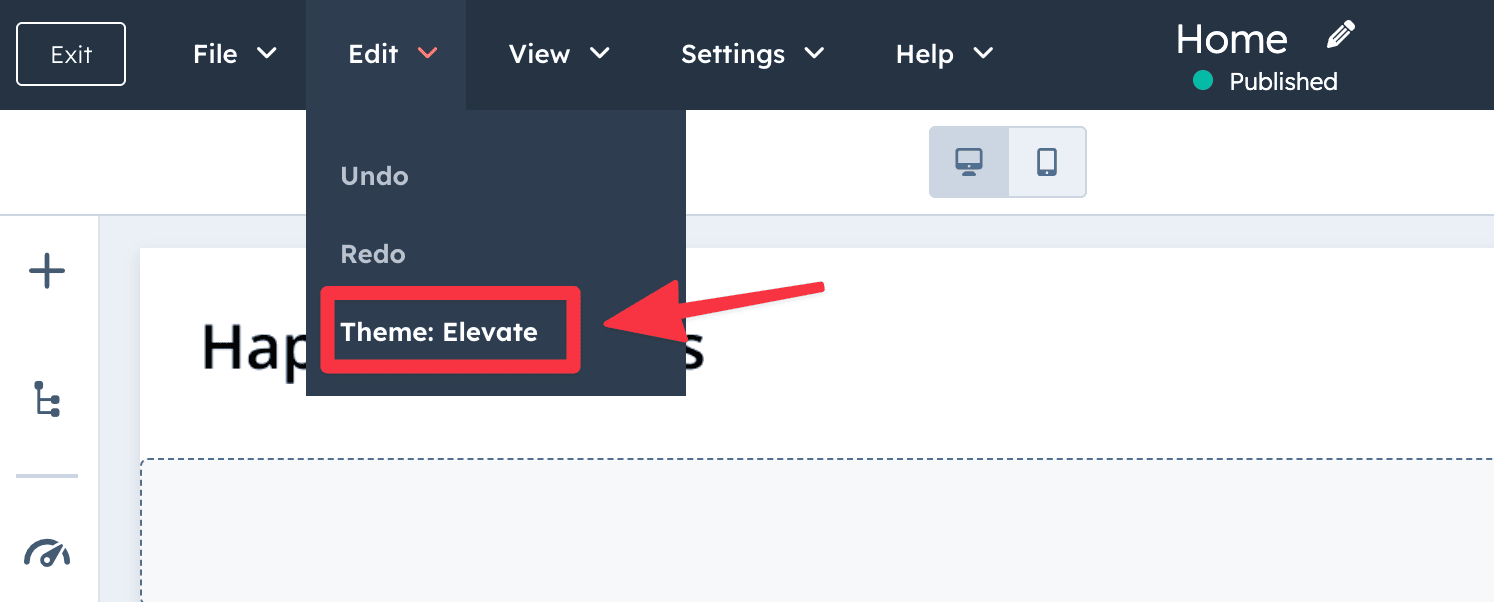
Then update the font and colors accordingly.
Now we'll build out the rest of the page sections.
First, go ahead and publish the page (from the top corner). Yes, I know we haven't done anything yet, but it will make the rest of the tutorial a bit easier.
You will need to add a Page title before you can publish, create a dummy title for now, We'll update it later.
Once you've published the page, you'll get a URL where you can view your site live.
Next, we can work on the site header.
To add a site header, click the pencil icon in the top corner. You'll be redirected to the Global content editor.

Click anywhere on the site header to bring up the sidebar and create a new menu.
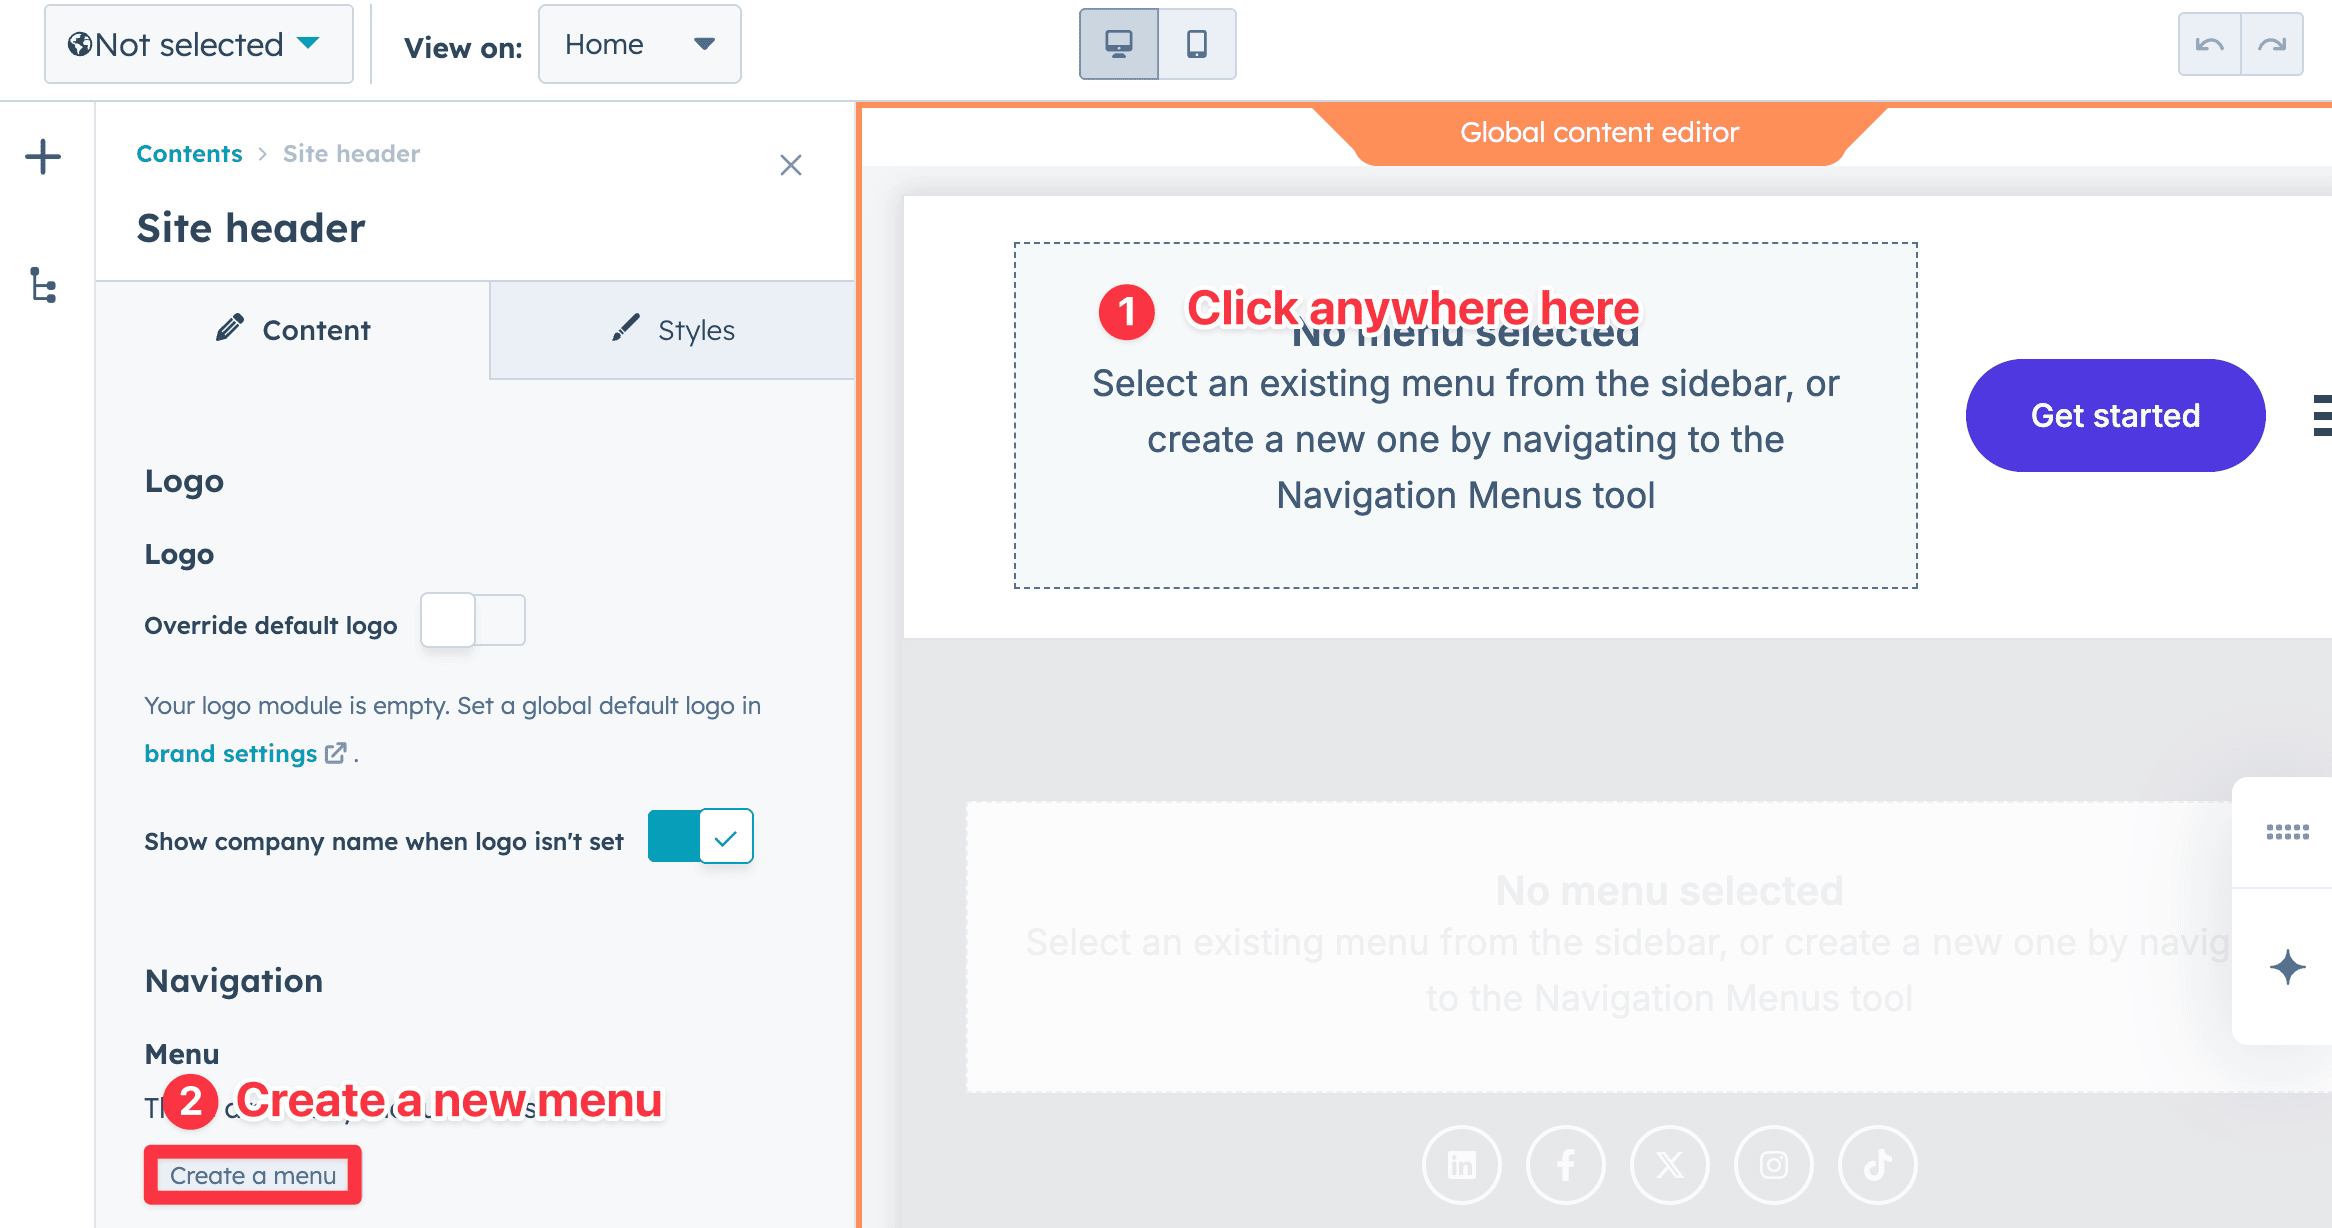
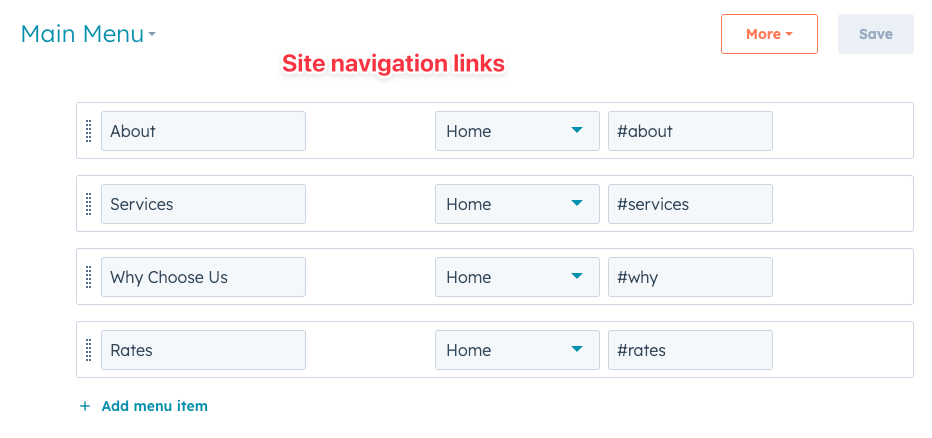
Go ahead and name your menu and start adding new menu items. Menu items are basically site navigation links for your site.
I've added a few that reflect what you'd typically find in a dog walking business:
Note that I've added Actions next to the site links.
Actions are special attributes you want to add to the site links.
Here I've added an Action: "Links with URL parameters", aka anchor links, so that when a visitor clicks on the navigation links, it'll skip to the section on the page. More on that below.
Now add the same menu for the site footer as well.
Next, from the same sidebar, head to "brand settings" On this page, you can add the brand details accordingly.
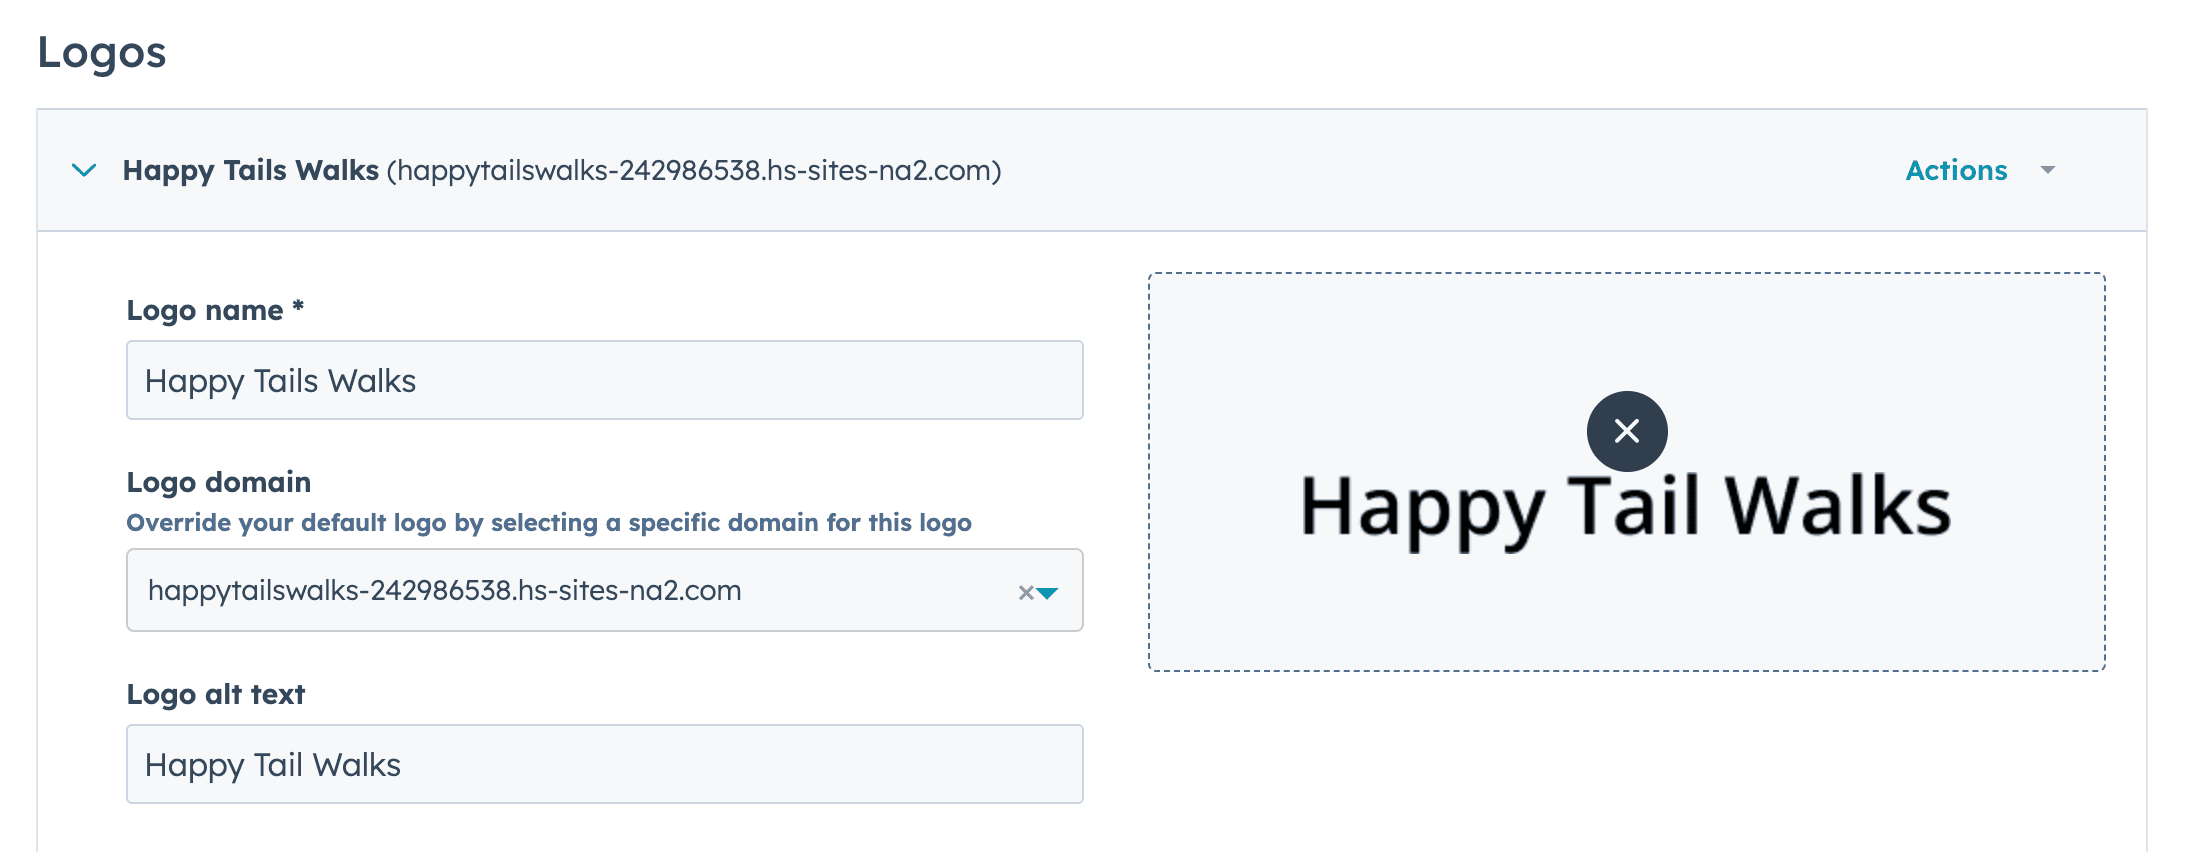
Once you're done, click "Save" and then "Publish". You can now head back to the page editor.
The Hero section is the most important part of your homepage.
It's the first thing visitors see, so it needs to make a strong impression.
Visually, it should stand out. And right at the top, you want a clear and compelling headline that quickly tells people what you offer.
Ideally, include a call-to-action (CTA) button that points users to the next step you want them to take, which in this case, is booking a pet walking session with us.
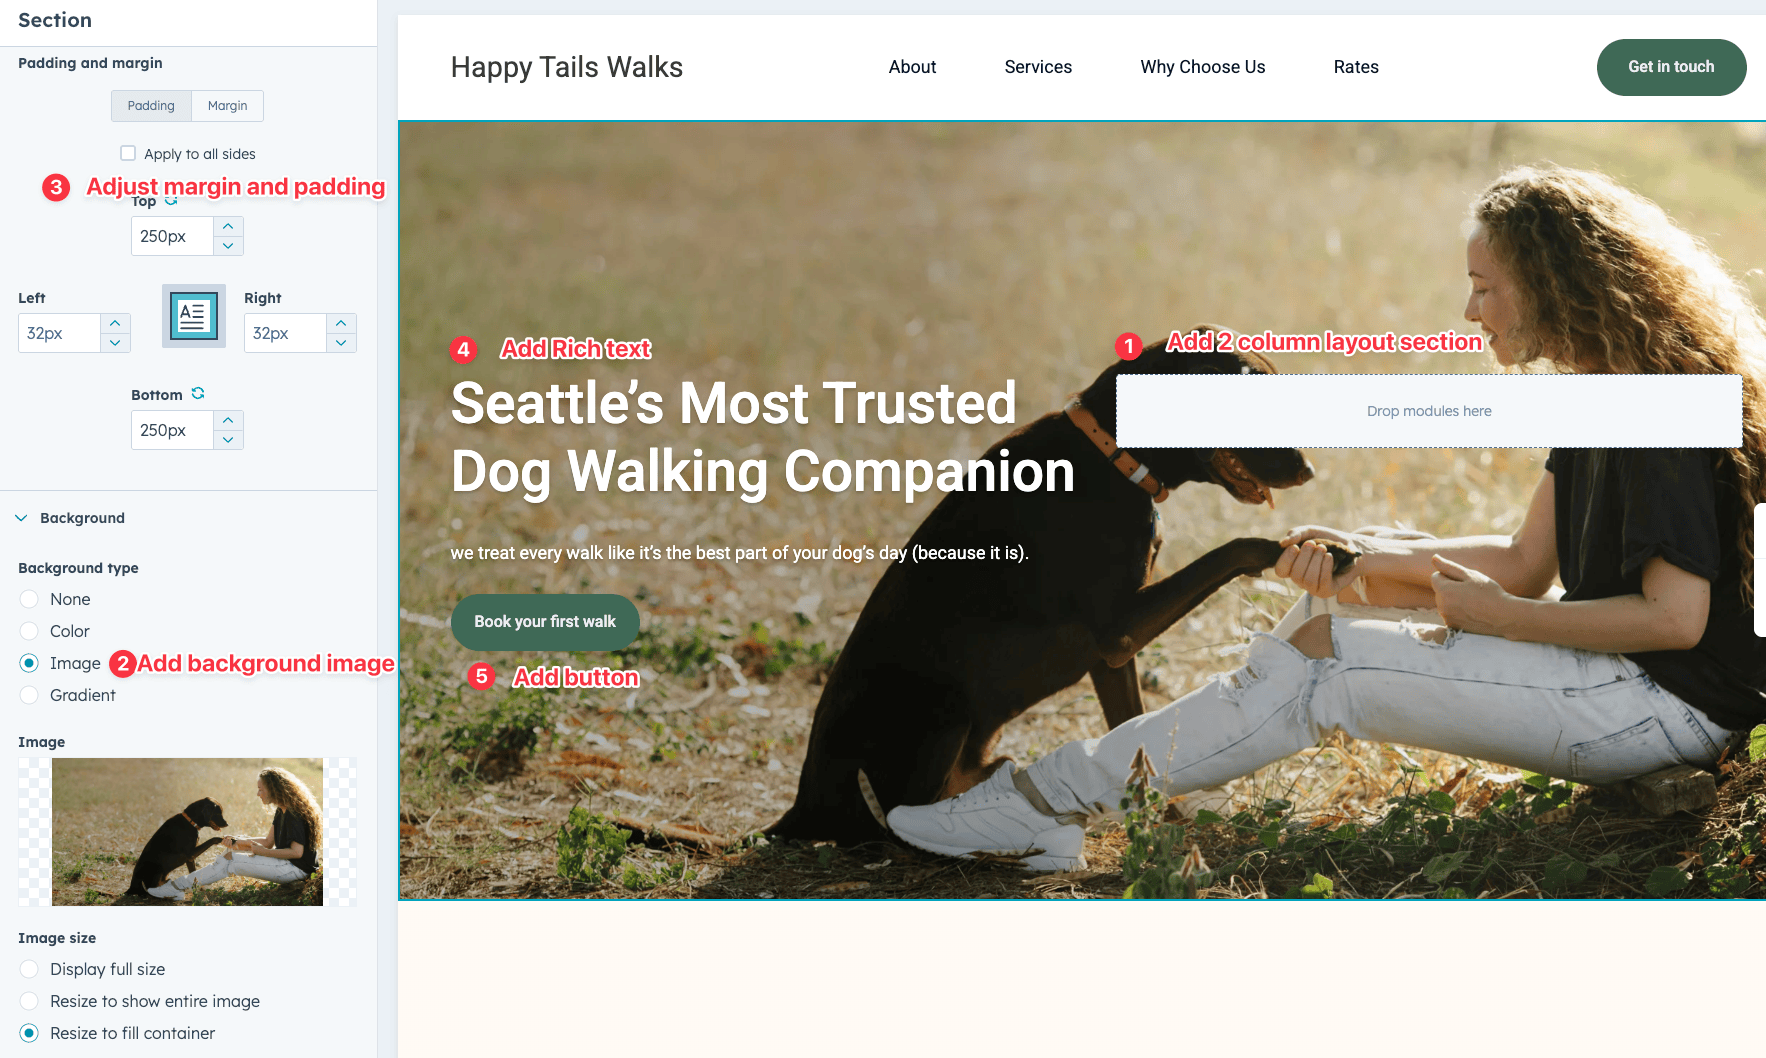
hero-background.png image to the section as a background. You'll notice the left side is slightly darker. That's because I've applied a dark gradient overlay to help the white title text stand out.If your white title text is blending too much into the background, a touch of text shadow can make it really stand out. We can do this by adding custom CSS inside the Rich Text module.
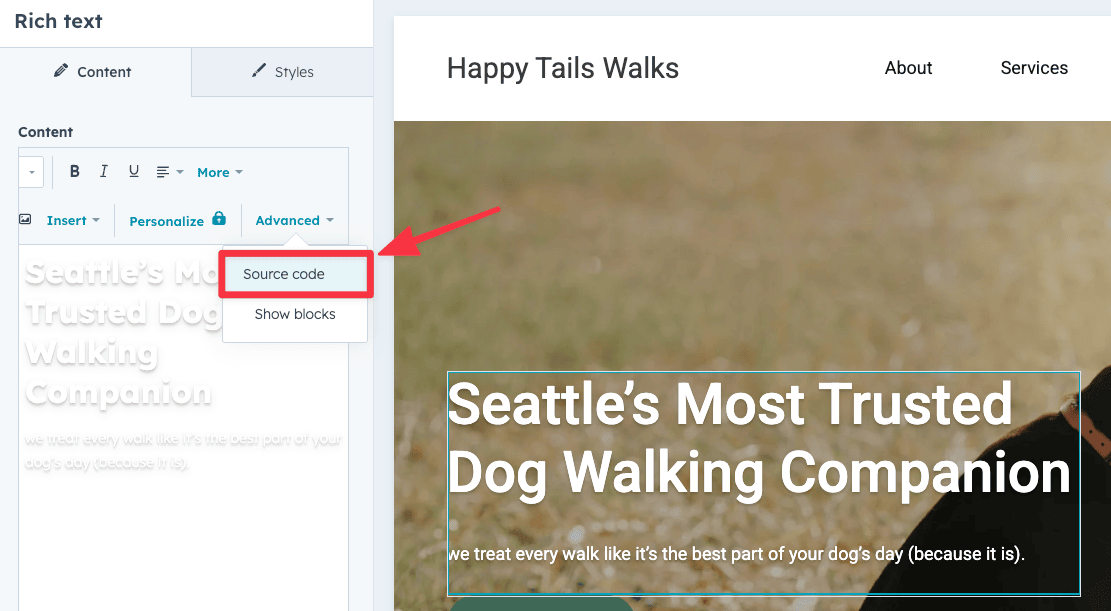
Select Title text ➝ Advanced ➝ Source code and replace the existing code with this:
<h1 style="color: white; text-shadow: rgba(0, 0, 0, 0.1) 0px 1px 2px, rgba(0, 0, 0, 0.1) 0px 3px 2px, rgba(0, 0, 0, 0.1) 0px 4px 8px; text-align: left;">
    Seattle’s Most Trusted Dog Walking Companion
</h1>

<div style="color: white; text-shadow: rgba(0, 0, 0, 0.1) 0px 1px 2px, rgba(0, 0, 0, 0.1) 0px 3px 2px, rgba(0, 0, 0, 0.1) 0px 4px 8px; text-align: left;">
    We treat every walk like it’s the best part of your dog’s day (because it is).
</div>
text shadow CSS for the title
The soft black shadow gives just enough contrast to make white text more legible. It’s a quick win for improving both readability and visual impact.
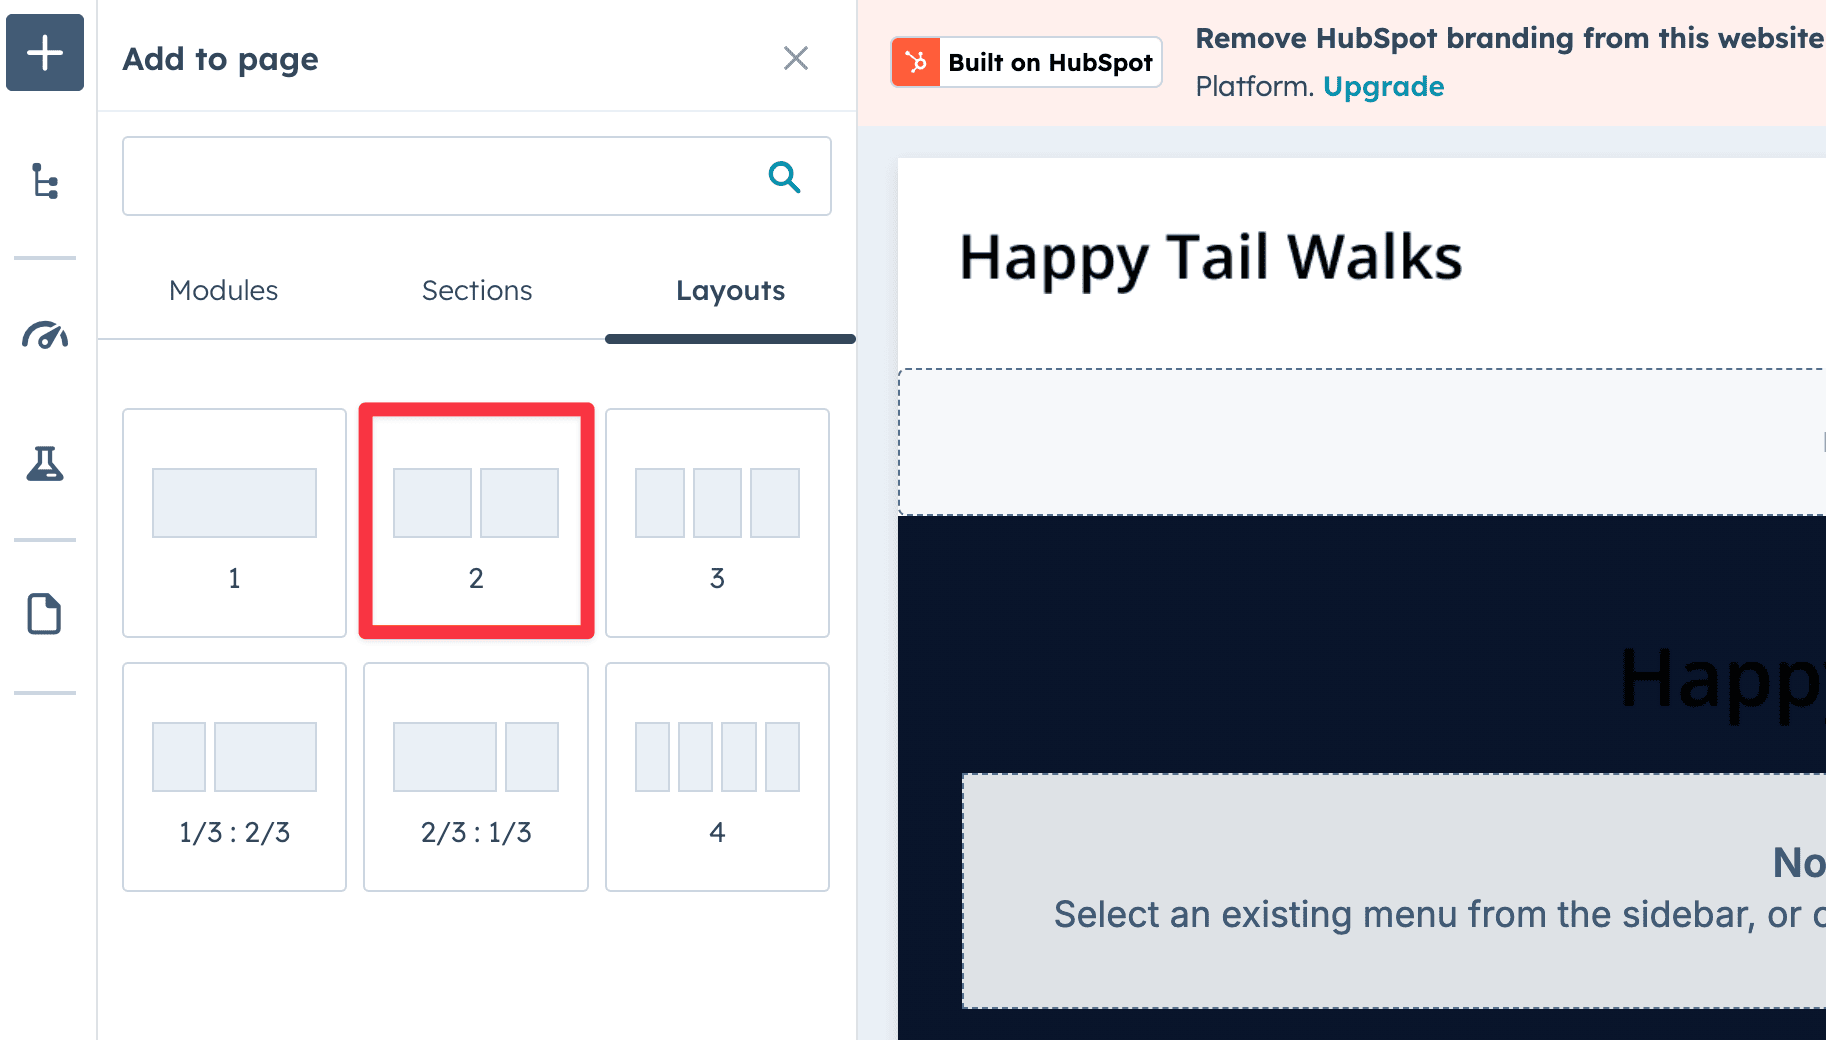
The About section is pretty straightforward. Another 2-column layout with an image and rich text on either side.
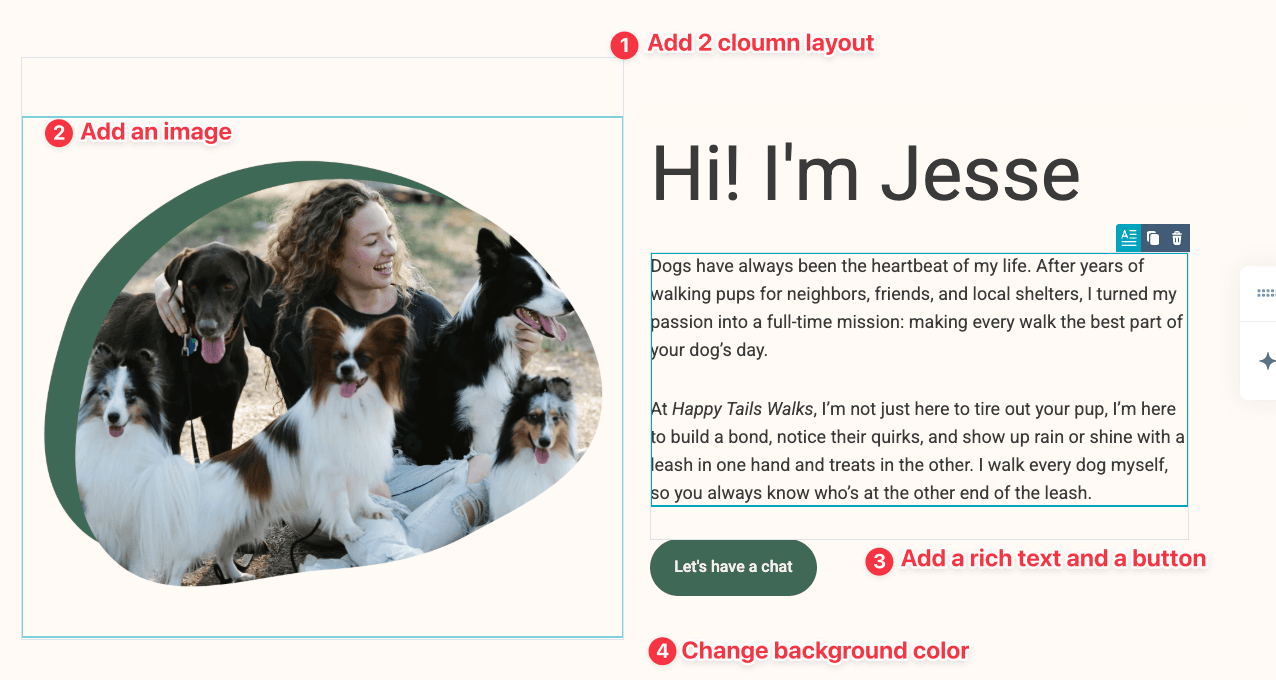
about-jesse.png to the left column#fffaf5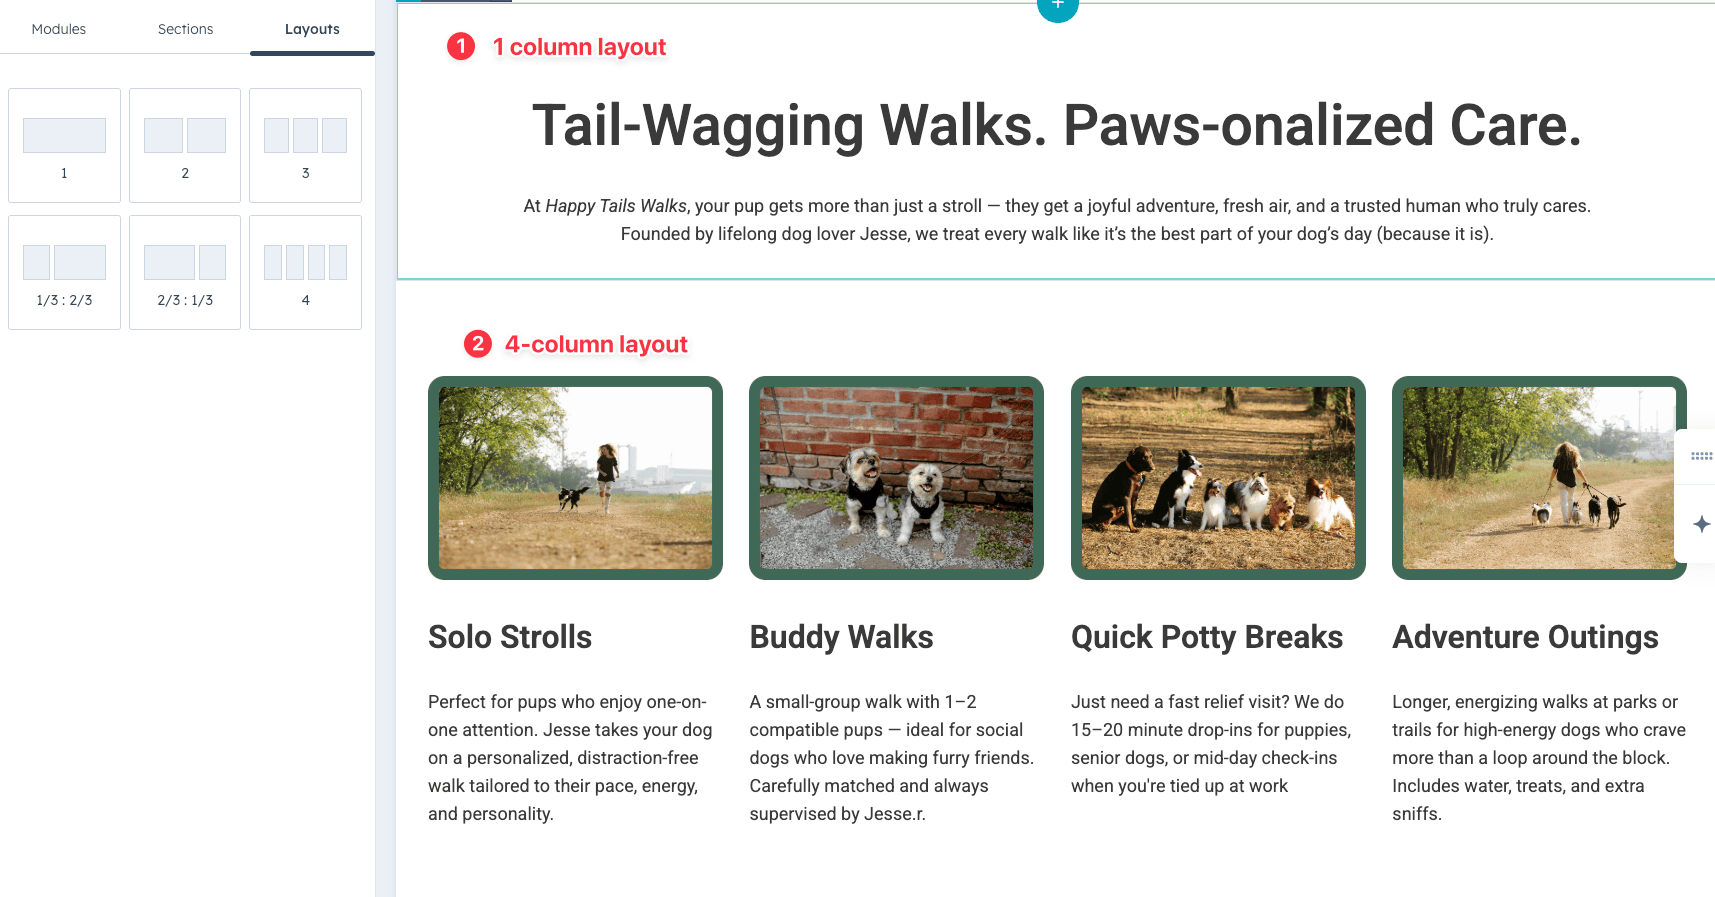
The Services section is made up of 2 sections — A single-column with Rich text (for the title and subhead) and a 4-column with images and Rich text.
You can find the copy for this section in the Website Copywriter prompt I shared earlier.
Think of this section as your “benefits” or “USP” (unique selling proposition) section. Here's where we might explain why a potential client should choose us, specific benefits/features that we offer that are unique.
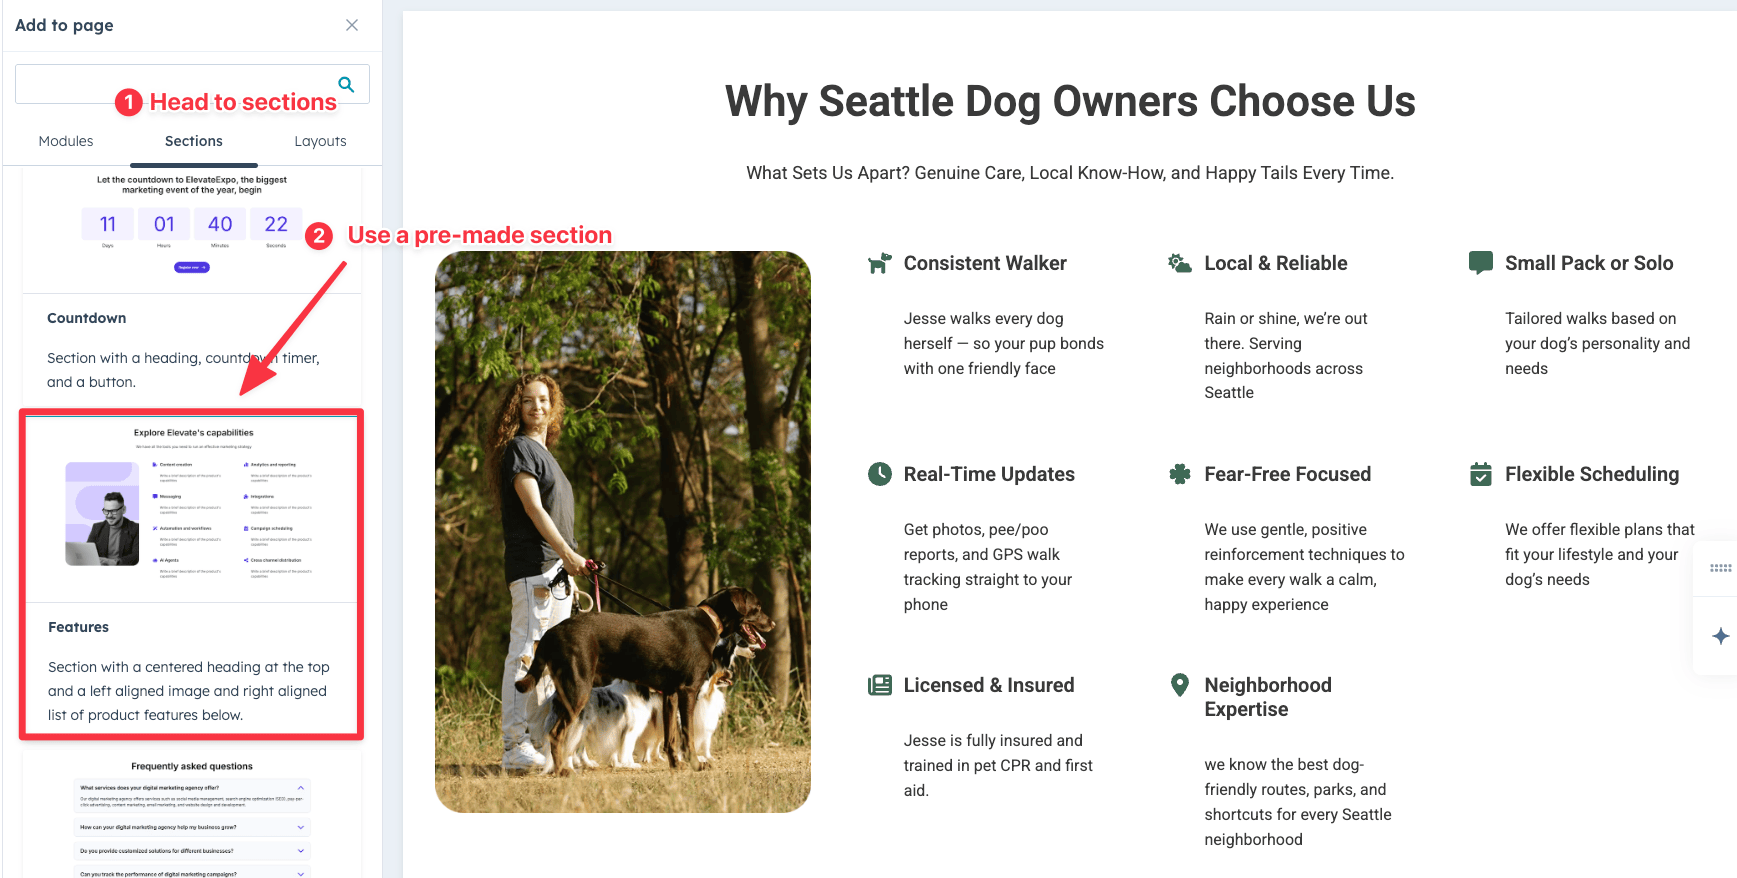
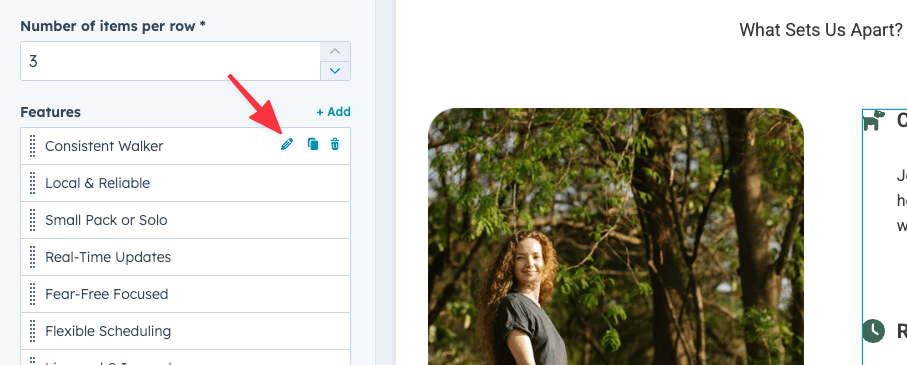
We're going to cheat a little and use one of Hubspot's pre-built sections, specifically the Features section. Then, swap out the default image and icons, and update the copy to match our business benefits.
You can find other pre-made sections in the Section tab, located in the sidebar.
For these last few sections, we’re keeping things simple by using HubSpot’s pre-built modules again. Just plug in your own text or the copy provided by the Website Copywriter GPT prompt from earlier.
If you don't like the first draft, you can always ask the GPT to generate more customized copy for each section.
Ever click on a link and it lets you skip to a particular section? That's an Anchor link.
Usually you need to write custom HTML to add anchor links, but Hubspot makes it a bit easier by allowing you to add it directly from the module tab.
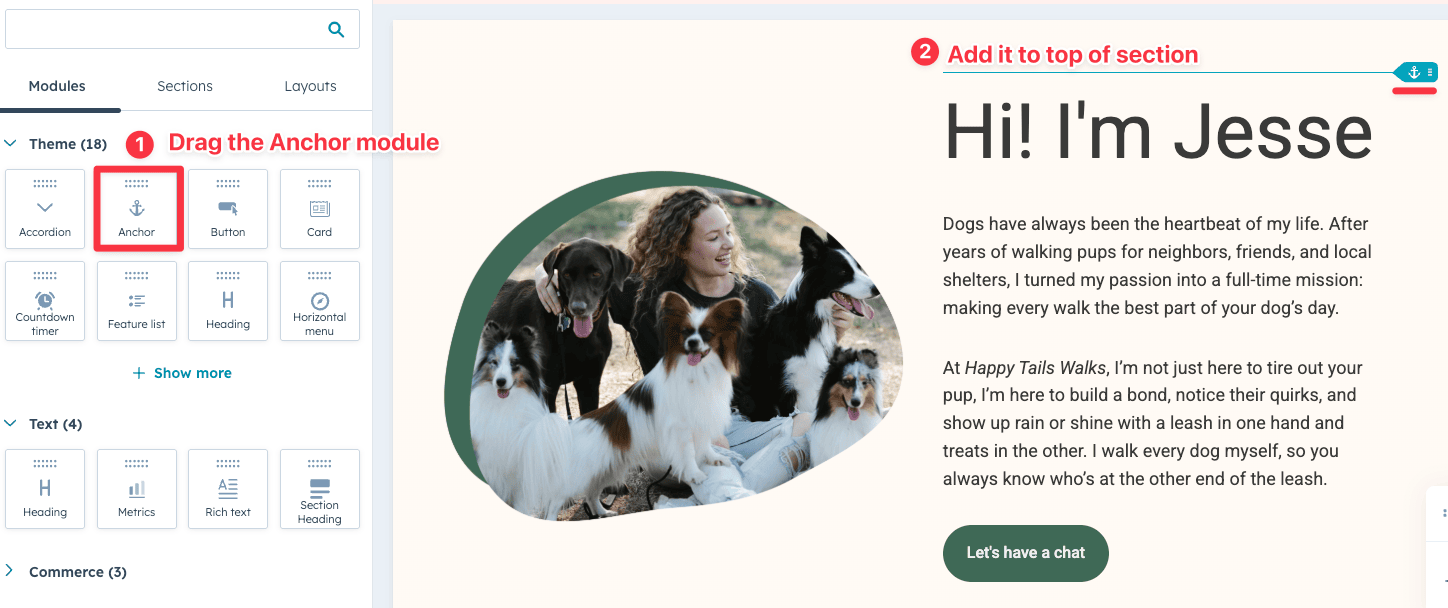
Go ahead and add the following Anchor links for every section of the page:
For example, if your “About” link in the menu is set to #about, then the anchor link on your page should also be named about.

This ensures that when someone clicks "About" in the menu, the page skip to the correct section.
SEO simply means making your site easier to find on platforms like Google, Bing, and even AI tools like ChatGPT.
It might sound technical, but the basics are actually pretty simple.
You can start by going to your Page Settings (top corner of the editor) and add
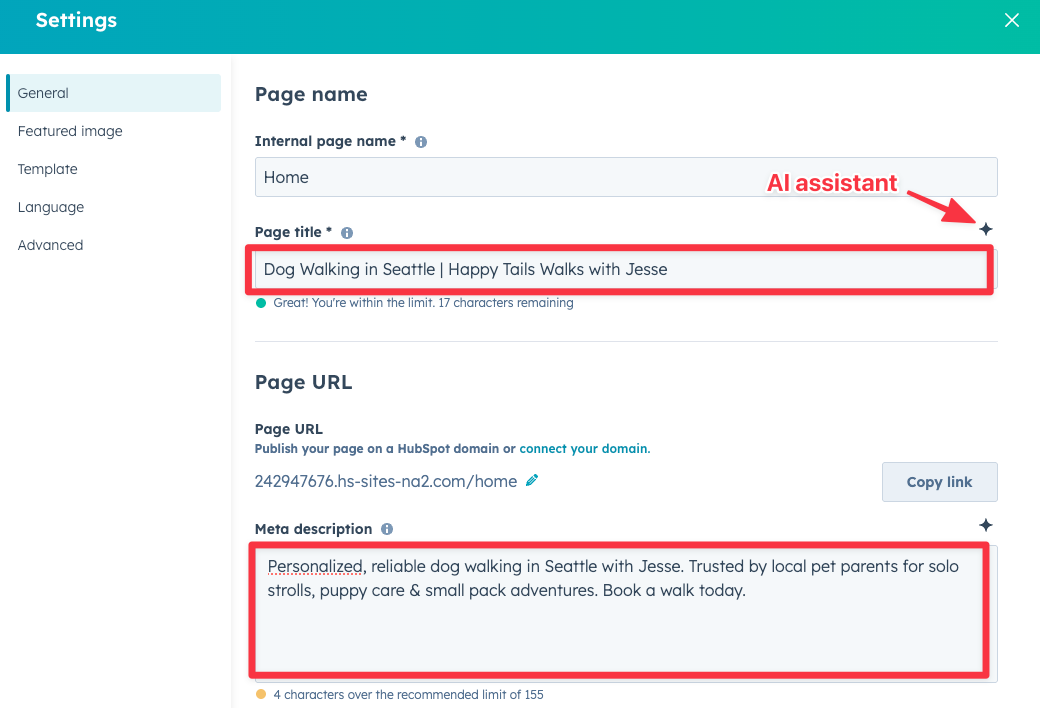
I used the Website Copywriter GPT to generate the copy, but you can also use Hubspot's AI assistant, Breeze, to write one for you.
These two steps matter because your page title and meta description are exactly what people see in search results.
We're almost done. The last thing to do is to add a custom domain, that makes it more legitimate than the default Hubspot URL.
Note that Hubspot allows you to add a custom domain to your site even on the free plan, which is nice.
You will need to get a domain name on your own. You can either get one through HubSpot, which is powered by GoDaddy, or go with your favorite domain registrar (I usually purchase mine from NameCheap).
I've done some research on where to buy cheap domain names if you want to check it out
By updating your DNS records, you’re telling your domain registrar to point your domain to HubSpot. So when someone types in your web address, it'll load a site that's hosted on Hubspot.
If you’re not sure how to update the DNS records, HubSpot has a detailed step-by-step guide to walk you through the process.
That's it! You've now created a free website with custom domain using Hubspot.
Hubspot's free plan is genuinely free. You don't need to sign up with a credit card and they allow you to use your own domain. They're one of the few platforms where you can launch a branded site without paying.
That said, there are limitations on the free plan:
Overall, Hubspot is good for creating marketing sites for small businesses. Either to promote your business online or generate leads. You can also create a blog on the free plan. All in all it's a good value.
Hubspot is NOT great if you want to create an eCommerce store or a membership site for your community, it's just not built for that.
There's a bunch of other features that are also included in the Hubspot's free plan, like accepting payments via Stripe (to sell digital products), create free landing pages, etc.
You can check out more details on what’s included in the free HubSpot marketing tools here.
Obviously, you can upgrade to a paid plan if you want to remove Hubspot's branding on your site.
Note that Hubspot's paid plan (Content Hub Starter) starts at $15/month per seat when billed annually ($20/month if billed monthly). That's reasonable compared to other website builders in the market. For example, Wix's Light plan starts at $17/month if you want to remove their branding.
Other reasons you might want to consider upgrading is when you decide to build a larger site (when you exceed the 30 page limit) or when you want to take advantage of Hubspot's advance CRM features, which is their core strength.
Wix and Wordpress come with their own tradeoffs.
Wix is far more customizable than Hubspot, but it doesn't allow you to add a custom domain on their free plan.
Wordpress, on the other hand, has a much higher learning curve (and requires ongoing maintenance), but you can build a way more advanced lead generation site or blog. Not to mention they have a massive ecosystem of themes, plugins, and freelance experts.
If you want to create a low-maintenance brandable site, Hubspot is an easy choice.
If you're opinionated about your site design, then go with Wix.
If you want to build the best possible site on a budget (and don't mind the extra effort), then consider WordPress.
You can continue using Hubspot's default URL (yoursite.hs-sites.com) if you decided not to connect your own custom domain.
Depending on your needs:
These 3 website builders also allow you to add your own domain for free.
David Nge is the founder and writer behind MakingThatWebsite.com. Since launching in 2021, he’s been on a mission to help non-techies—especially small business owners—build better websites using easy-to-learn tools and smart, time-saving strategies. He specializes in website builders, SEO, and practical AI tutorials for small business owners.
Have a tutorial you want to learn? Leave a suggestion here.