How to set up a blog on Squarespace
 By David Nge | Last Updated: September 19, 2025
My work is supported by affiliate commissions. Learn More
By David Nge | Last Updated: September 19, 2025
My work is supported by affiliate commissions. Learn More
If you've decided to use Squarespace for blogging, here's a complete step-by-step tutorial on setting up a Squarespace blog from start to finish.
We'll go over:
By the end of this tutorial, you should have a perfectly setup blog to go with your Squarespace site.
Related: Compare Squarespace vs. Wordpress for blogging.
Let's dive right in.
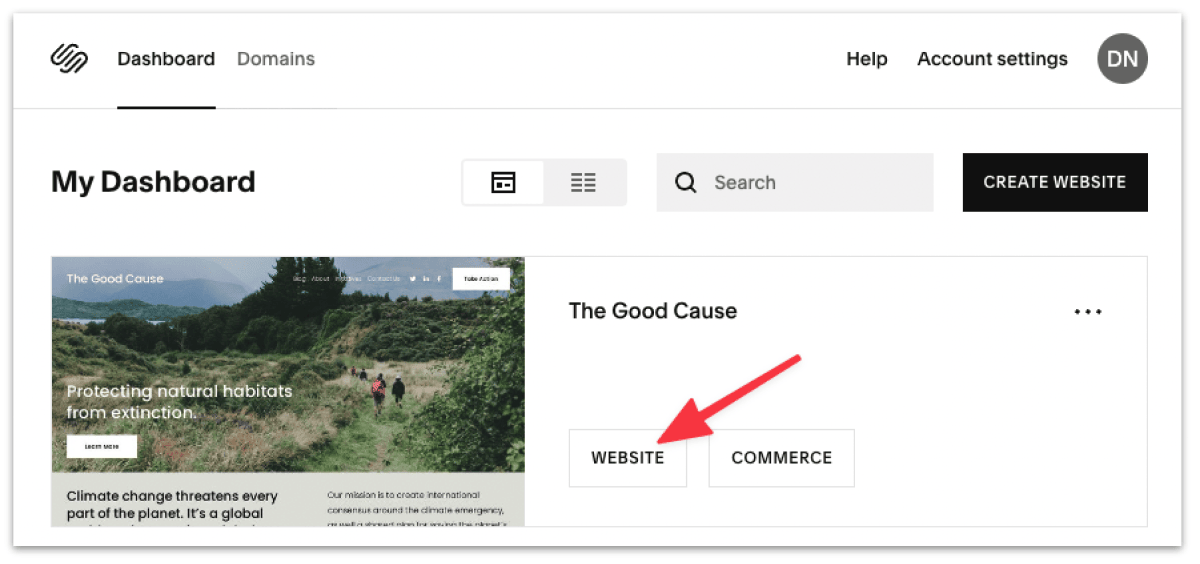
Sign in to your Squarespace account and head to your website via the dashboard.
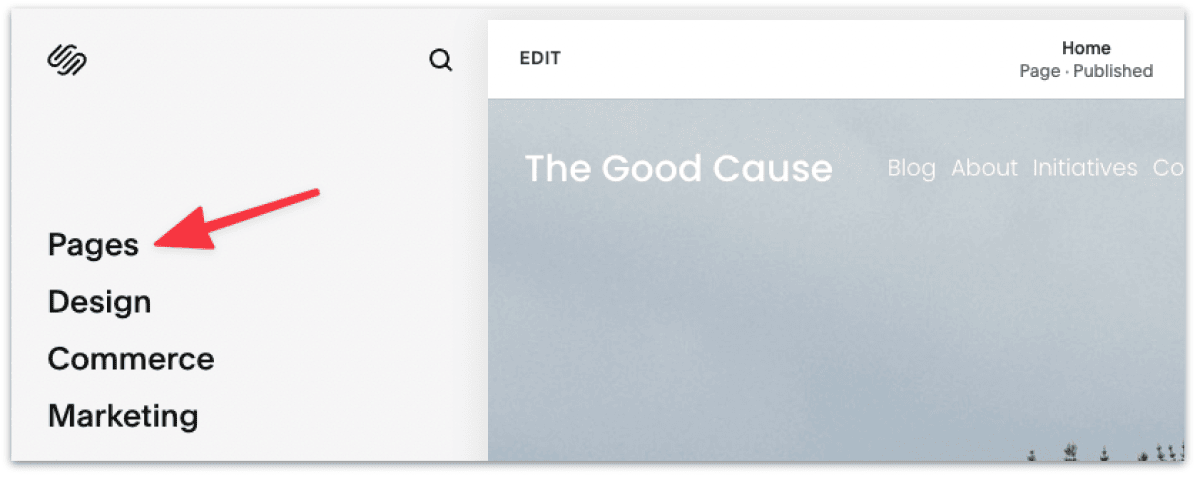
Then head to Pages settings.
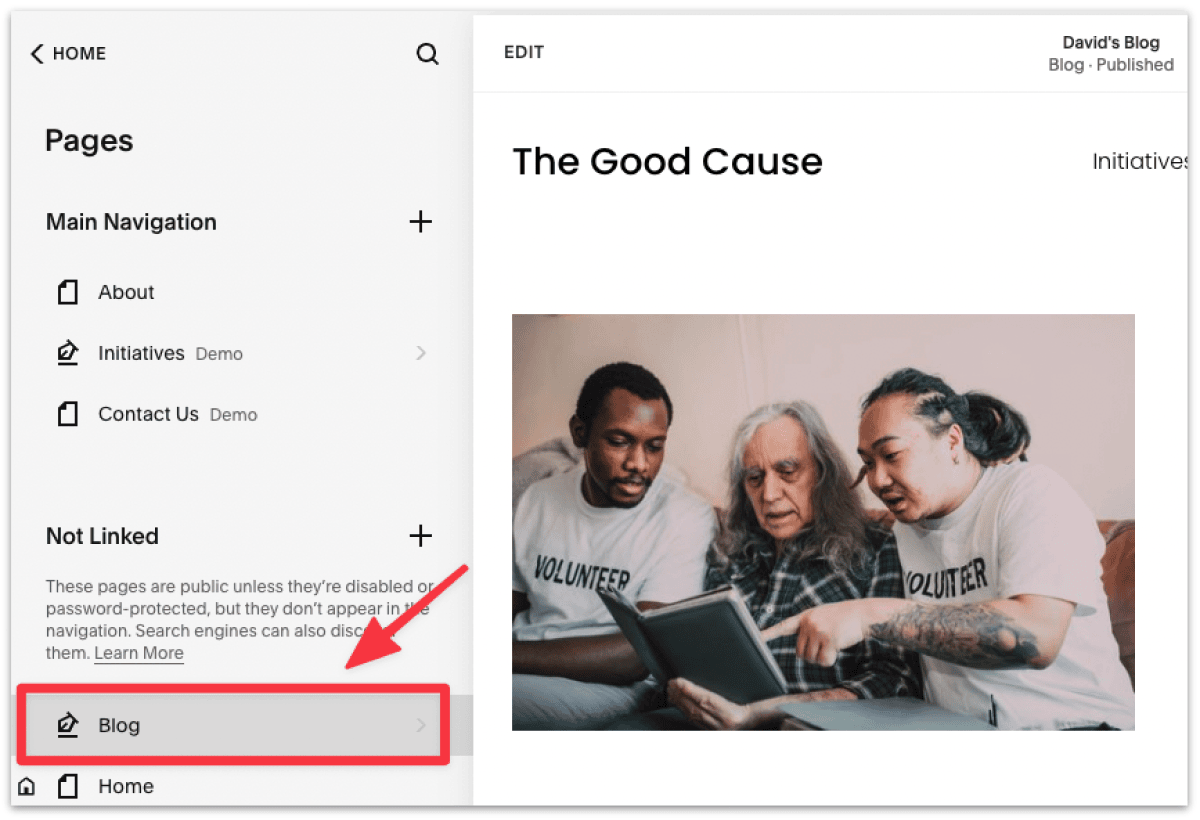
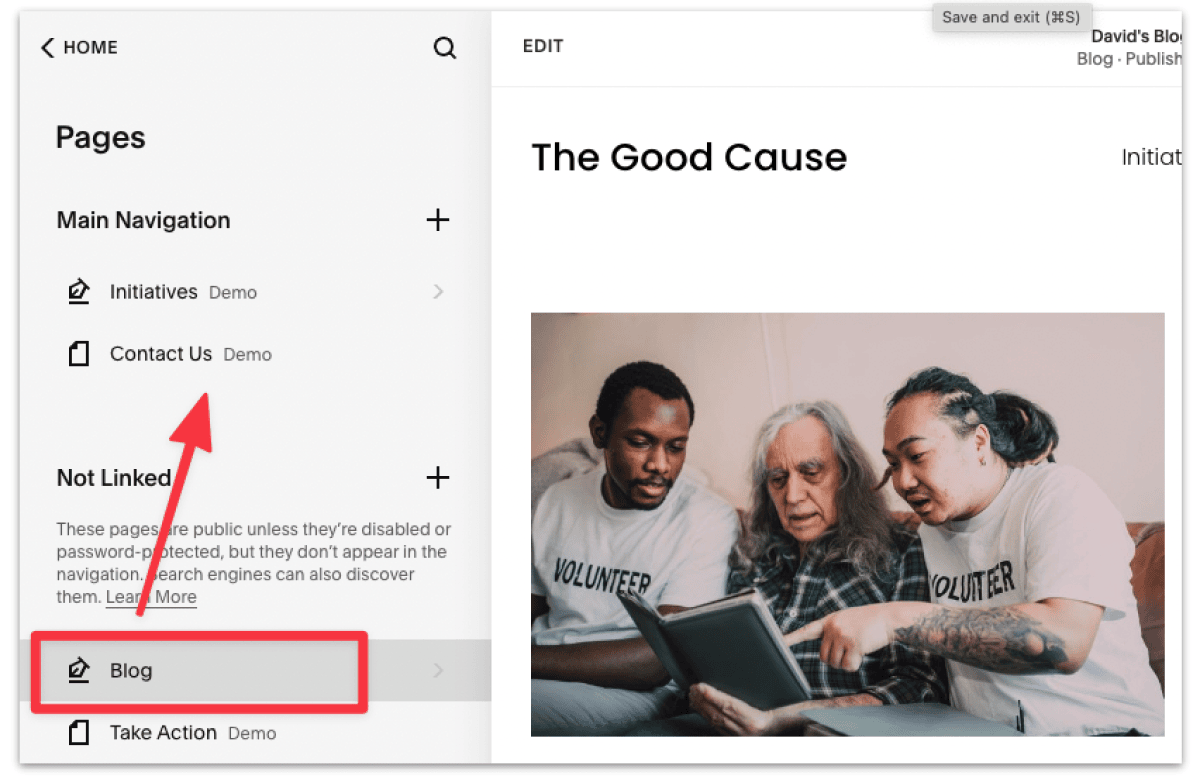
Click on the Plus icon (+) right next to Not Linked and add a Blog Collection.
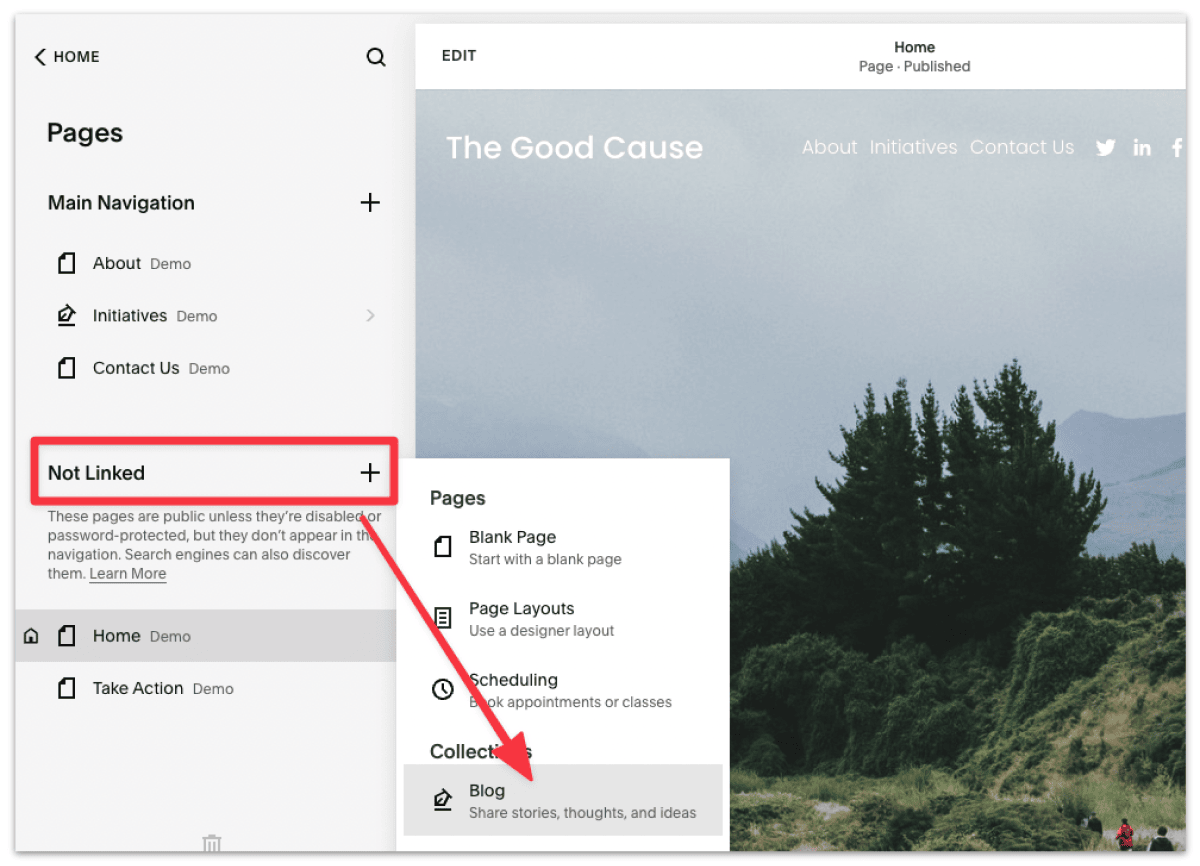
The reason you add the blog collection to Not Linked first is so that it won't show up in the main navigation. You can drag the blog page to the main navigation after you're ready to show your blog to the world.
You can then choose a blog layout. It doesn't matter at this point which layout you choose, as you can customize it later.
You should now see the blog on the sidebar under Not Linked.

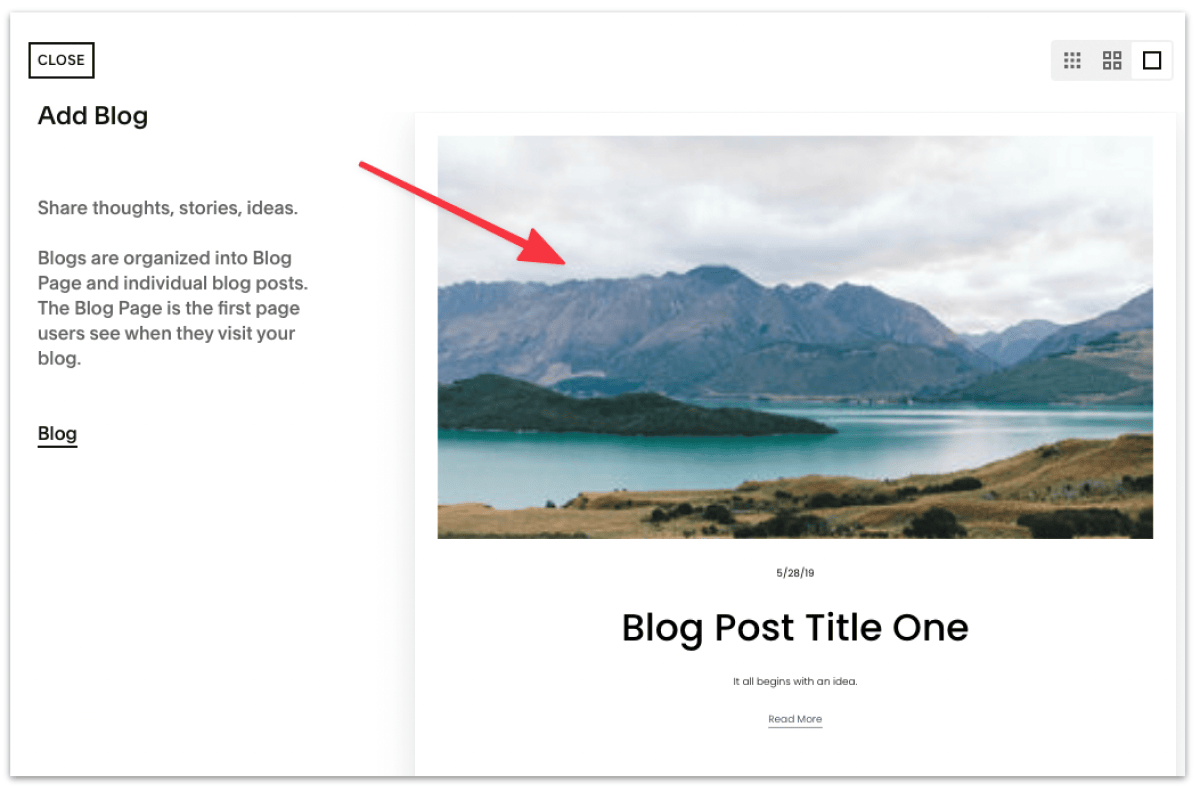
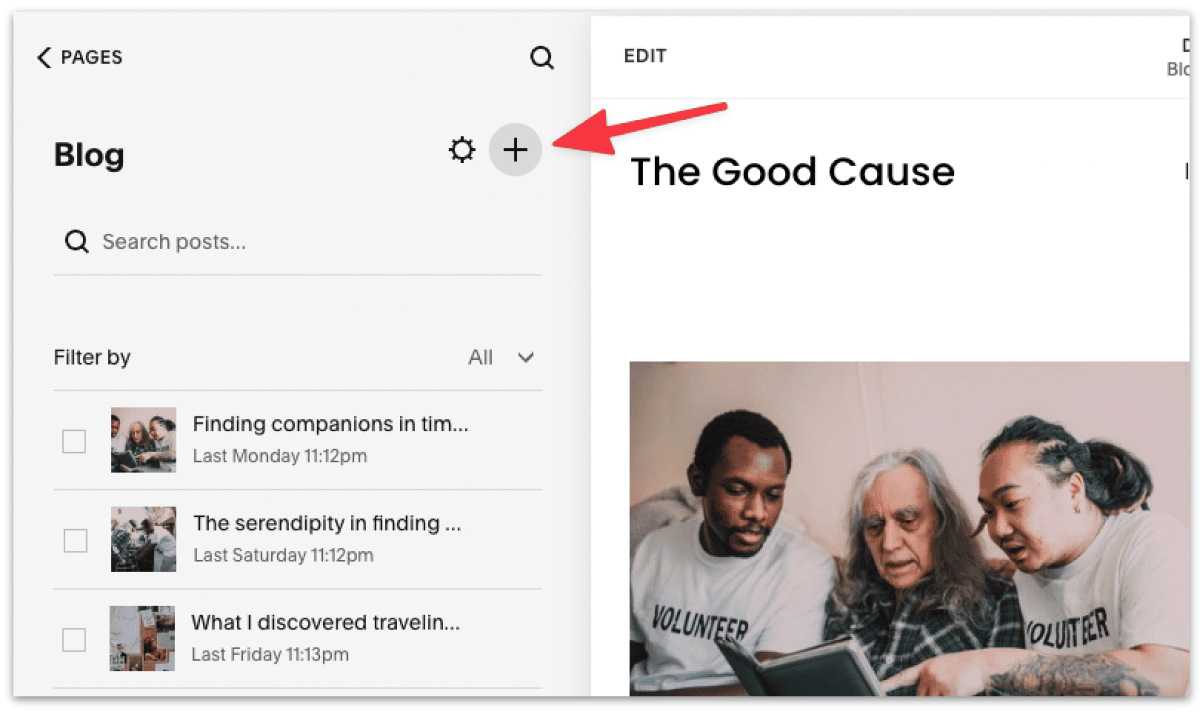
Click into the blog page, and you'll find a few pre-populated blog posts from Squarespace. Feel free to delete them.
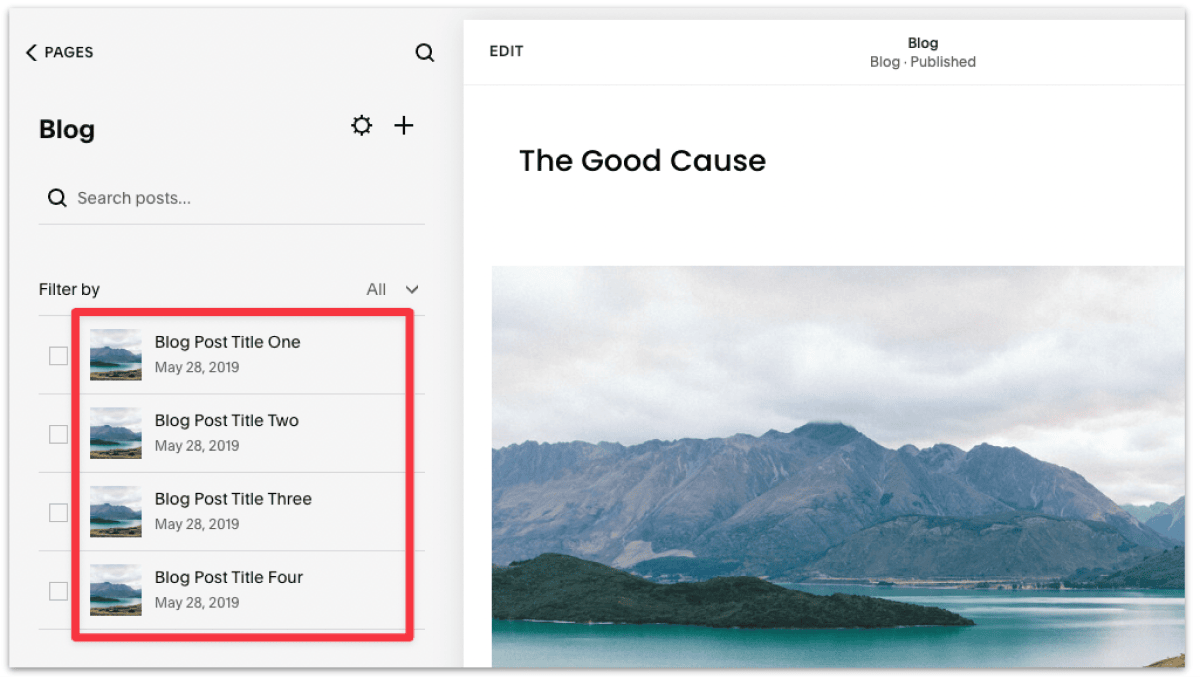
You've now added a blog to your site; now let's configure the blog settings.
Back in your Pages Settings, click on the gear icon (⚙) right next to blog to bring up the blog settings menu.
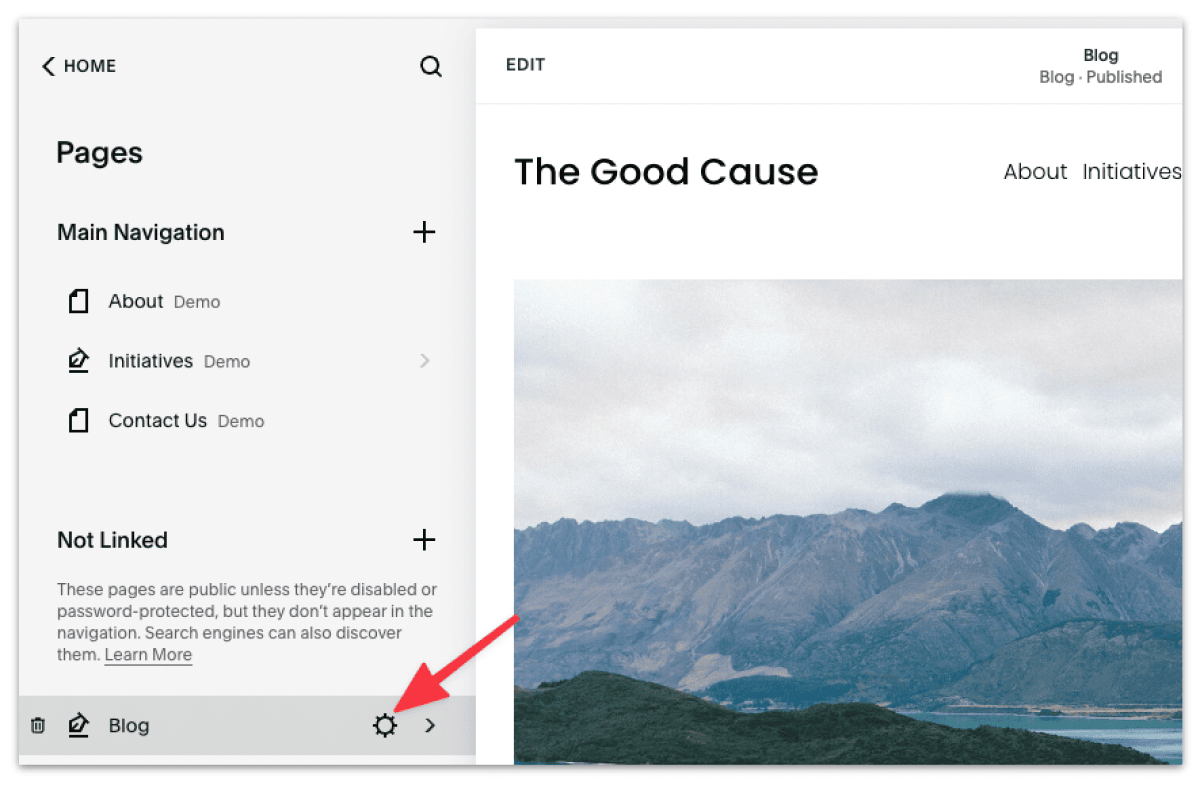
Here you'll be able to adjust your blog settings, such as adding a blog title, setting a password for your blog (optional), configuring SEO for your blog, and more.
Here's how to configure your blog under each setting:
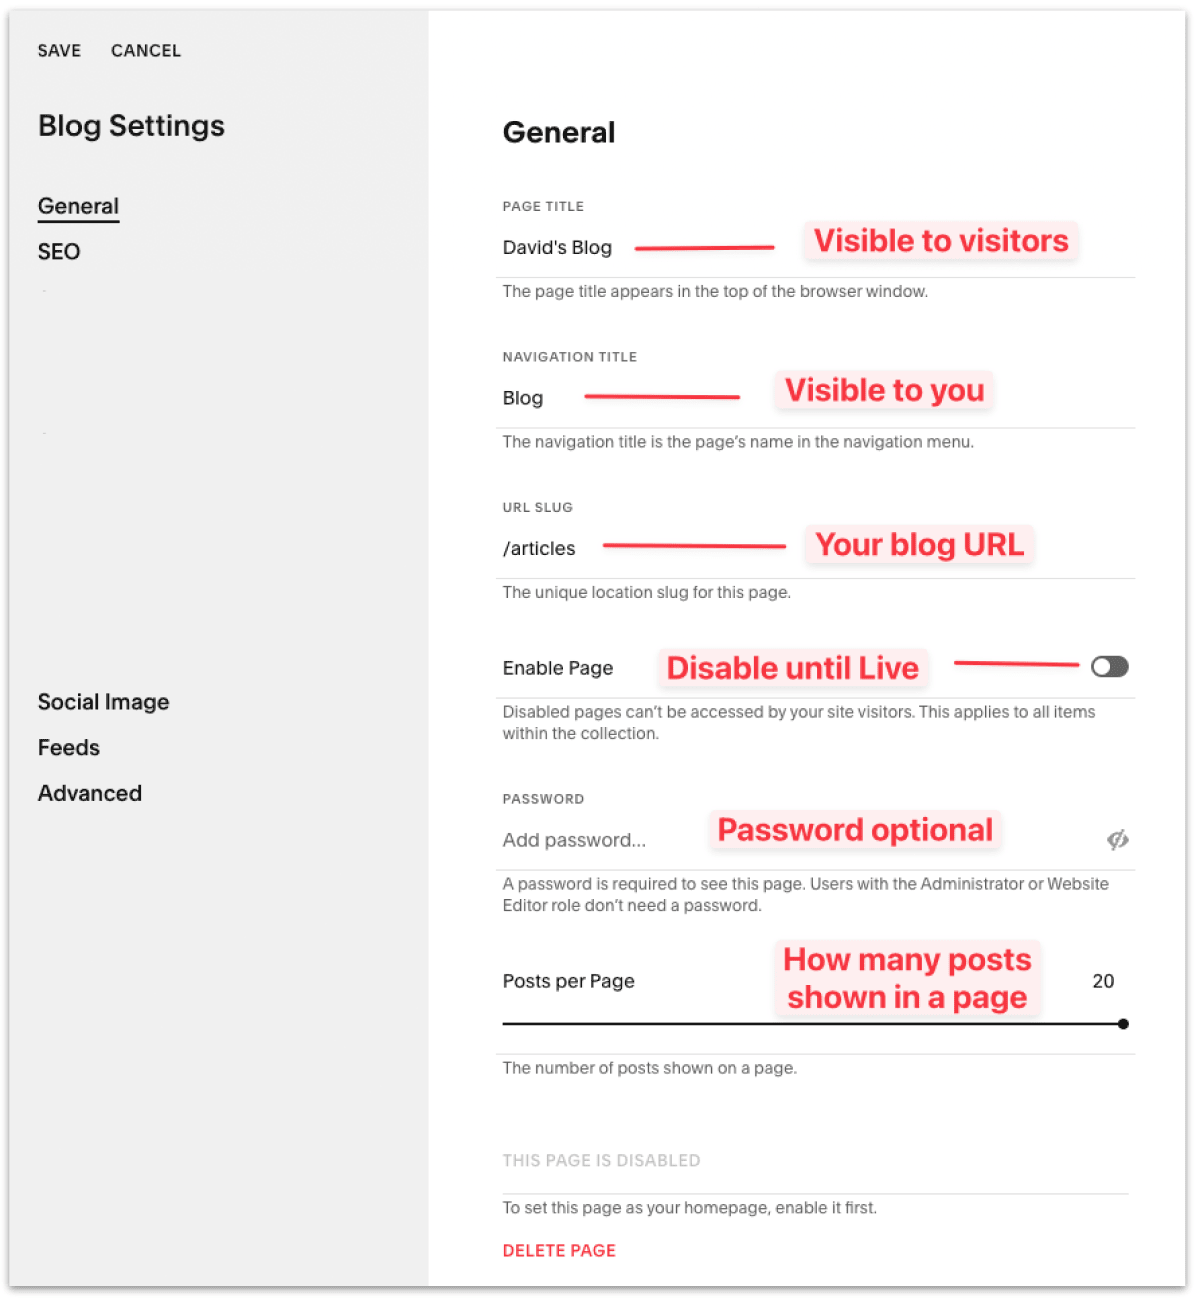
Page Title — The page title is visible to your visitor when they first land on your blog page. It can be as simple as "Welcome to David's blog!" Or if this is your company blog then it could be "Latest news and announcement," as TinySeed did with their blog.
Navigation Title — The navigation title is only visible to you in your dashboard (under navigation). It helps to give it an easy-to-read navigation title to help you manage your site. For example:"Blog".
URL Slug — The URL slug is the URL of your blog. Common URLs for a blog are /blog/, /articles/, /posts/, etc. Note that all your articles will follow the same URL structure. For example:
Enable Page — Enabling the blog page means allowing visitors to view the blog if they can access the URL. It's recommended to disable the page until your blog is ready.
If you've hidden the blog from the navigation (as we did earlier) but somehow a visitor manages to get access to your blog URL, they'll see a 404 error page if your blog has been disabled.
Password — Optionally set a password for your blog.
Posts per Page — This is the number of articles you can display on the blog page. The maximum posts per page on Squarespace is 20.
If you have written more than 20 articles, article 21 onwards will be shown on the next page instead.
It's recommended to leave this to the default unless you have specific requirement for your blog.
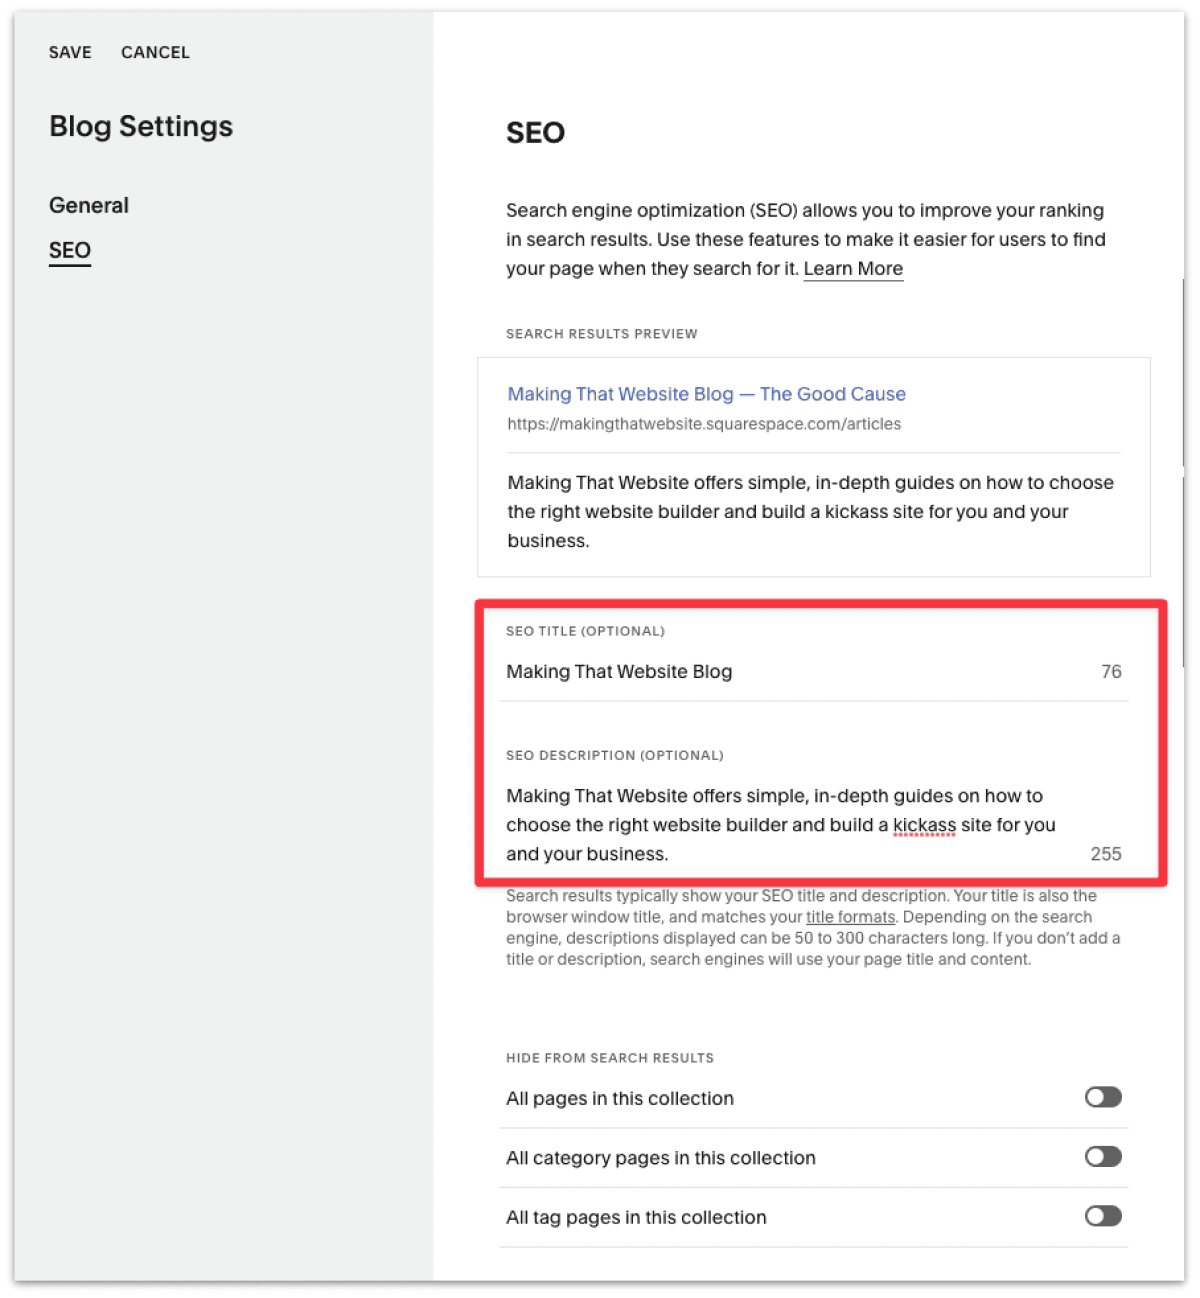
In the SEO settings tab, the most important fields to update are the SEO Title and Description.
SEO title and description are the text being shown on Google Search results when someone searches for your blog.
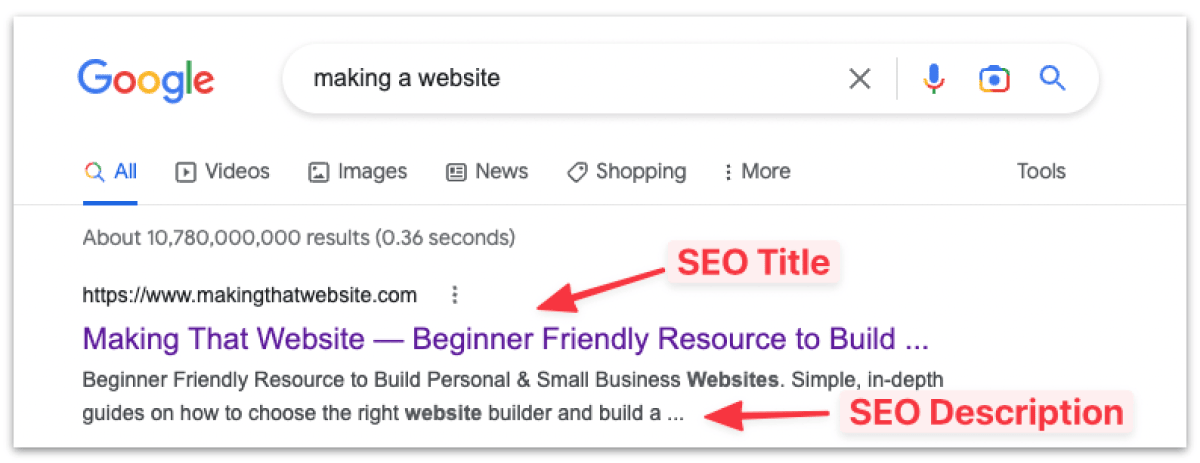
Even though it's optional, I would recommend you give a proper SEO title and description, as they'll have a significant impact on the click-through rate for your blog.
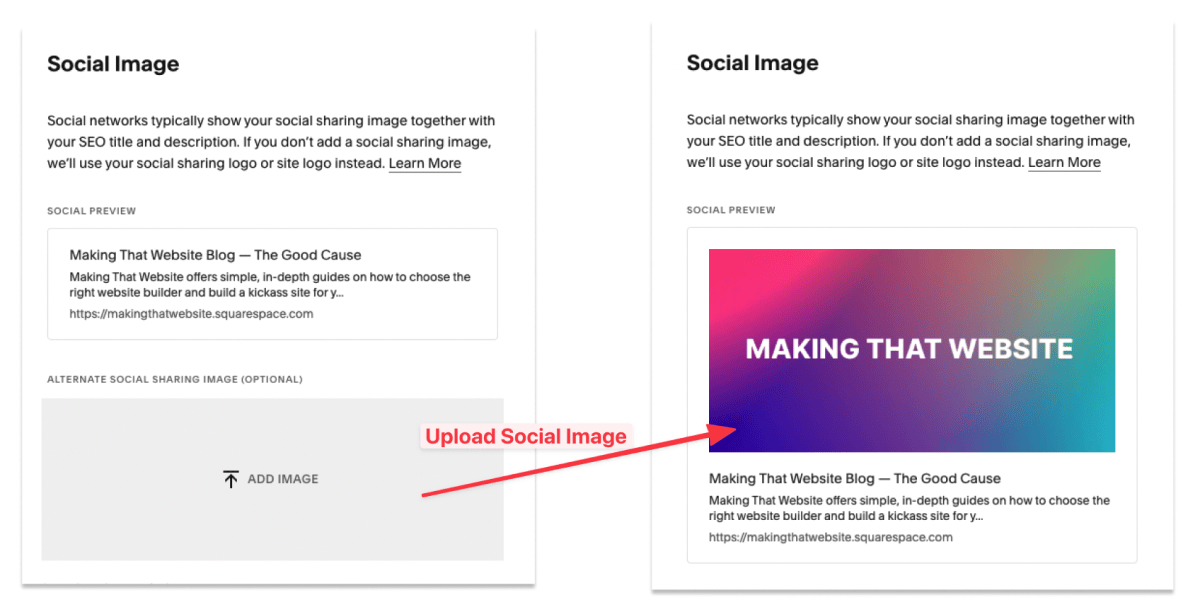
Social image is optional, but it is also recommended to upload one as it increases the sharability and clickability of your blog when you share it on social platforms.
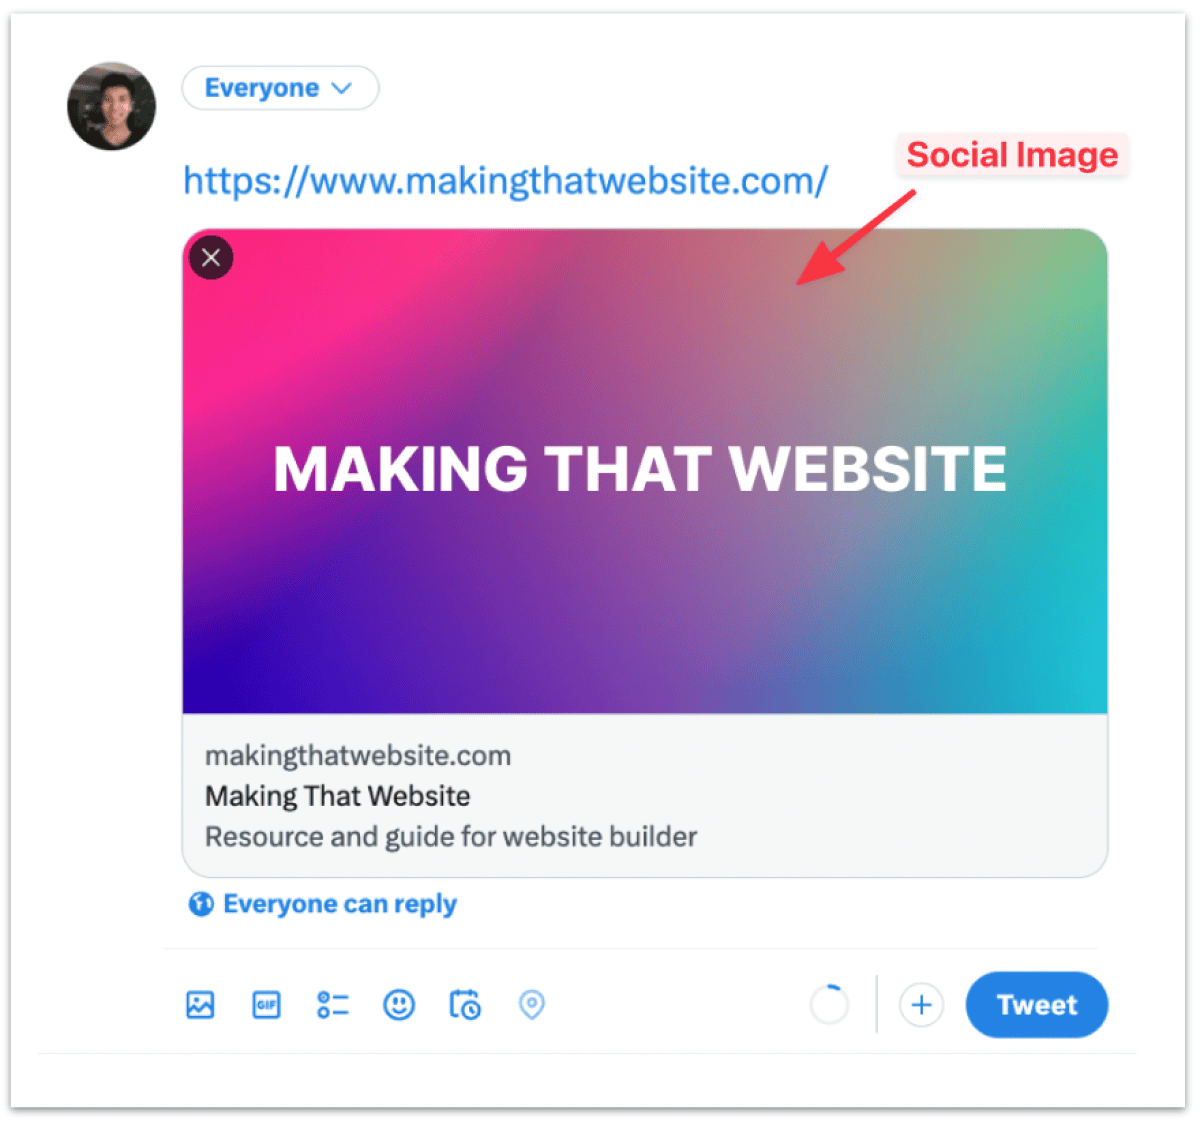
Here's an example of how the social image would show on Twitter when you share your blog URL.
Squarespace allows you to syndicate your blog articles to other platforms such as Apple news and Apple podcast, but you would need to set it up, i.e. connect to your Apple account.
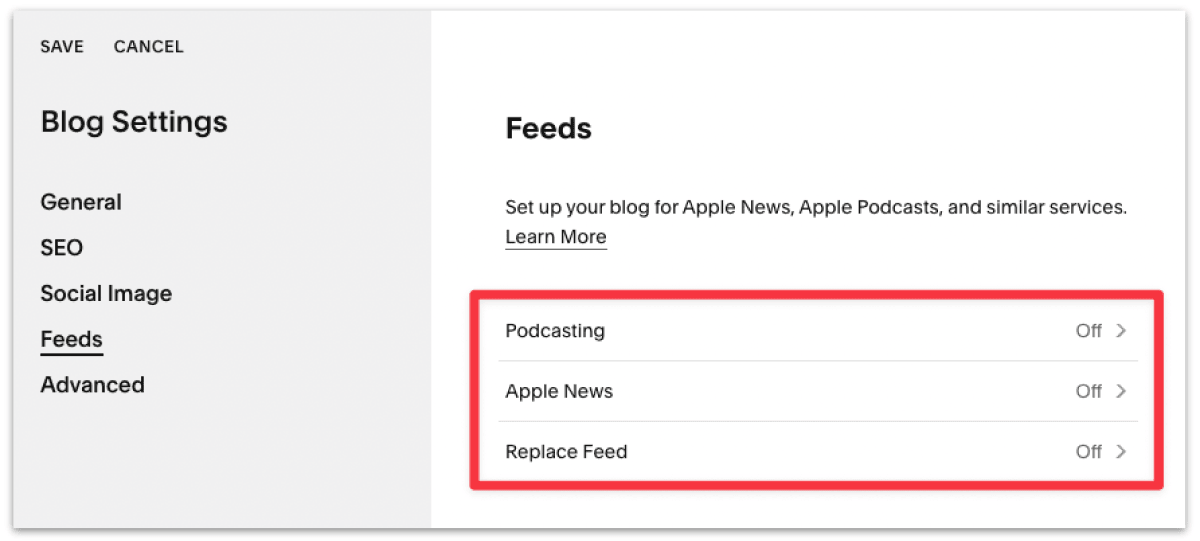
In my opinion, you can skip this one, at least for now, until you have a sizable audience.
You can instead set up an RSS feed that allows you to share your blog with other blog aggregators such as Feedly or Google News.
Follow Squarespace's official documentation to set up an RSS feed.
In advanced settings, you can add tags and categories to your site. Most of these are not needed at this point since you haven't started writing articles yet on your blog.
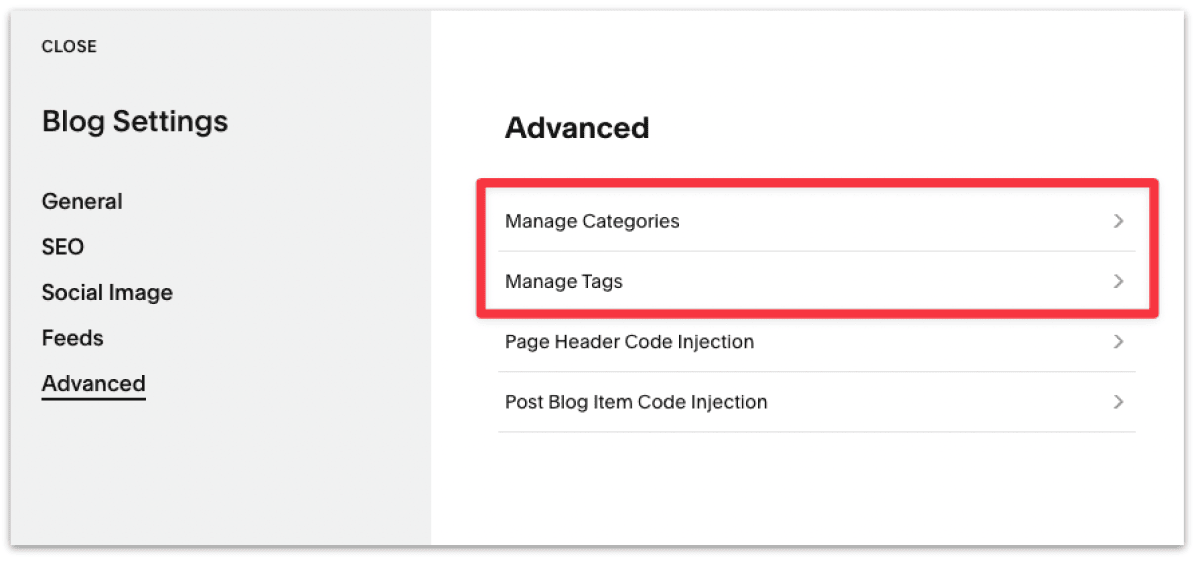
Once you've written a dozen or so articles and you need a way to organize your blog articles (via tagging and categorization), then you can start managing tags and categories here.
Here's a more detailed explanation of how tagging and categories work on Squarespace.
What I would highly recommend instead is to start adding tracking & analytics to your site. I have a full tutorial on how to add Google Analytics to your site. It's free and the de facto analytics tool for all site owners.

Once you're done, don't forget to Save the blog settings you've updated.
That's it for configuring the settings for your blog; now let's customize the blog layout.
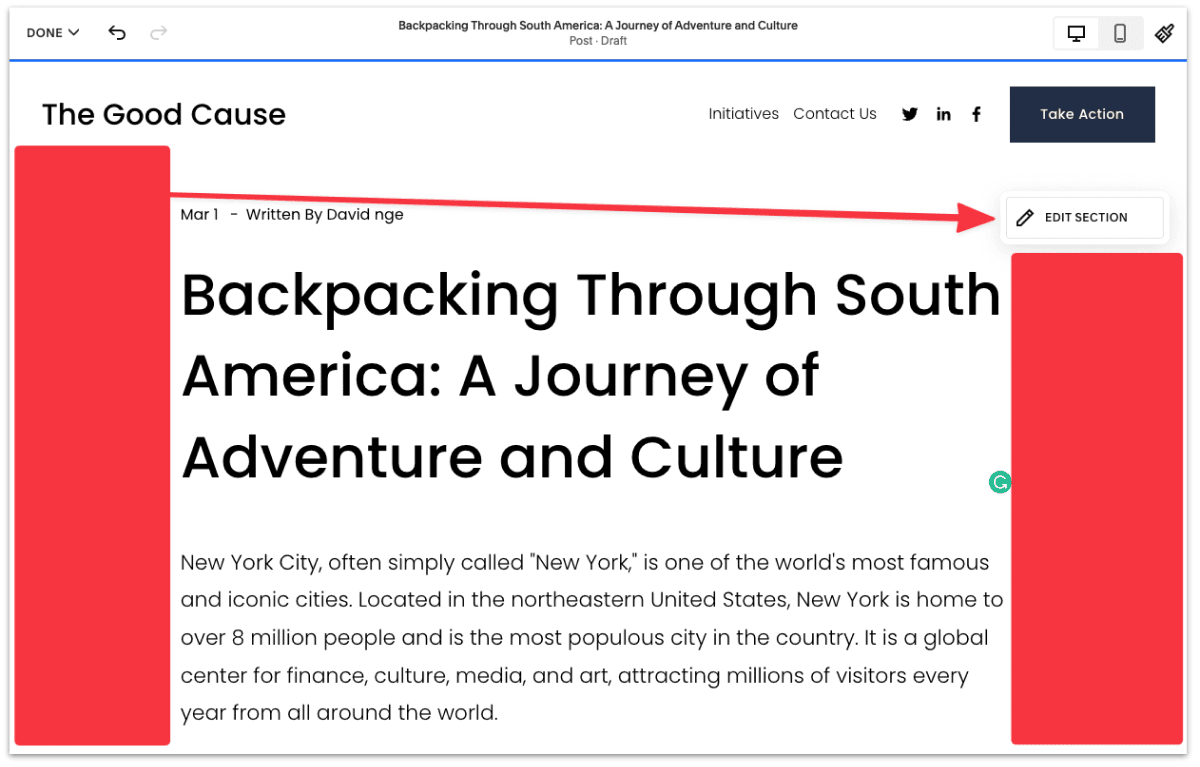
To customize the blog layout, head back to your Page Settings and edit the blog page.
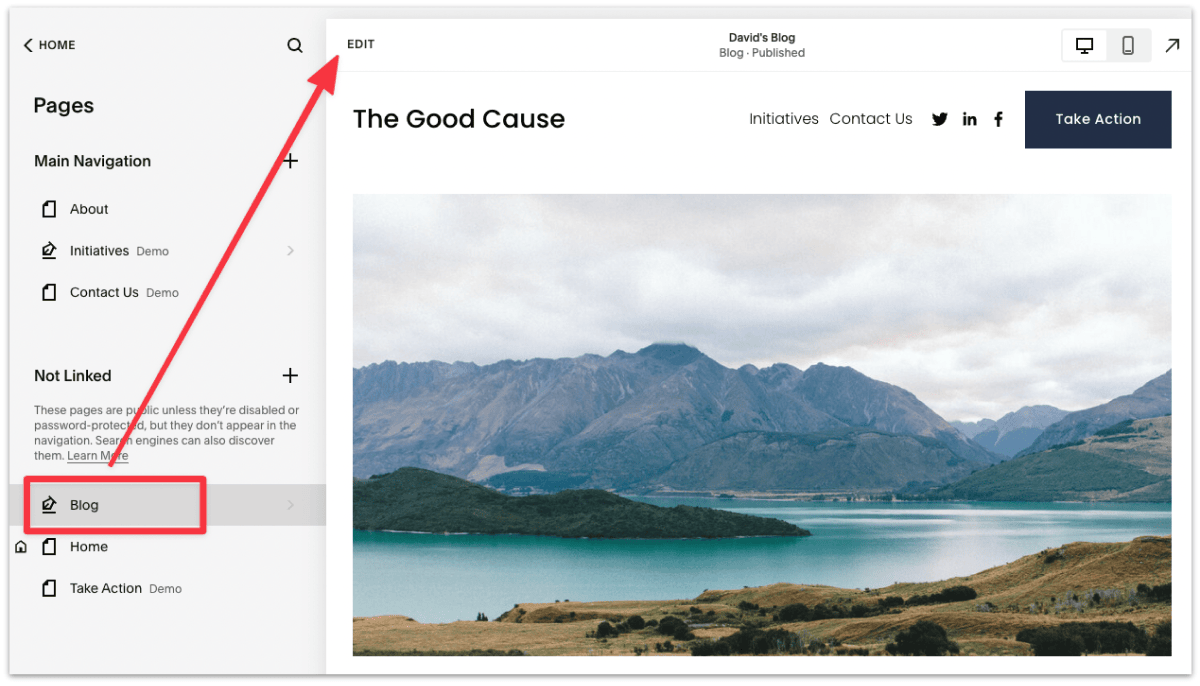
Note: You're currently editing the layout of the blog collection page, not the individual blog post.
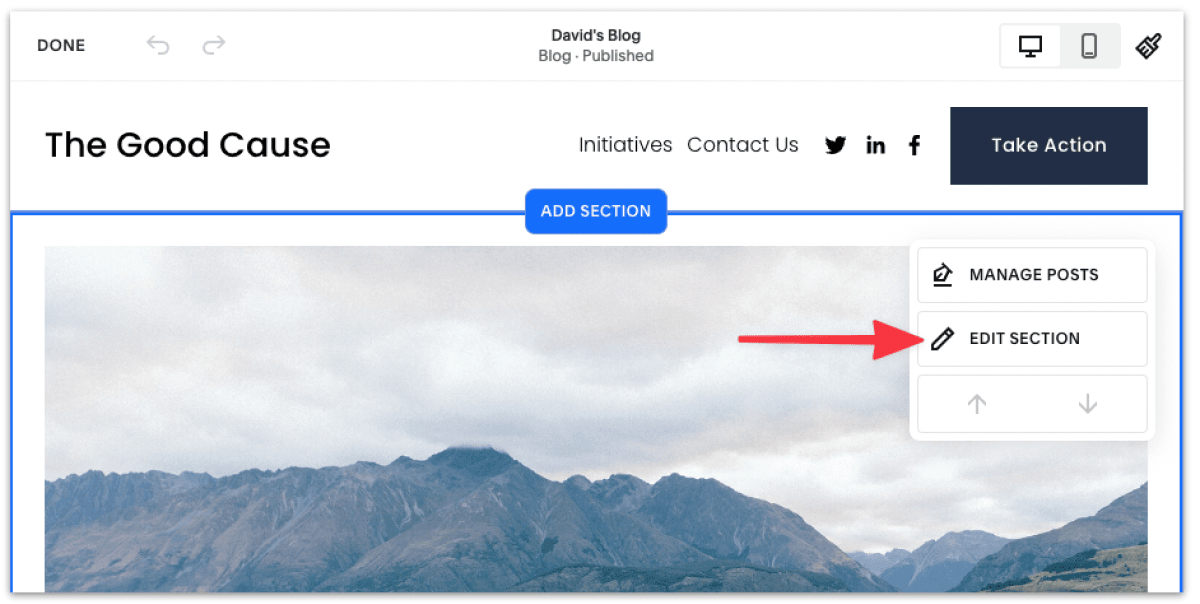
Hover your mouse over the main blog section and select Edit Section.
First, choose a layout that you like.
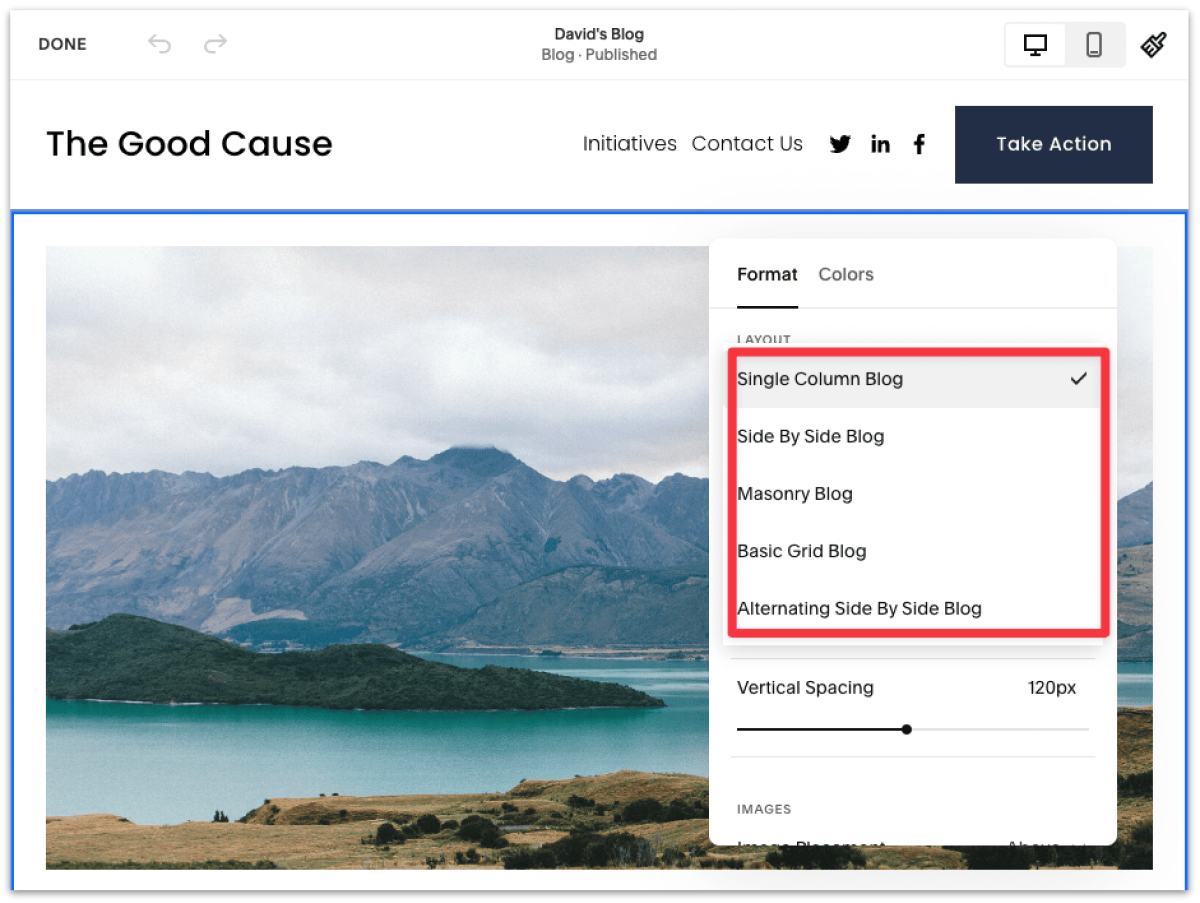
Squarespace has several common blog layouts, which makes it easy for blog owners to decide. You can always switch the layout in the future.
Here, I've updated the following blog layout settings based on my preference:
There are more layout and visual settings you can adjust, such as
and more!
Now that you've configured your blog settings, let's add a new blog post.
From the Pages Settings, click on your blog page and hit the Plus icon (+) to create a new blog post.
You'll be taken right into the blog post editor.
For the purpose of this tutorial, I've created a sample blog post (feel free to copy) to speed up the process.
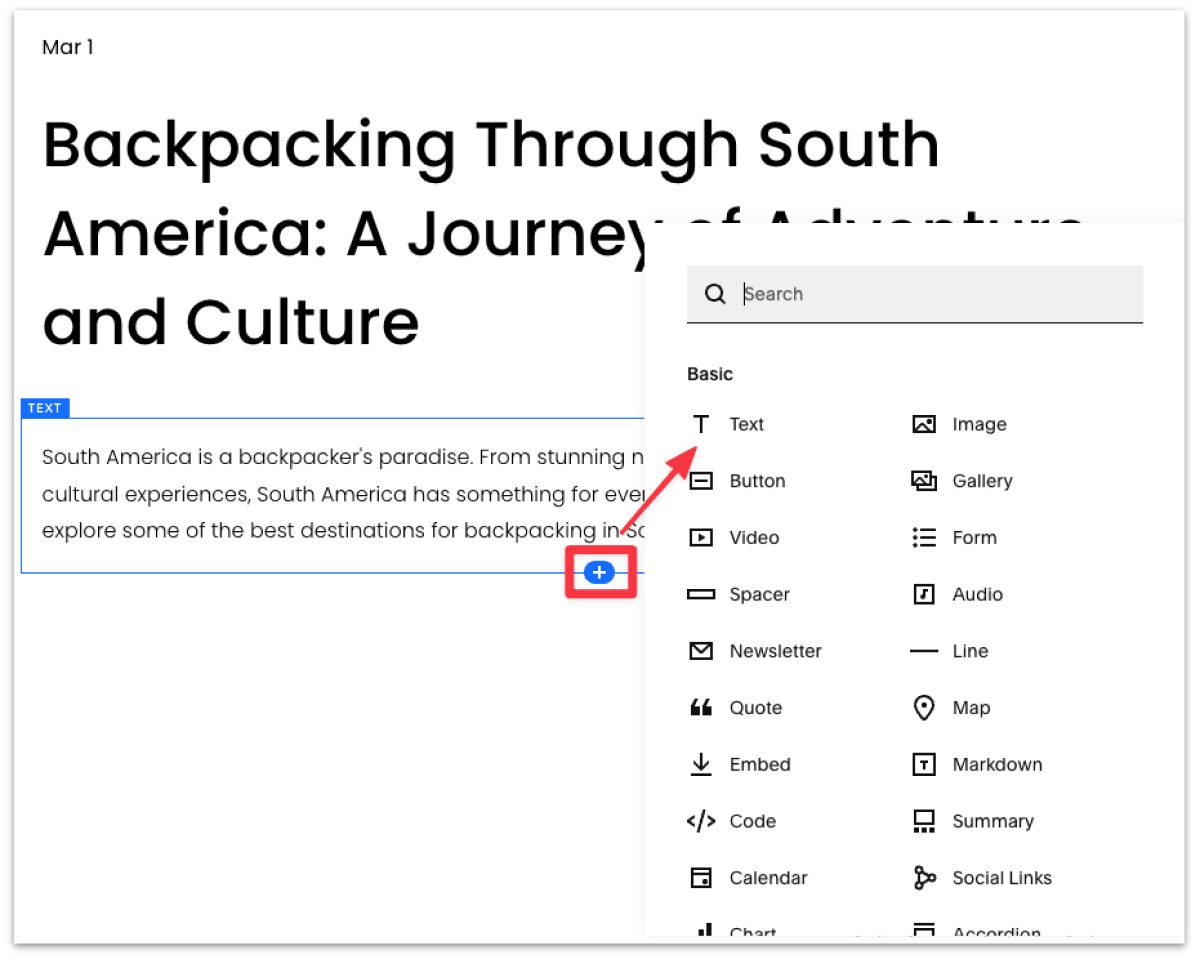
In the blog editor, it's pretty intuitive to start adding your content, starting with the blog title and the introduction paragraph.
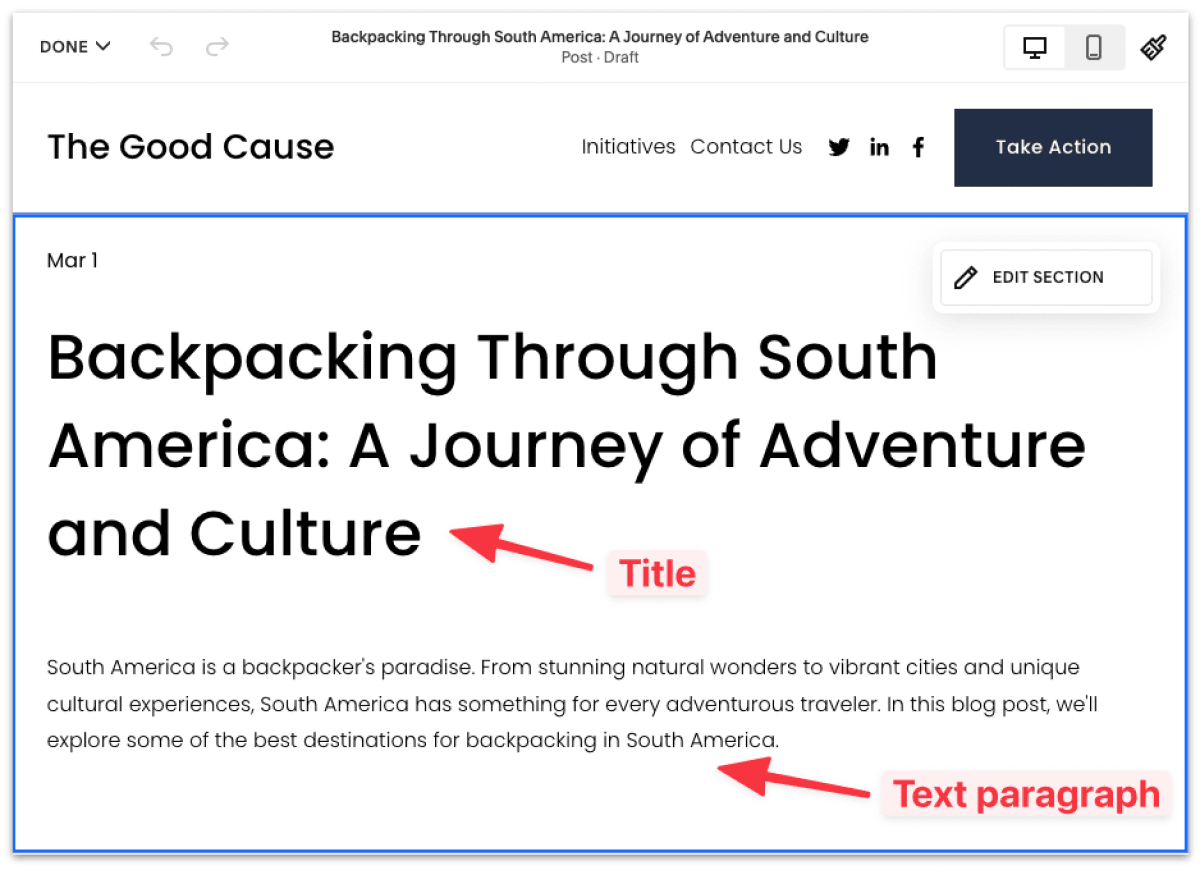
And whenever you want to add a new paragraph, click the Plus icon to add a new page element and select Text.
That's it for the most part.
But there are a few ways to make your blog post more presentable.
The Web content Accessibility Guidelines recommend text widths be no more than 80 characters, which translates to about 16 words per line.
To improve the readability of your Squarespace blog, click the outer section of your blog post and select Edit Section ➝ Content Width.
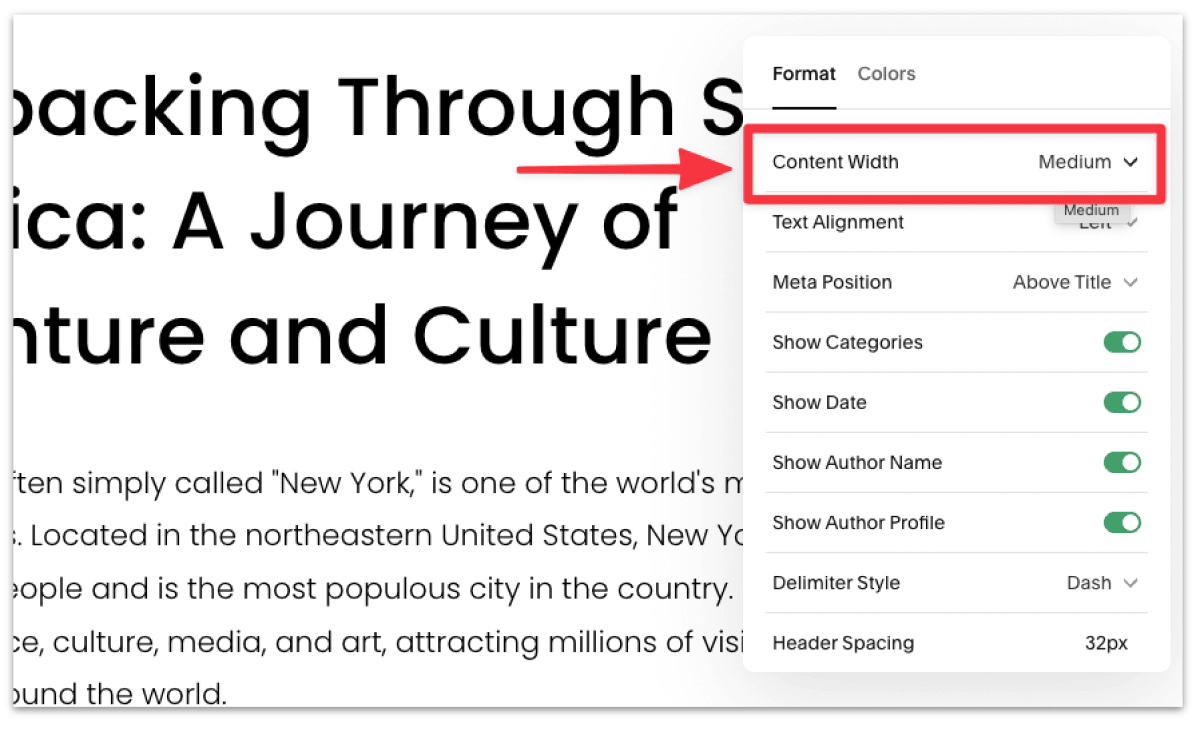
The Medium content width would put you on good terms with the accessibility guidelines, but if you want to have even more control, you can set a custom content width.
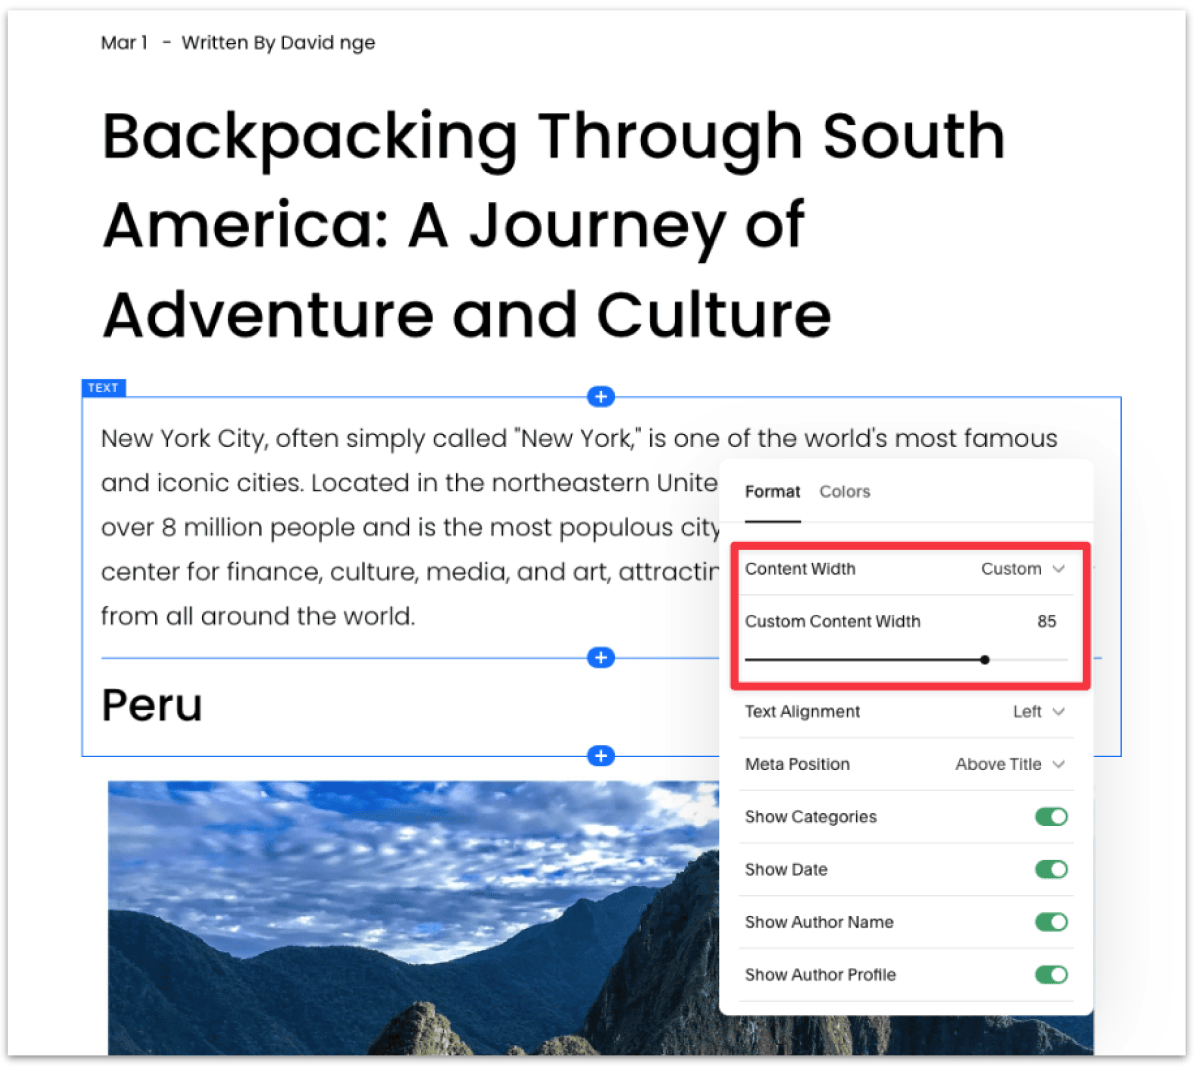
Personally, I like my blog to have more breathing room, so I like to set my content width to 85% of the total width.
Squarespace provides an easy way to set up an author profile for your blog. It'll inform your audience of your background and a quick way to build credibility as well. You can go to the account settings directly to set up your profile.
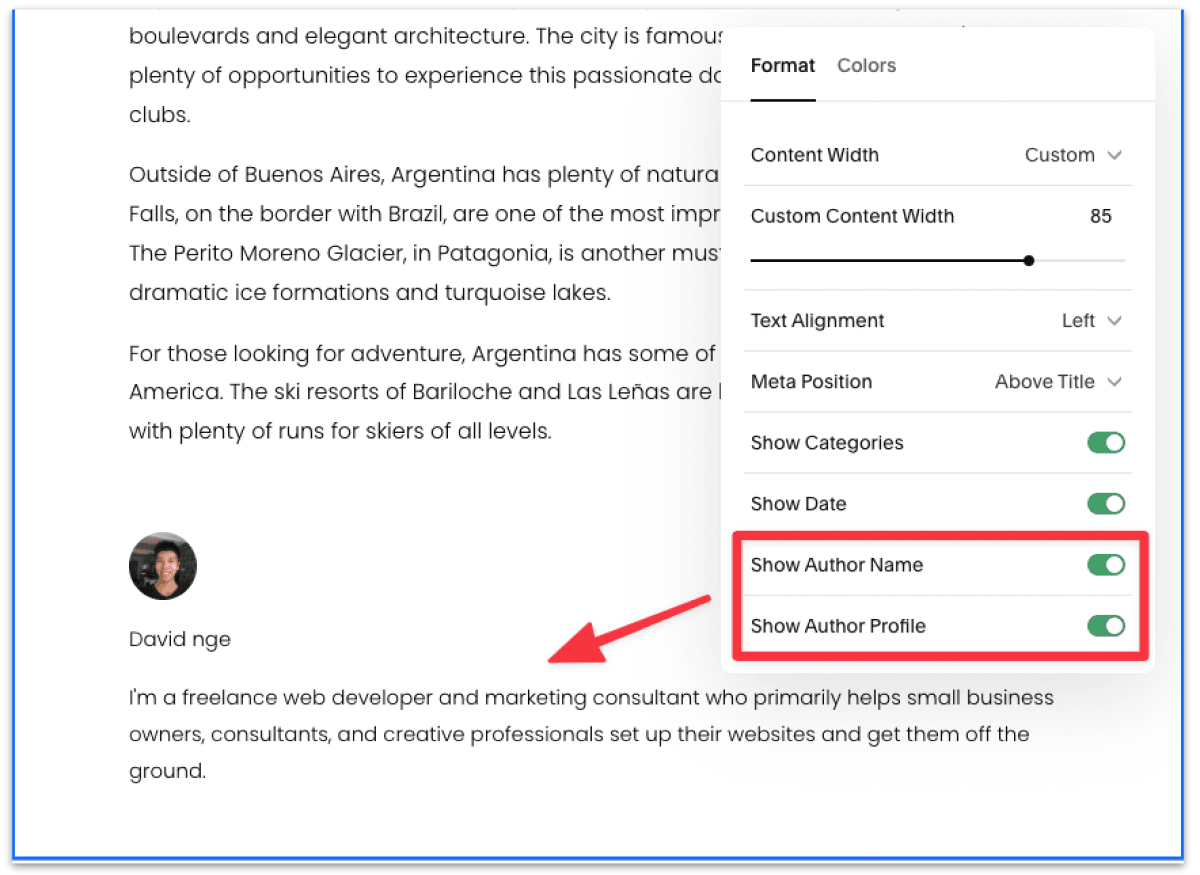
Once you've set up your profile, toggle it in the blog post settings to show it in your blog.
Squarespace has default headings and paragraphs sizes that are optimized for readability. Generally, you want to follow this structure:
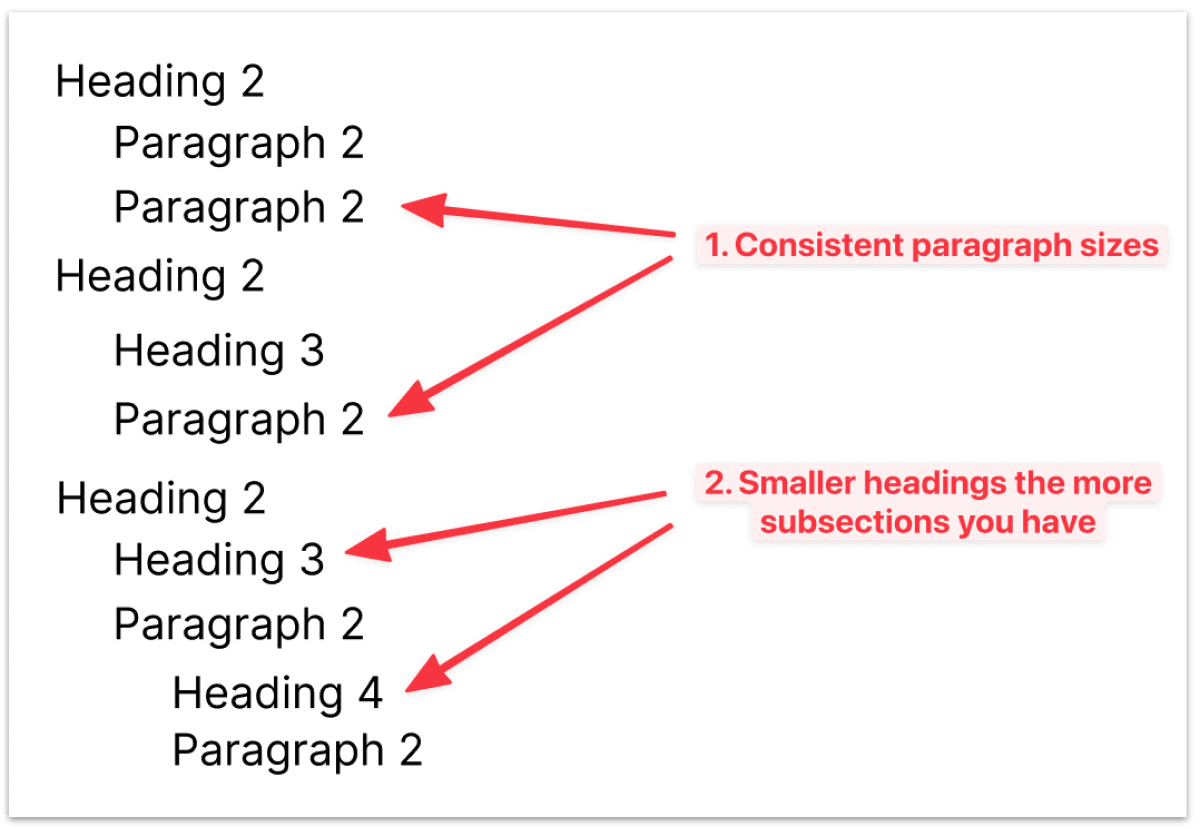
It doesn't matter which paragraph size you choose; use it consistently throughout the blog post. The only exception is the introduction, where you can use a larger paragraph to lead in.
And as you have more subsections or subheadlines, use smaller headings. The heading sizes are in descending order. (i.e Heading 1 is larger than heading 2 and so on).
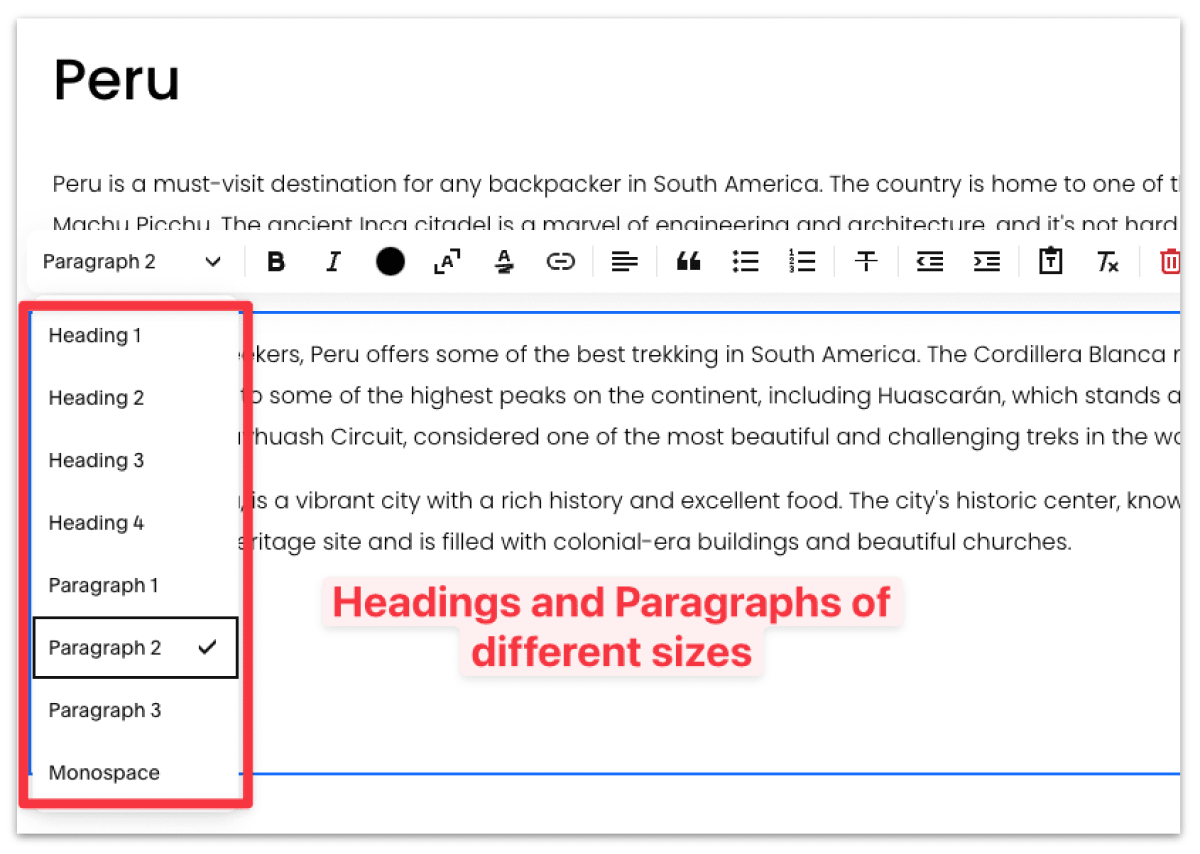
Note that you can always change or customize the font sizes in Squarespace.
Squarespace has done a great job formatting images and videos, which are optimized for mobile devices. So use them wherever you can.
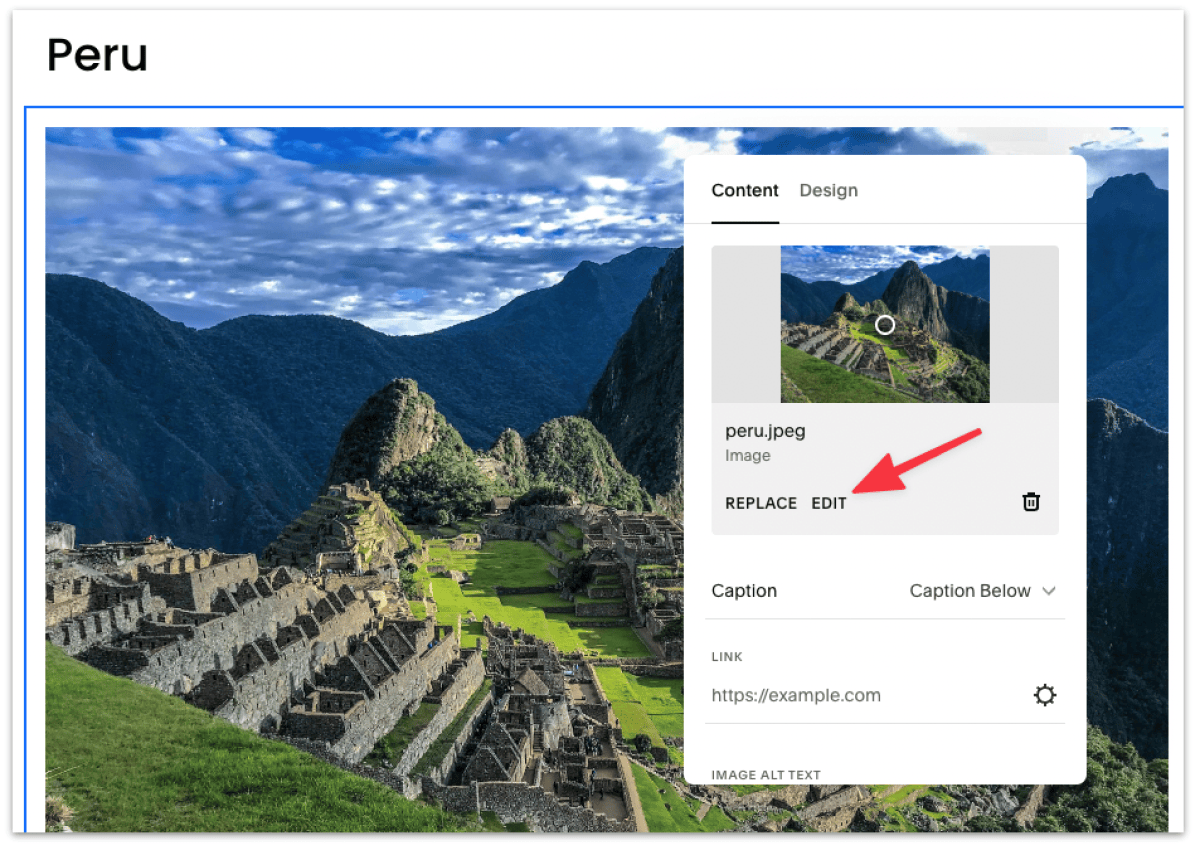
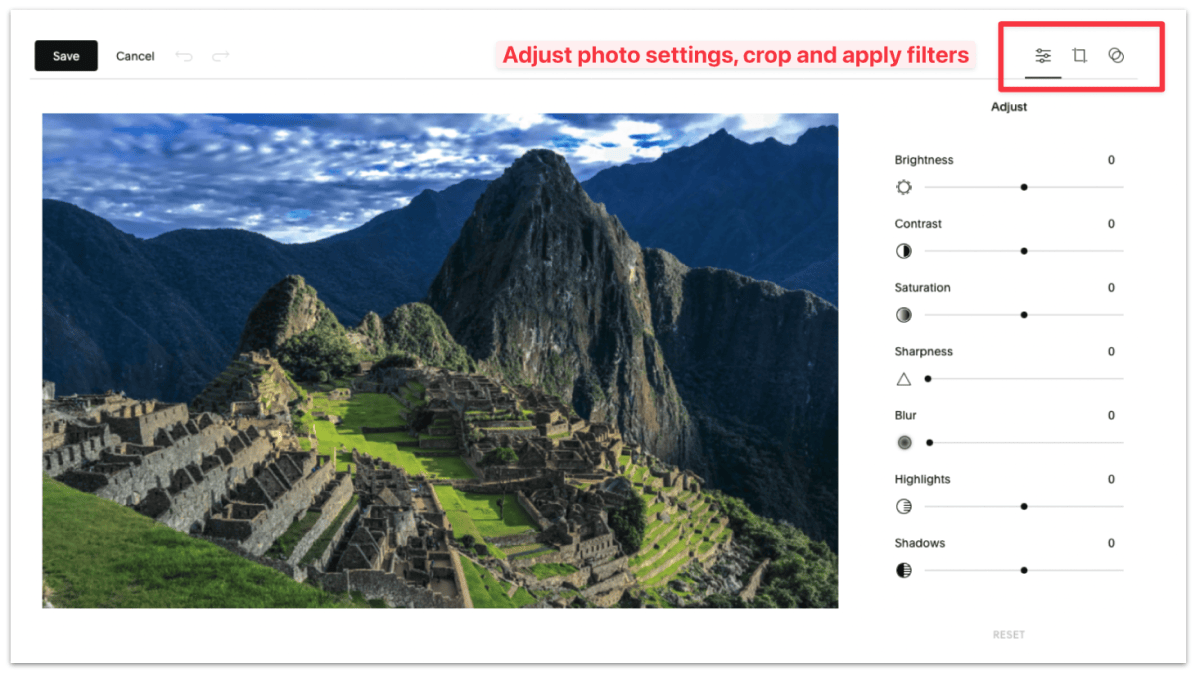
Pro Tip — Use Squarespace native photo editor to enhance your image
Once you've uploaded an image, click Edit to bring up the photo editor, which you can then adjust the photo settings (like contrast, saturation, and sharpness of your photos), crop your image, and even apply filters.
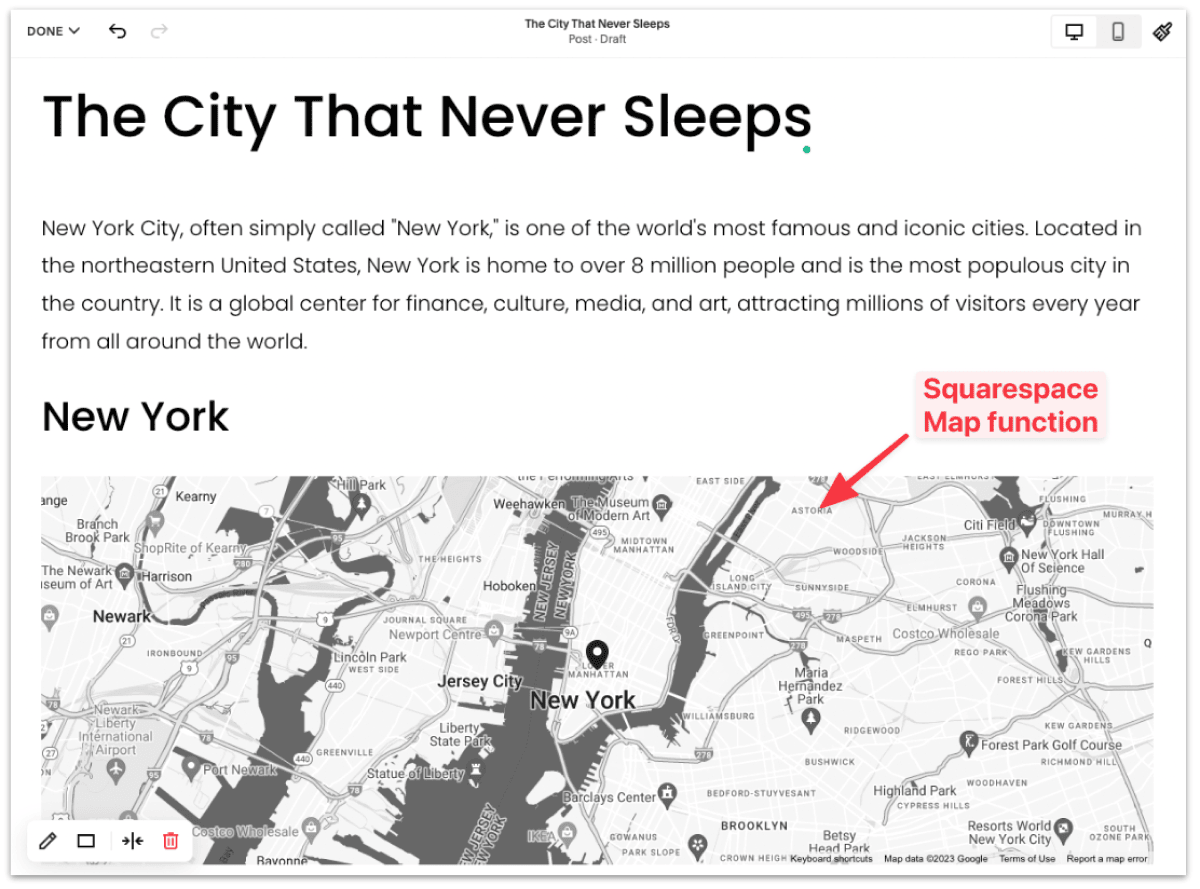
Squarespace has a gorgeous map function that you can use to add visual interest to your blog post.
It's powered by Google Maps, so you can search for a location and pin it or change the outlook altogether, as they have different types of map designs.
Squarespace default fonts are clean and professional but you can always take a step further to personalize it.
Here's a tutorial on how to change font on Squarespace, but if you'd rather use a custom font, then this tutorial is for you: How to add a custom font to Squarespace.
Amongst all the block elements that Squarespace provides, the Quote block is one of the most useful for highlighting a certain text or quote. You can even add a custom animation and background to make it stand out.
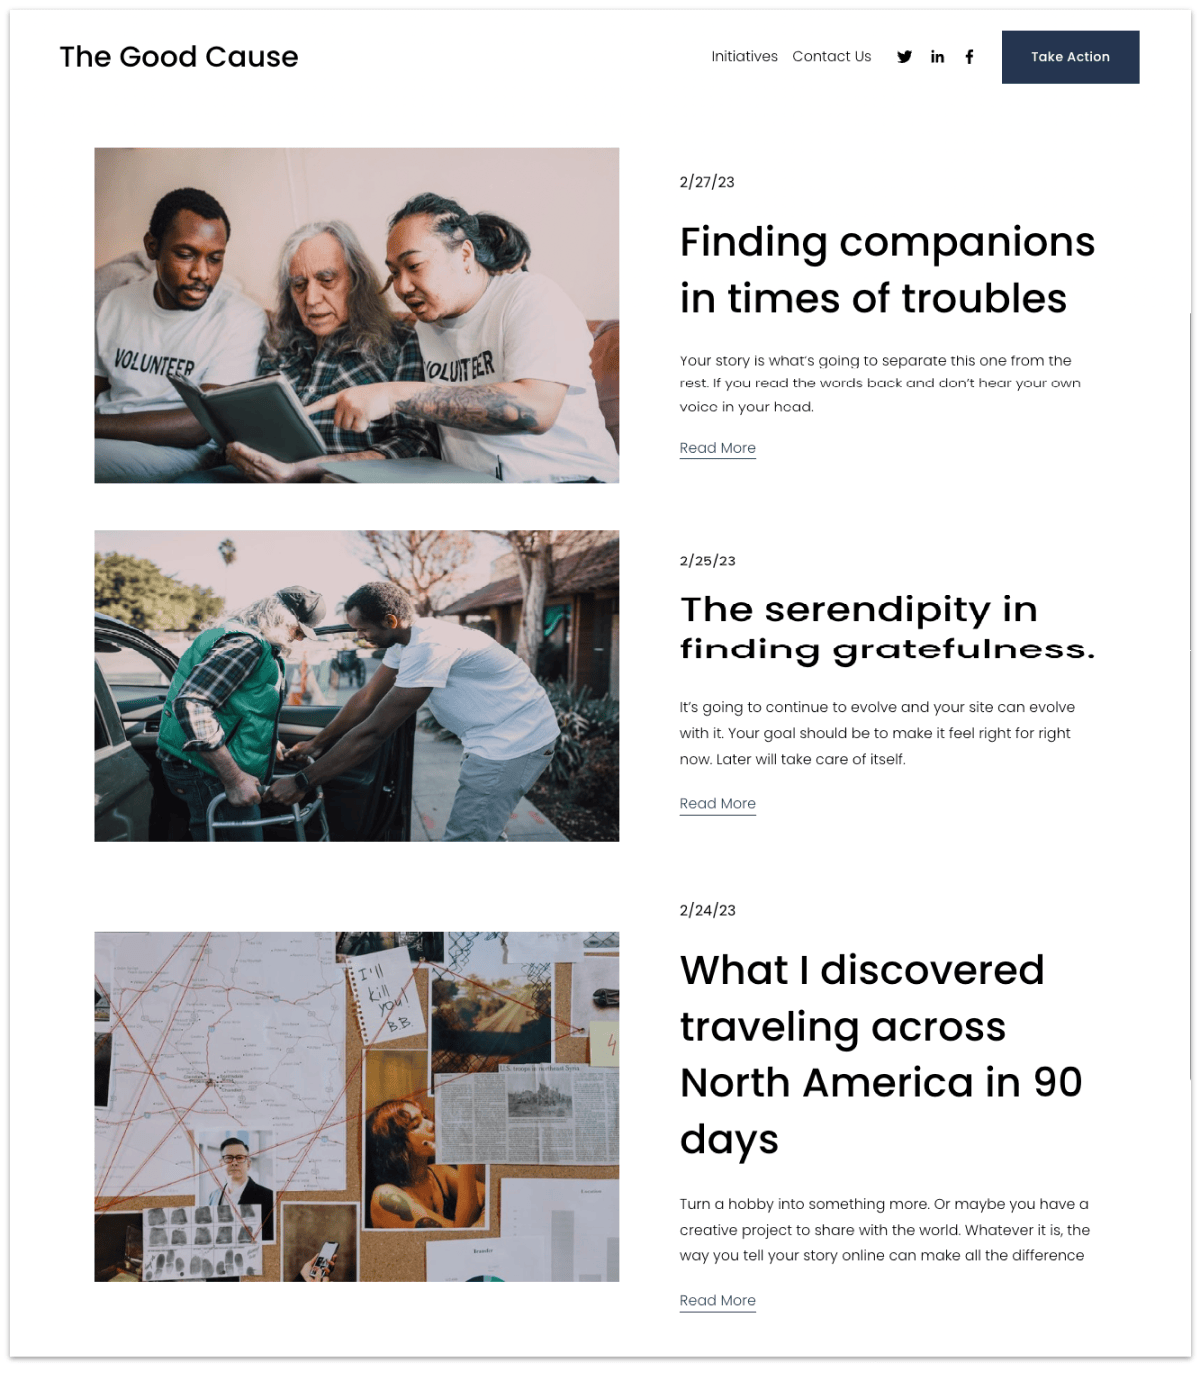
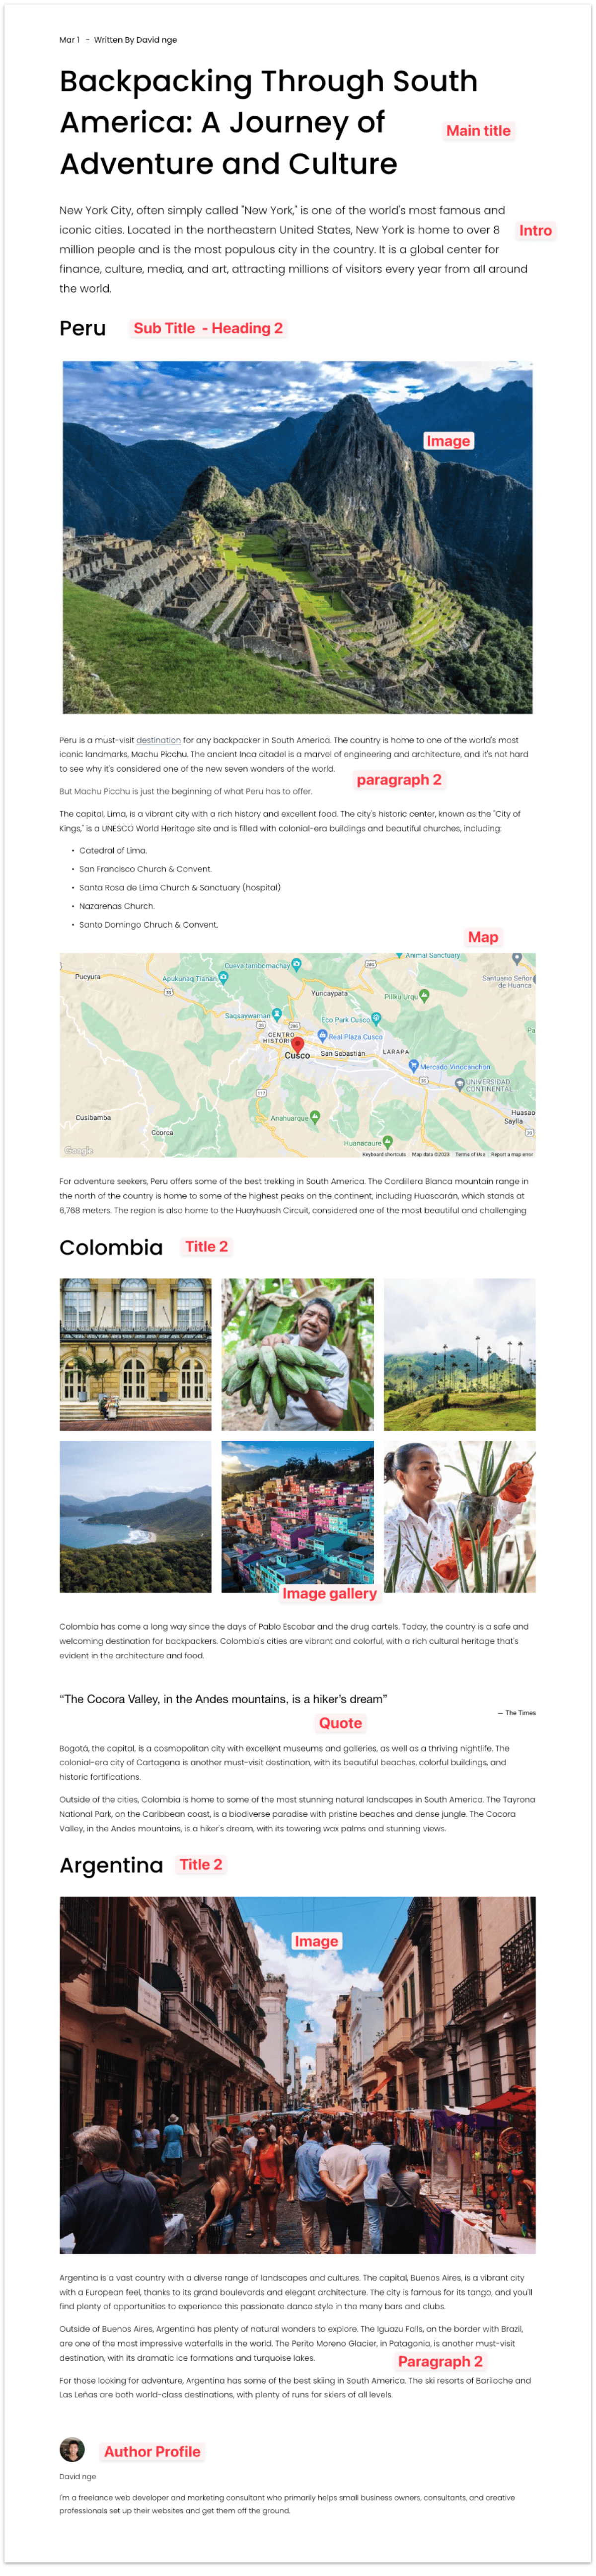
At the end of writing your blog post, your blog post may look something like this.
Now that we've set up our blog post let's optimize it for Search Engine Optimization (SEO); that's how popular Squarespace bloggers grew their site to tens of thousands of visits per month and earned over $100,000 annually.
I've written extensively on how to optimize your Squarrespace site for SEO, but let's go over some of the important SEO settings for your blog post.
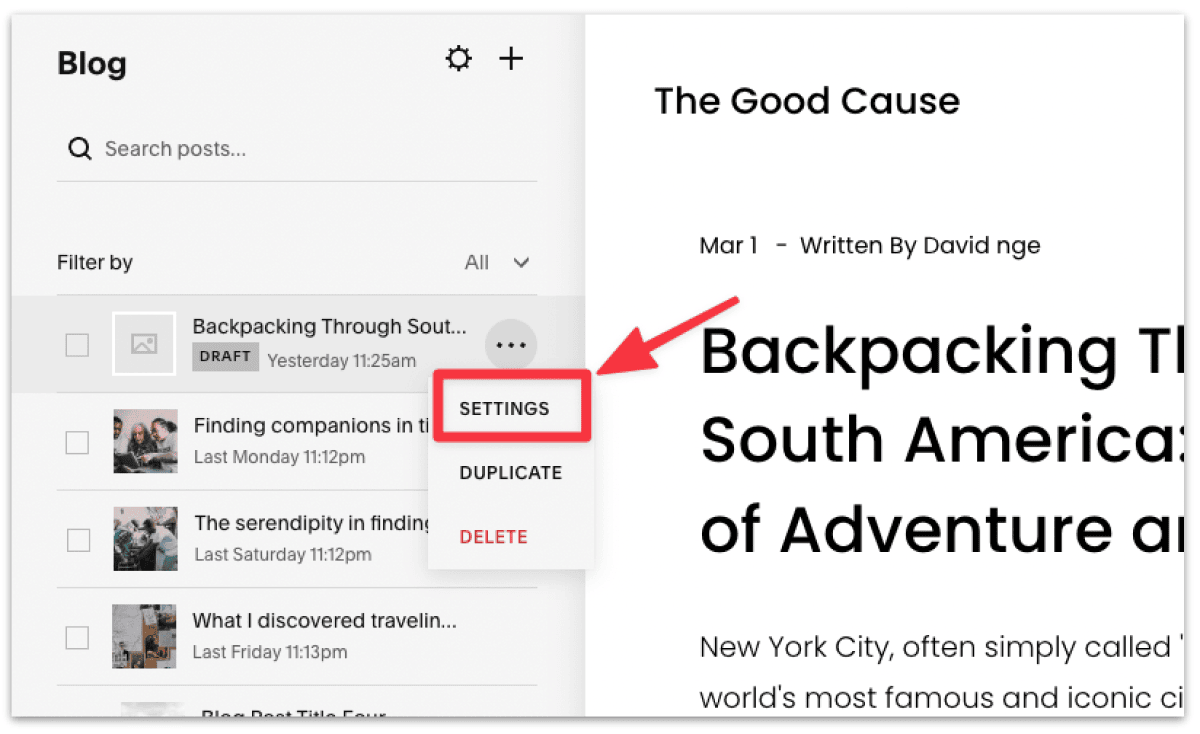
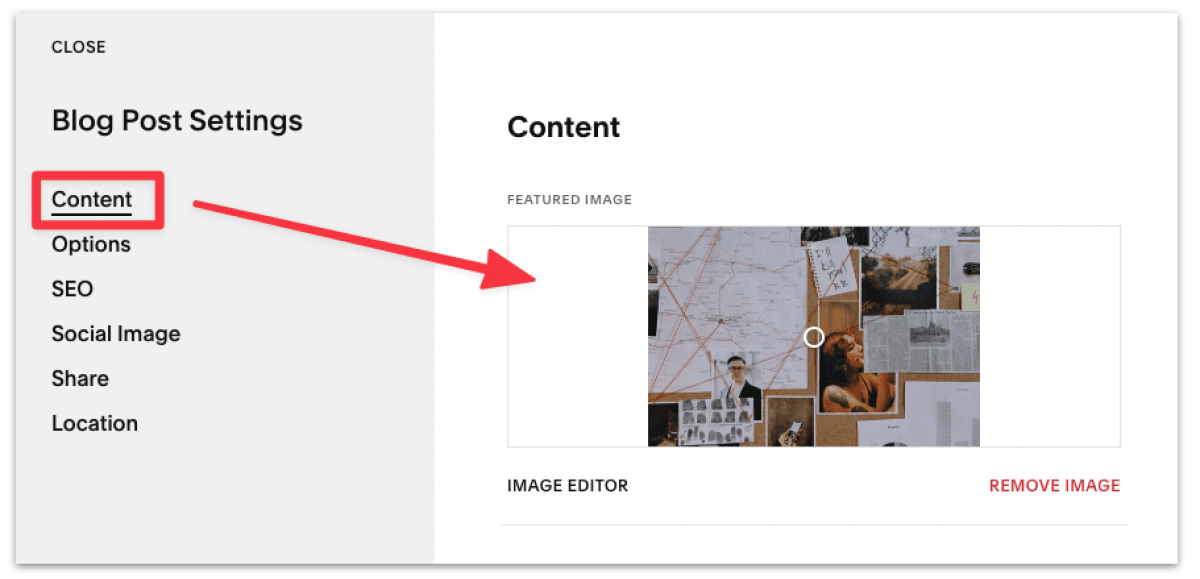
Start by heading over to the blog post settings page. Then follow the checklist below:
1. Add a featured image to your blog post — This featured image is the primary image Google will show for your blog post.
Note that this featured image is not the same as the one we set up for our blog earlier. This featured image applies specifically for your blog post.
2. Customize blog post URL — By default Squarespace will add a blog post URL based on the blog title you wrote earlier. SEO best practices suggest keeping your URL short and human-readable.
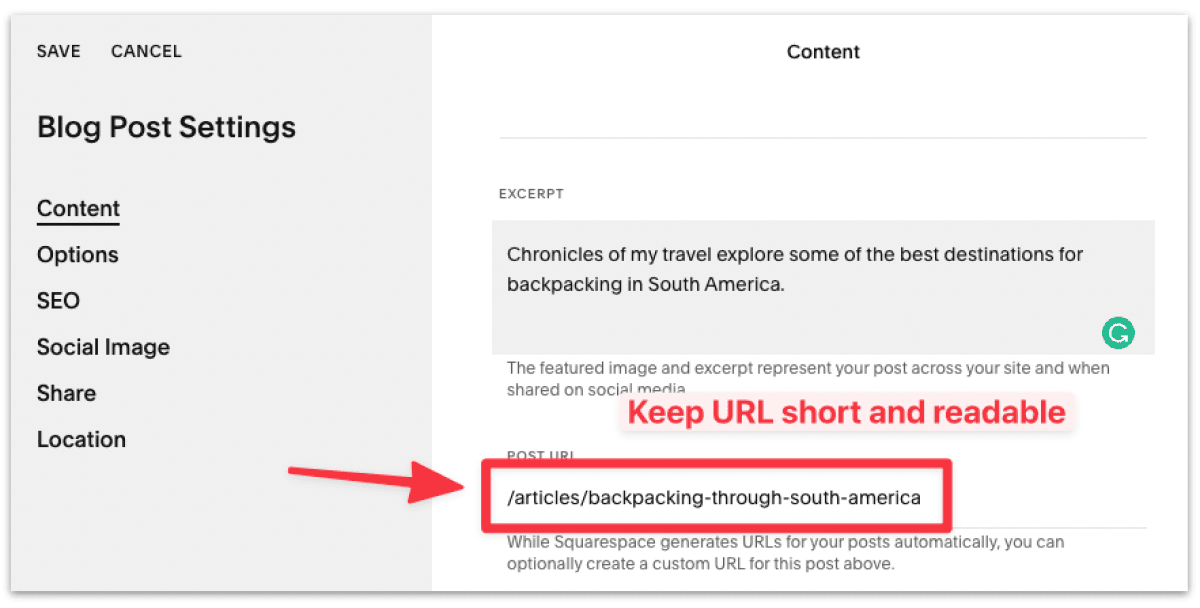
So it's best to modify the default URL accordingly.
3. Add tag and categories — Setting up tags and categories helps organize your blog post articles. As you write more and more articles, visitors can navigate to specific section of your blog, for example: All South America-related travel articles.
4. Add an SEO title — As mentioned, SEO title is the title that will show in Google when someone searches for this specific article of yours. This applies to this specific blog post and not the blog page that we have set up earlier.
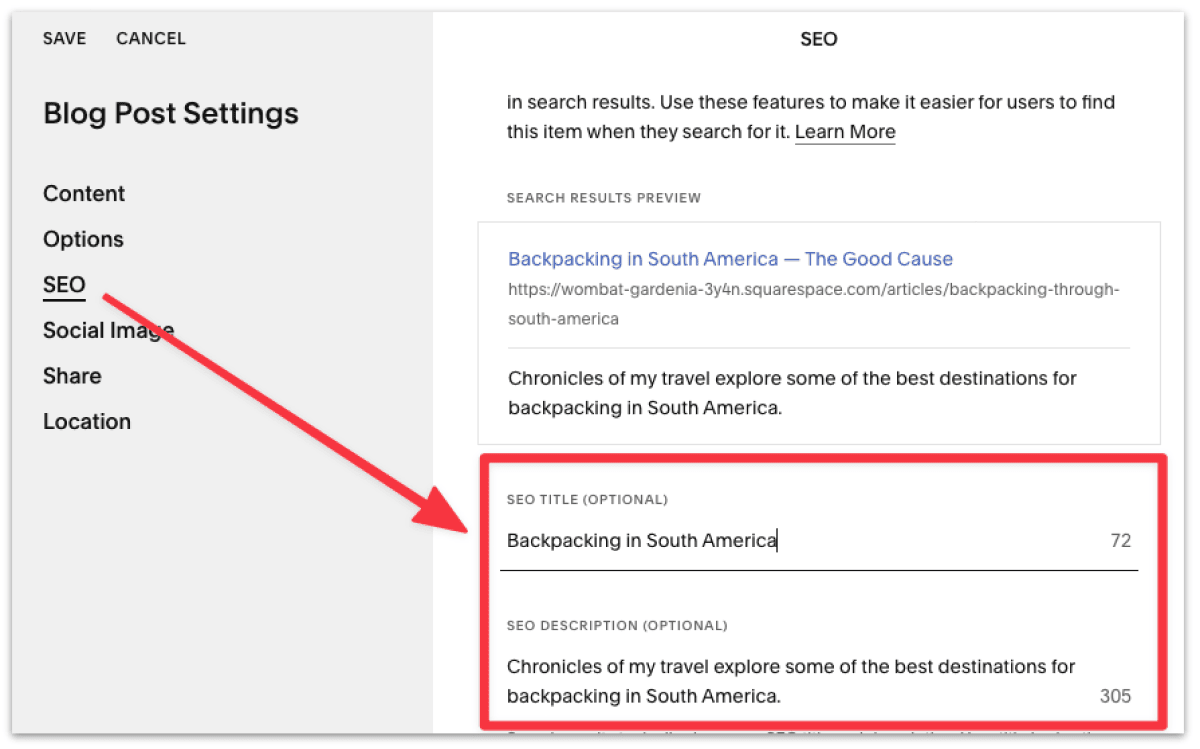
SEO best practices suggest keeping SEO title below 60 characters so it's best to keep it as short as you can.
5. Add an SEO description — Similarly, SEO description shows up on Google search along side the SEO title.
SEO best practices suggest keep the SEO description below 150 characters. Note that Google will often replace your SEO description to
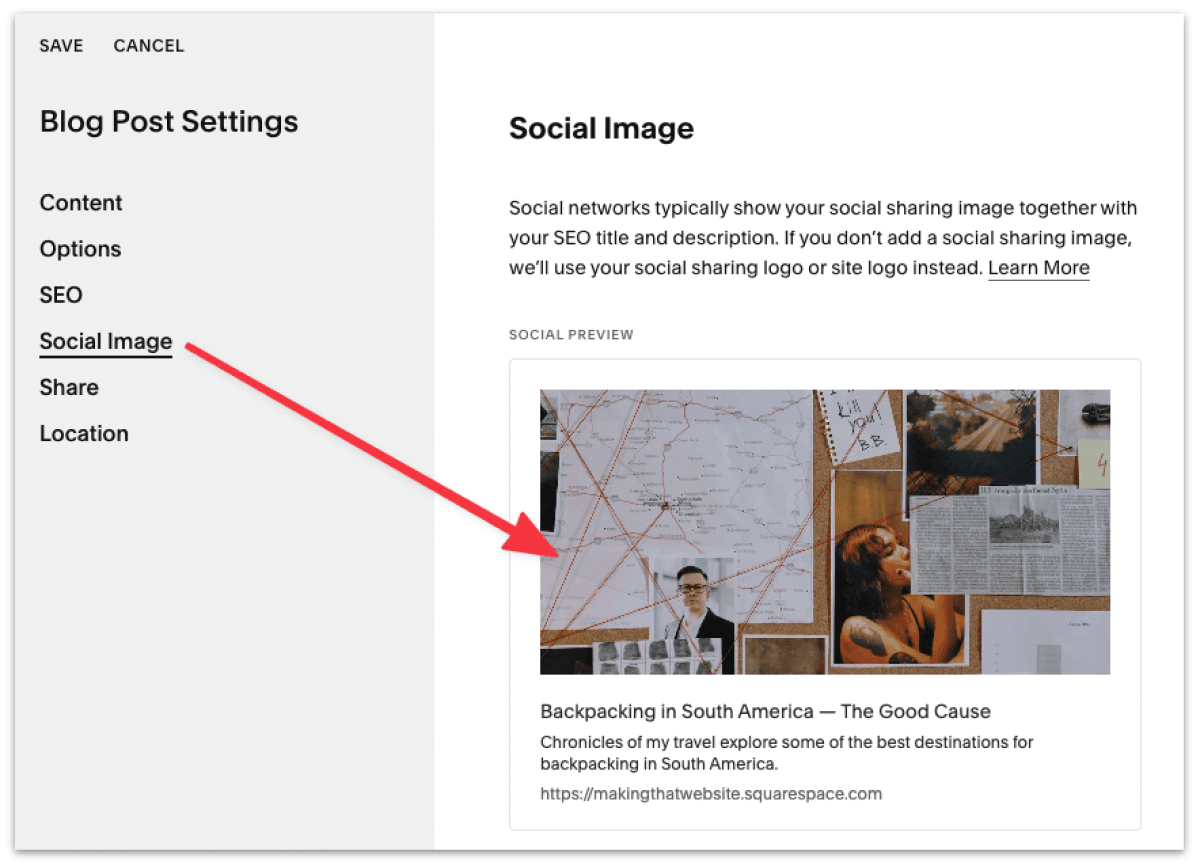
6. Add an image for social sharing — Social networks typically show your social sharing image together with your SEO title and description. If you don’t add a social sharing image, Squarespace will use your social sharing logo or site logo instead.
That's it. This should cover the basics of Squarespace SEO to get your site rolling.
To maximize your blog potential, sign up for Squarespace's SEO webinar, where they'll focus on how SEO best practices and how you can utilize their built-in tools to boost your site's discoverability.
Up until this point, we have:
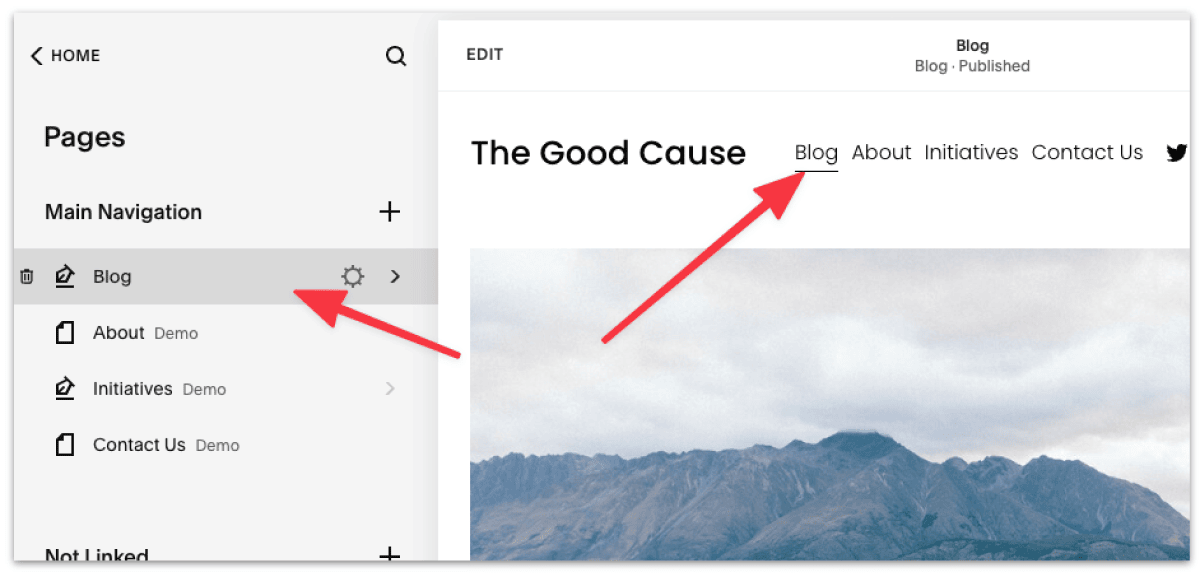
Once you're ready to show your blog to the world, drag your blog page to the main navigation menu.
You should then see your blog in your site navigation.
You have now successfully set up a blog for your site!
Squarespace is great if you need a one-stop shop to set up a branded blog for your business.
Here's a full analysis of whether you should use Squarespace for blogging.
It does come with a few quirks and limitations, but it is the best beginner-friendly, hassle-free blog solution next to Wordpress.
Also read: Compare Squarespace and Wordpress for Blogging.
Binging with Babish, the popular cooking channel on Youtube, used Squarespace to host his recipe blog. He (or his team, rather) used a unique 2-column blog layout to present all his recipes.
I've also listed several other successful Squarespace blogs here and shared my thoughts on what makes them great.
Common strategies bloggers use to grow their blogs, besides consistently publishing great content, are email marketing, following SEO best practices, and starting a Youtube channel to complement their blog.
Here I've broken down how popular blogs (that are built using Squarespace) market and grow their site.
Depending on your need (if you need to sell products or use their add-on tools), you can expect to pay $15-$50 per month to host your blog on Squarespace.
I've run the numbers here for a complete cost breakdown.
In short, yes. And many successful Squarespace bloggers have monetized their sites either via ads or selling products and services on their own.
Here I've laid out specific examples of Squarespace blogs that have successfully monetized their site and the strategies they used.
David Nge is the founder and writer behind MakingThatWebsite.com. Since launching in 2021, he’s been on a mission to help non-techies—especially small business owners—build better websites using easy-to-learn tools and smart, time-saving strategies. He specializes in website builders, SEO, and practical AI tutorials for small business owners.
Have a tutorial you want to learn? Leave a suggestion here.